Warframe Arbitrations Guide
By: Geek, Diza
Arbitration Goons Discord: https://discord.gg/Arbitrations
*These are all my personal opinions, by no means the be all end all. Run any build you like, this is simply meant to provide a good starting point for those looking to improve their arbi game*
Introduction
Welcome to endgame Arbitration farming. The goal is simple; stack Vitus Essence and turn it into Kuva for purple cards. Arbitrations unlock after Pluto and the Eris Junction “Equip a Focus Lens” task, and rotate every hour. We’re mainly looking for Interception, Defense, and Mirror Defense because the tiles are smaller and spawns are better. Vitus comes from Arbitration Shield Drones, and only five can be alive at a time, so they’re always the priority. 25 Vitus = 10,000 Kuva from the Arbiters of Hexis in relay, and you can realistically expect 200k+ Kuva an hour depending on the mission. Vendor also sells galvanized mods and other stuff if you don’t care about Riven rolling.
VIEW > SHOW OUTLINE (For easier tab navigation) - Go check out the site version: https://arbi.guide/
The gameplay is just maintaining buff uptime and wipe everything on spawn as fast as possible. Instaloot Vitus on Interception so you don’t delay spawns. For defense missions, loot near the ends of each wave. Focus on the vitus, ignore riven slivers and other drops, loot as quickly as possible and get back to the camp spot. It all sounds harder than it really is, but you’ll learn the spawns as you go so don’t worry too much if you’re new, just shoot the red dots on minimap.
☆ Host Migration ☆
🔻Do not press TAB or P to view kills and damage% during arbitrations, especially later on in the mission. Game client becomes clunky during longer missions and people will disconnect from the host. I just wouldn’t press tab/P at all for defense, and for interception you can kinda get away with it during wave changes where you're capturing points. Another bug, If you are playing windowed or have a multi monitor setup and your game pauses when you ALT TAB, then you will disconnect from the host if you do so for more than 7 seconds.
- If one or two players migrate away from your session the spawns don't reduce until the end of the wave change state for defense or new round of interception.
- If the game host migrates you away from the group, if you're quick enough you can press CTRL+SHIFT+ESC and end the warframe process instead of pressing ALT+F4, then start up warframe and you should be able to reconnect to the group in more cases.
AI bug & Anchor
🔻AI bug is caused by the defense operative roaming freely near spawns. This often breaks them for 5~10 seconds, causing enemy AI to break for the rest of the mission and just stand there when they do finally spawn, leading to much less overall spawns and vitus. So until they fix it, anchoring is the solution. Anchor is triggering the start of the mission with an atomicycle. Make sure the person anchoring is closest to the operative. After that you drive to the camp spot and park there.
You can drop an On Call Crewmate at the start of the mission to handle the initial wave of enemies so he doesn't get shot right away breaking the anchor. Any aoe weapon works but Kuva Zarr is ideal.
(Crewmates do not utilize rivens in non railjack missions)
Other than the initial start of the mission, if the defense operative takes damage from any enemies, he will begin to follow the player who killed whatever damaged him. You can reanchor by making the person who the operative is following use atomicycle.
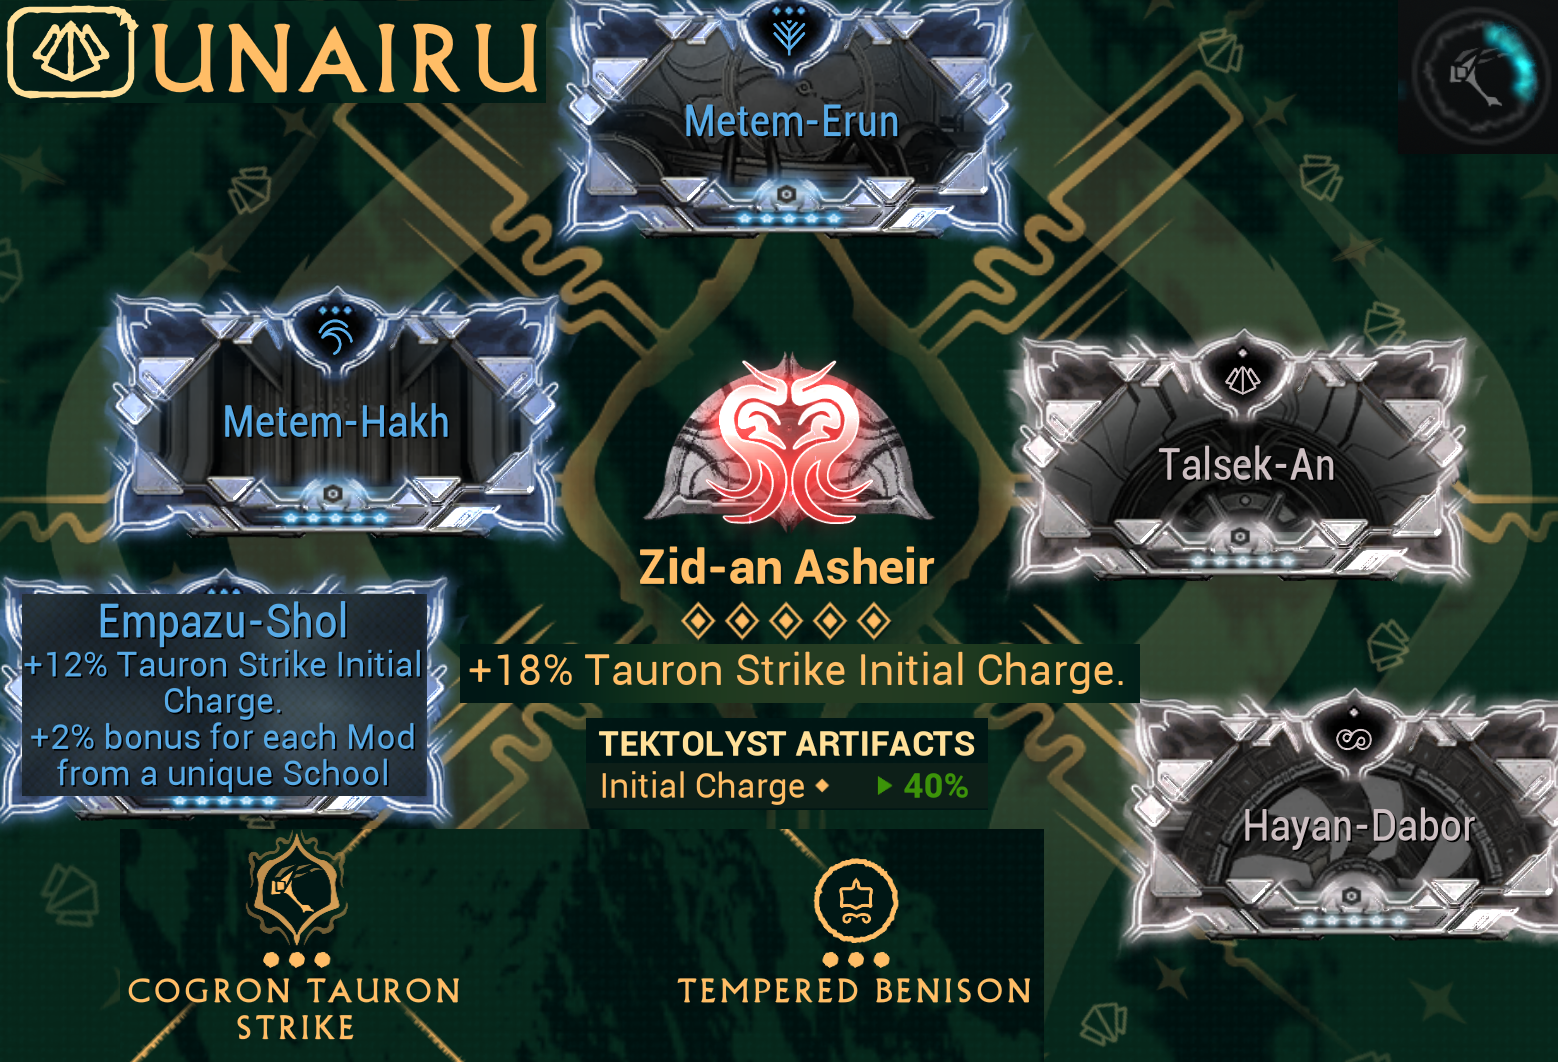
Unairu Focus School
🔻For the DPS players
Unairu for the Cogron Tauron Strike which grants up to 5 armor motes that give 450 each to you and the team. You charge your operator ultimate by picking up a focus orb while having focus lenses of any tier on all of your weapons and frame, Including your archgun and Amp. 1 armor mote is consumed each time you take health damage, but not if you take overguard or shield damage. Use archgun deployer at start of run to get overguard. If you dont have Unairu, you can drop your flex mod for Health Conversion to max out overcharge. You will be at 266/350% of the multishot buff just from primed flow at the start of the mission, so it’s still worth it just to have that flex mod slot.
The purpose is to max out Arcane Battery, giving us over 1,000 energy. While at or above 90% energy pool, Primary Overcharge grants 350% multishot.
Recommended Settings ☆
🔻You can vote yes quickly between waves by spamming the Y key by default and for controller ▲.
You can make Kuva Ogris full auto with this setting, be careful though, you can incinerate your ammo very quickly. You only need to shoot each spawn 2-3 times as you’re rotating through.

Graphics Engine no longer matters for achieving maximum Eclipse percentage. Disable screen shake. Set recoil type to camera. Max FOV helps you see more at once, motion blur and depth of field can be annoying. Turning off bloom and elemental FX helps reduce strain on your GPU.


Visual effects intensity set to 10/200 and enable Reduce Teammate Visual Effects.
Enemy highlighting still works with effects intensity at 10/200, and is nice for helping to spot enemies that can start to blend with the terrain if they escape spawns.

Set both energy colors on Kuva Ogris to smoke palette black to effectively mute napalm’s visuals.
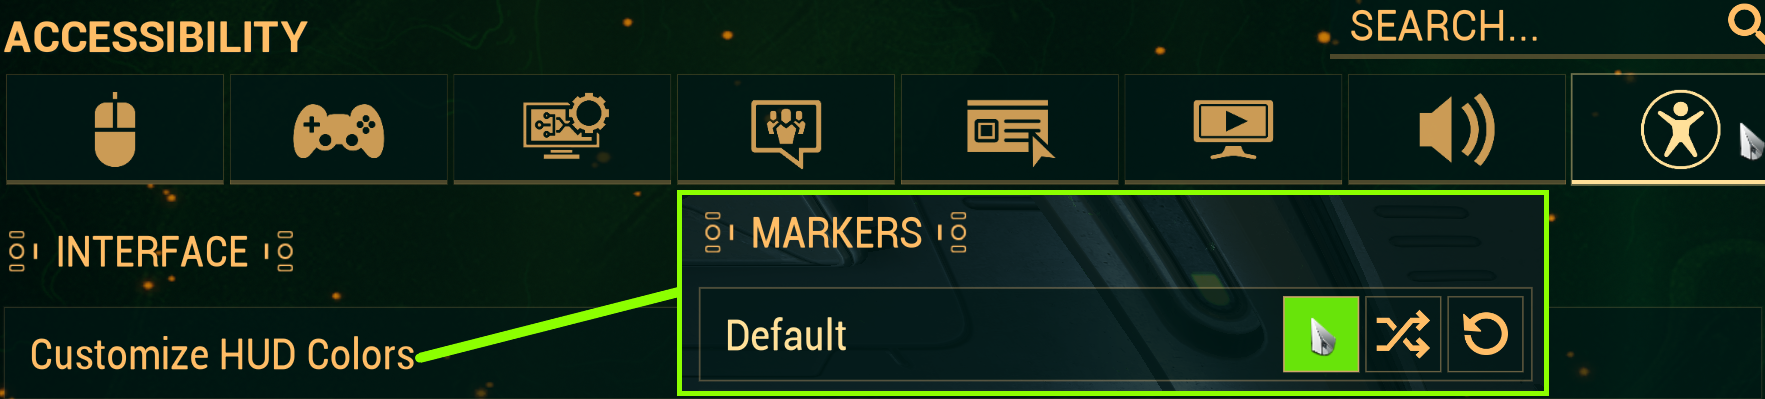
You can change the color of your vitus drop icons to something more high contrast than default white. Setting loot to dark gray will make normal loot less noticeable in the map so you can focus only on looting vitus.
Warframes:
🔻Cyte makes a lot of previously unplayable tiles for double ogris DPS playable again. Depending on the tile, you can run 2 Cyte, 1 Cyte 1 Ogris or just 2 Ogris comps. It comes down to player skill level if you want to play Cyte on tiles where Ogris is already viable, but Cyte often yields better vitus and faster runs.
- DPS #1:
- Cyte+Shock
- Saryn+EM
- DPS #2:
- Cyte+Shock/Smite/Thermal/EM
- Saryn+EM
- Wisp+Roar (Thermal if w/ Rhino)
- One of these supports (w/ jade pre):
- Vauban+BB only if 2 Cyte
- Rhino+BB only if 2 Cyte & large interception tile
- Volt+Disp if Saryn (Saryn needs the ammo+reload)
- ^If double Saryn, jade pre motes can be too much firerate for Ogris
Cyte squads will always prefer to have prebuff Wisp motes. If you are running 2 Ogris comp, around 200% haste is ideal and prebuff is not needed. Before you try to hop right in and attempt to shyte dps, you need to fully understand a few things:
- Cyte is way more aim intensive, and requires CONSTANT firing uptime.
- Cyte doesn’t have the leisurely lingering aoe that is nightwatch napalm to cover your mistakes. Even a few seconds of not shooting may result in failing the run.
- You need to fully understand the spawn locations, and where to aim to hit them. Don’t try to first time a tileset on shyte, run it as a support or ogris dps first to learn the spawns.
- If you suck, the vitus for the run will suck. Cyte makes bad tiles good only if you can properly take advantage of how he can reach those previously unreachable spawns.
- Saryn needs to keep shooting, their nightwatch napalm provides invaluable crowd control and keeps enemies from swarming out of spawns or getting too close if you get overwhelmed. Don’t let them just afk because “shyte is killing fast.”
When you first join the server, everyone is green. The first role after that is Arbivanced, which lets people know when LFG’ing that you have all the builds and have performed each role at least once. Other ranks that can be acquired during your Kuva grind are listed in the discord ranks channel. Do not be discouraged if squads in LFG have any sort of requirements, plenty are happy to take new folks if your builds are correct..
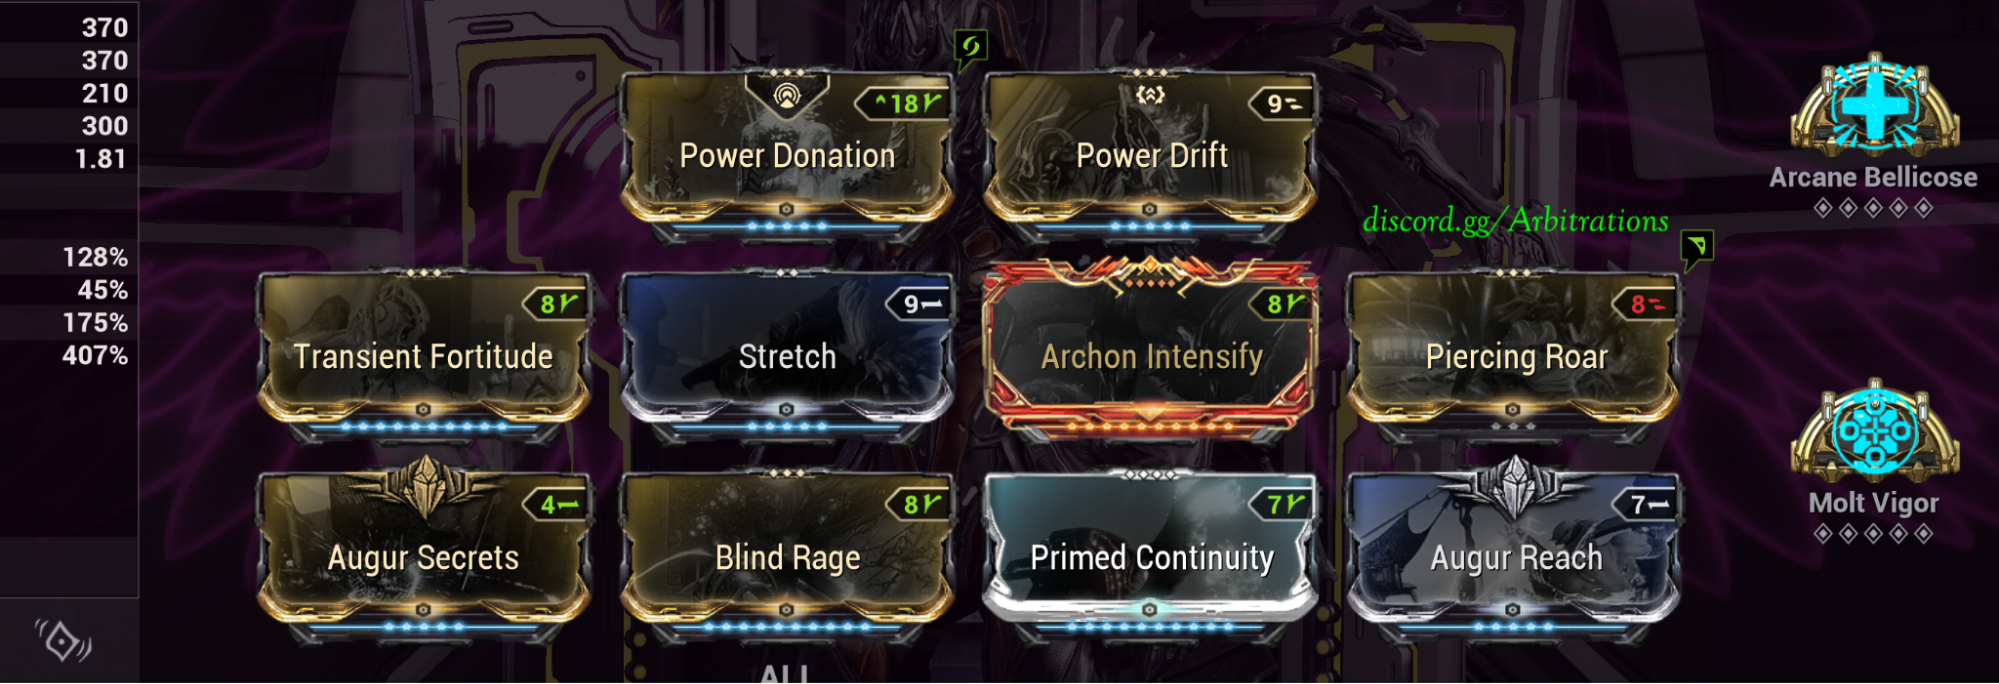
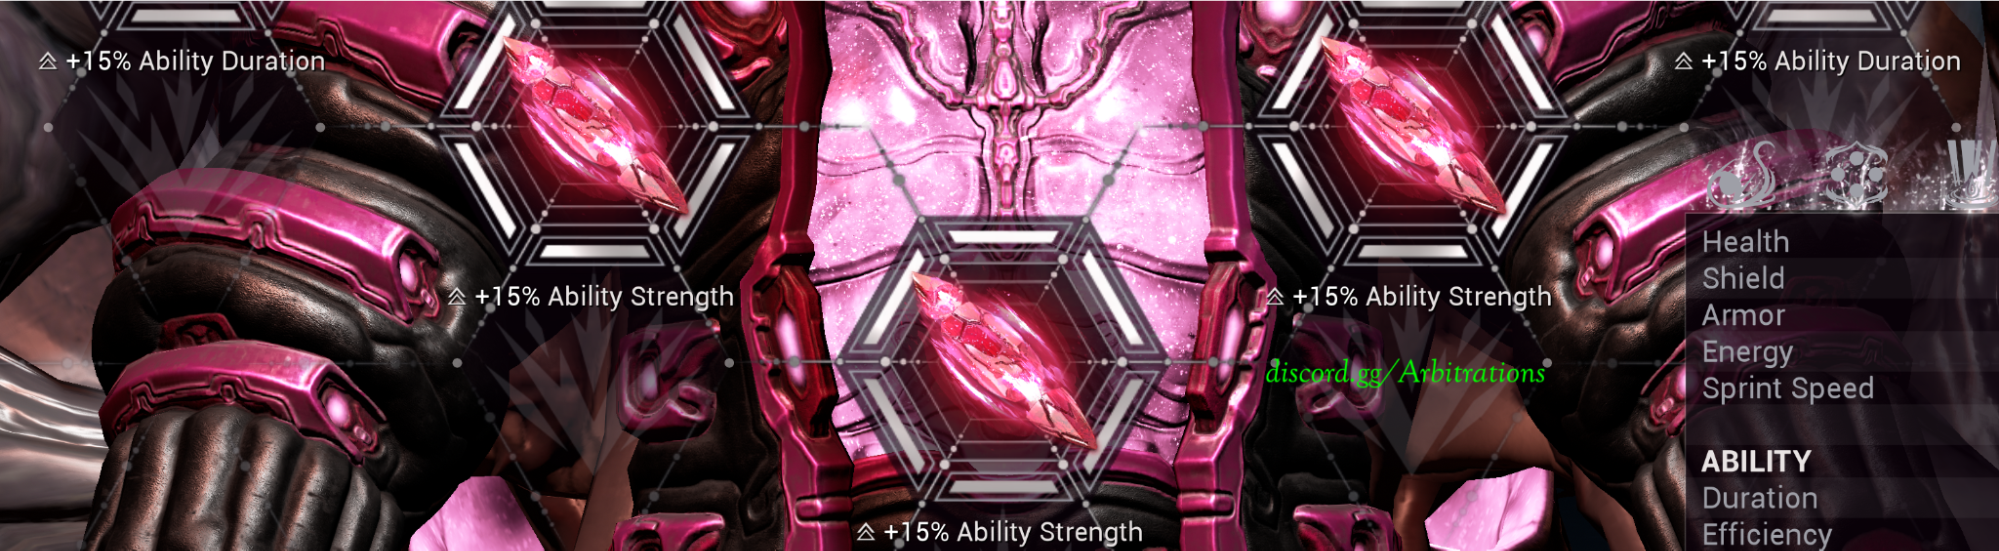
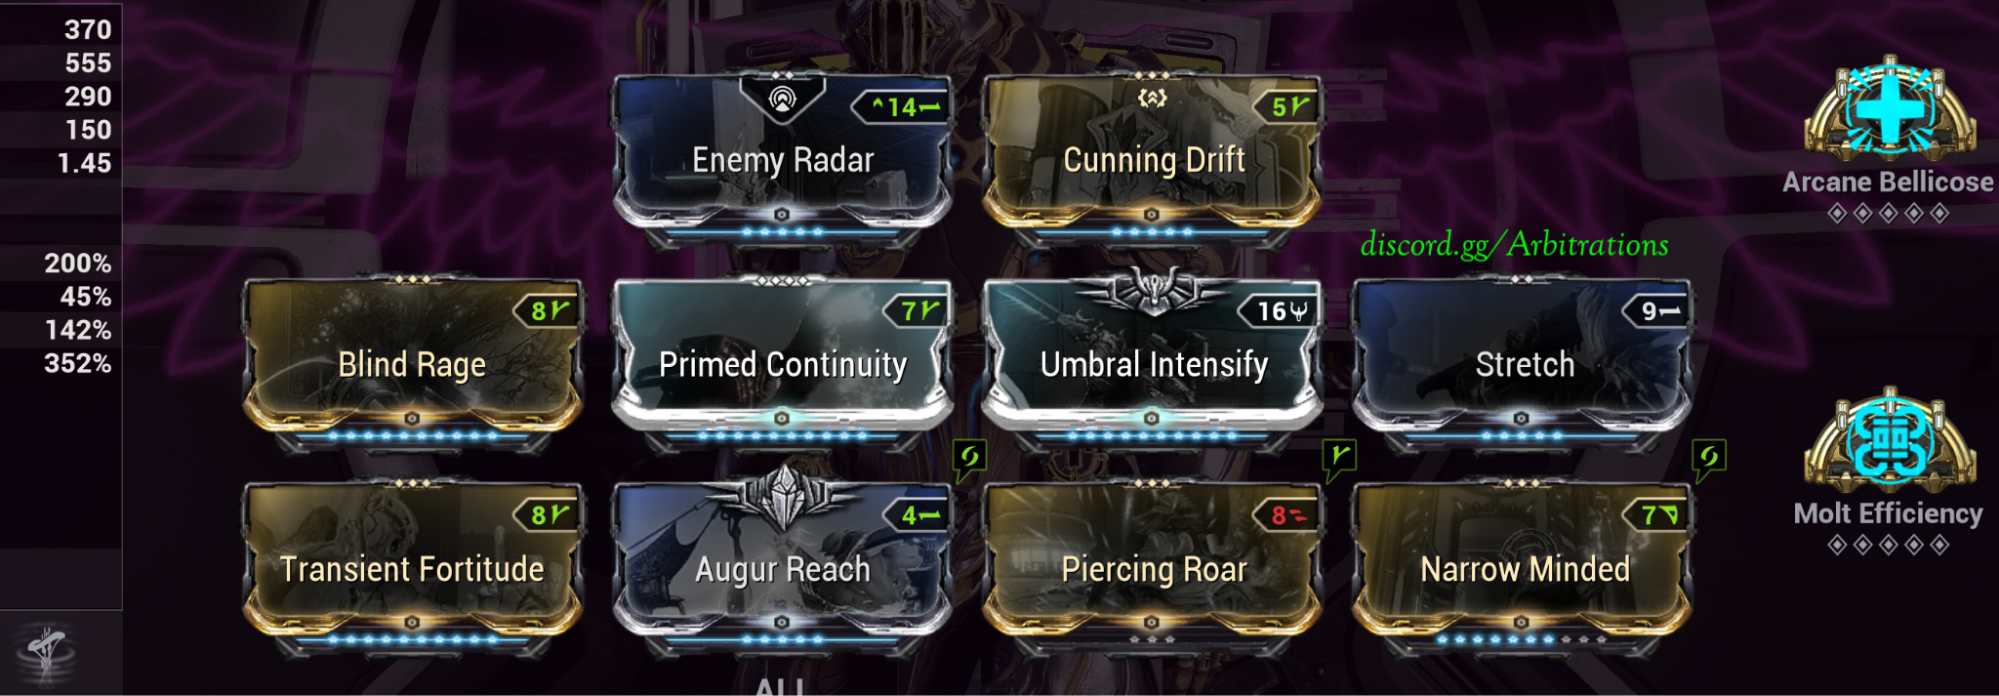
Cyte ☆
🔻Cytes first ability gives infinite terrain punch through (Fully intended), the punch thru value listed in mod screen is for body punch through, 3.4m with this build which is sufficient. Cytes 3 makes you invisible and its duration is extended via weak point kills. Subsume over 4th. Run Unairu.
- Shock ☆ subsume gives you electric damage buff, 5m radius so basically just for self. Both Cytes can run this to ensure they have good uptime. Better than Smite due to the instant AoE proc from electric being relevant.
- Thermal Sunder Tap+hold drops lingering blast buff zone. Requires thermal transfer augment. Wisp will have this if running with Rhino support in most cases.
- Energized Munitions gives you 12.7 seconds of 75% ammo efficiency for full auto goodness. No augment required, extra flex slot.
- Smite subsume gives you radiation damage buff, Only use if you just want to minimize overlap vs double shock. Requires augment. It’s still essentially a self buff with this range.
- Bright Bonnet (BB) gives strength and energy. Do your best to upkeep 2 shrooms at all times for squad energy, place them close to the other DPS, but not right on top of them to avoid accidental bunny hopping. This is only used on one of the Cytes if you are trying to do triple cyte nonsense on certain tilesets like Mirror Defense or Callisto for example, and you do not need to bother with Arbucep buffing shrooms in this scenario.
*Cyte is often referred to as “client” in #arbi-lfg. Generally client means any player other than the host, but in arbitrations it is almost always the non-host Cyte due to client cyte often having performance issues.
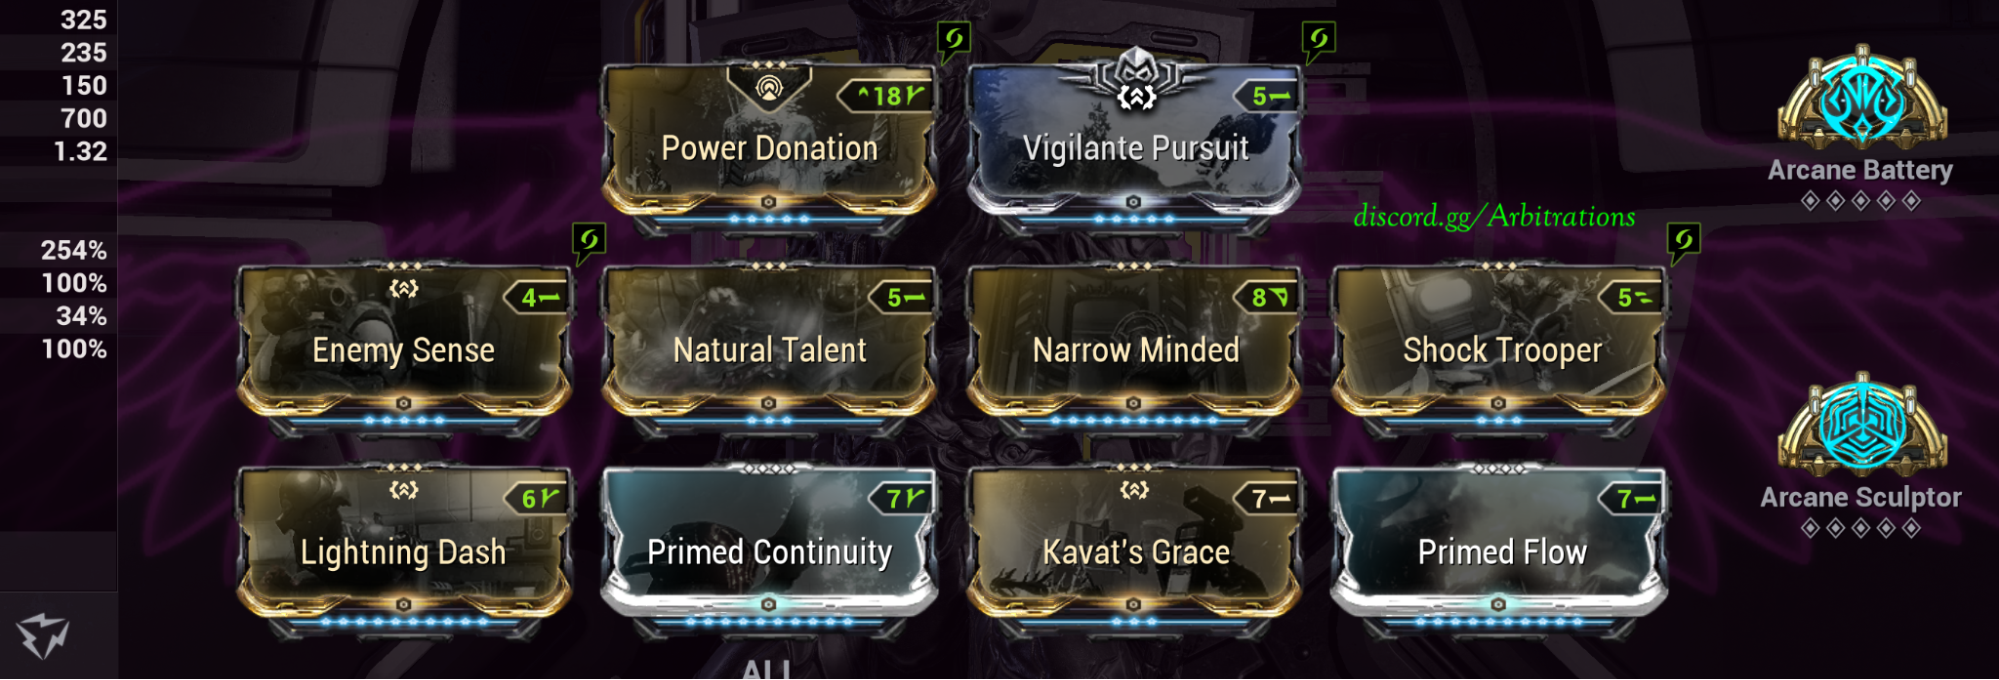
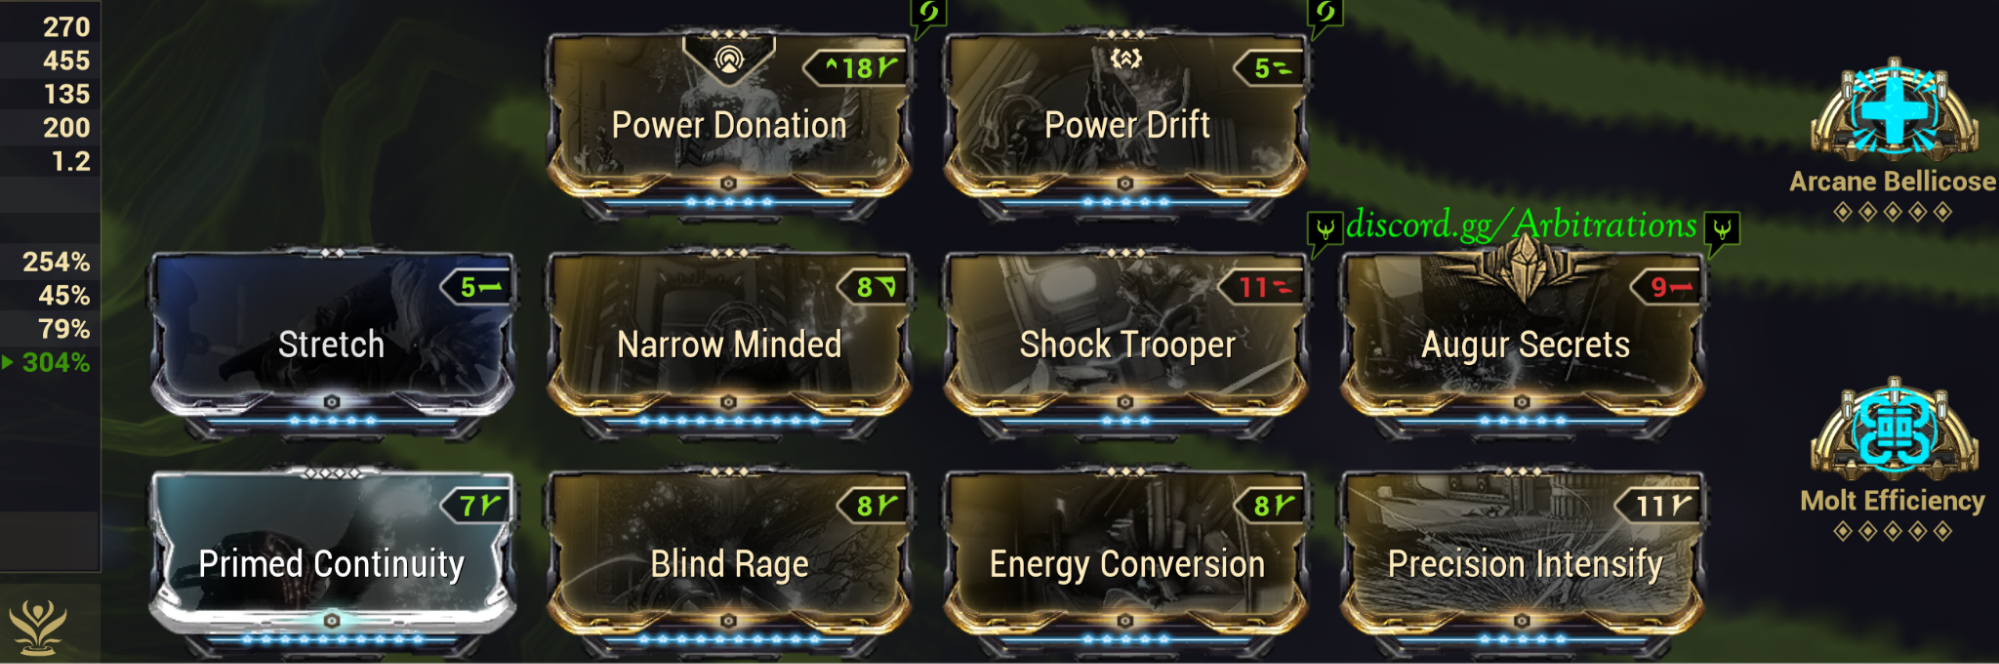
Running 175% efficiency arcane sculptor allows you to self sustain over 90% energy for Primary Overcharge without having Nourish on the squad. Natural Talent and Lightning Dash can be replaced with Blind Rage and Umbral Intensify if you need more damage. On smaller tilesets where all spawns are within 93m, can drop Enemy Sense for additional flex mod.
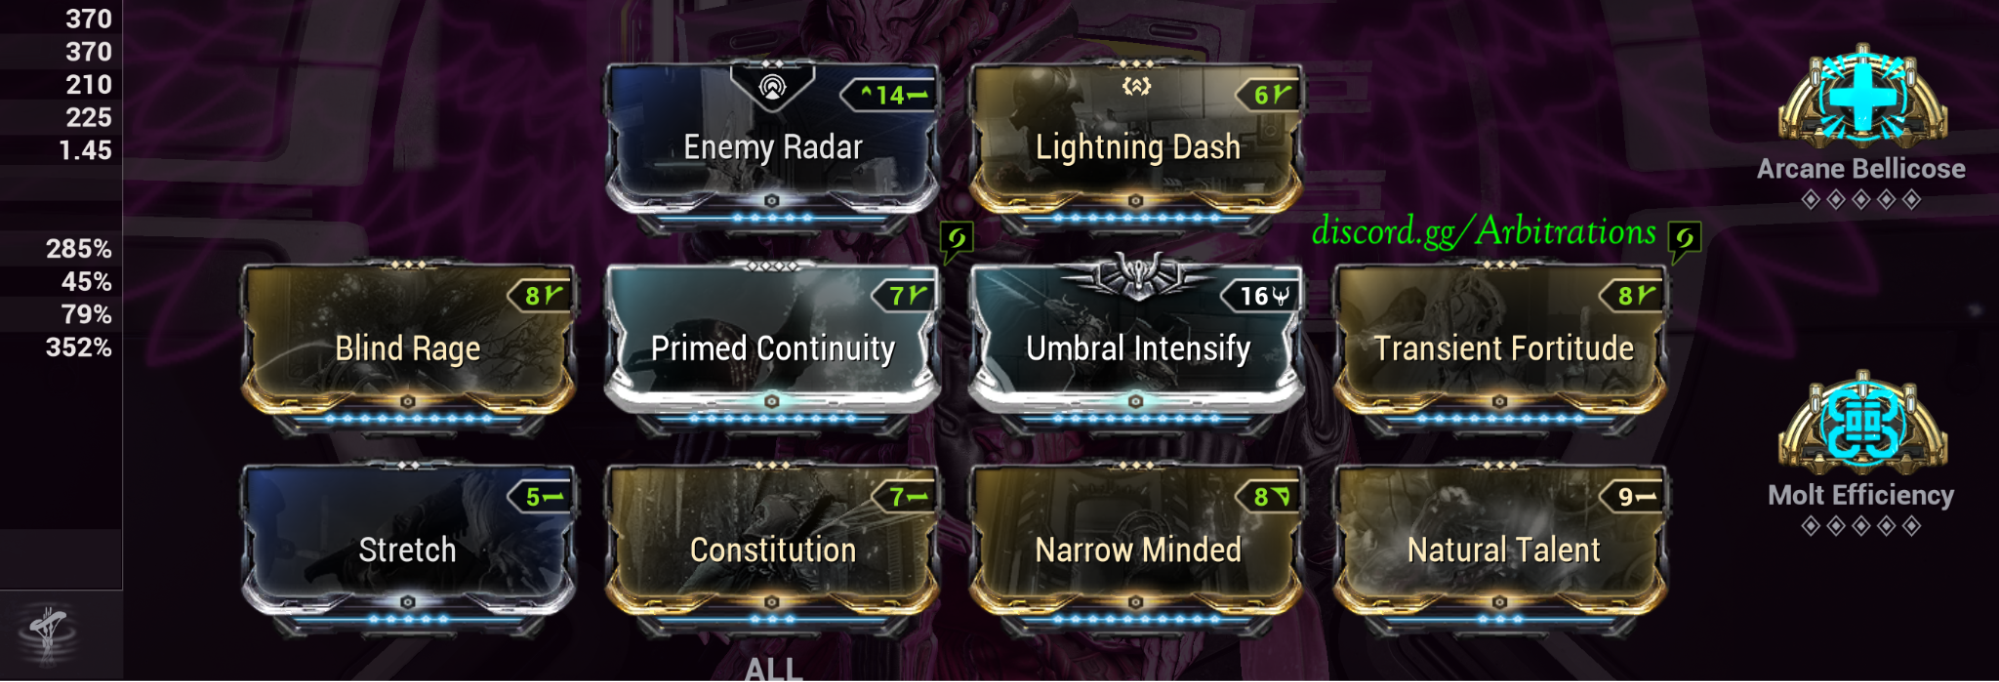
Wisp Prime ☆
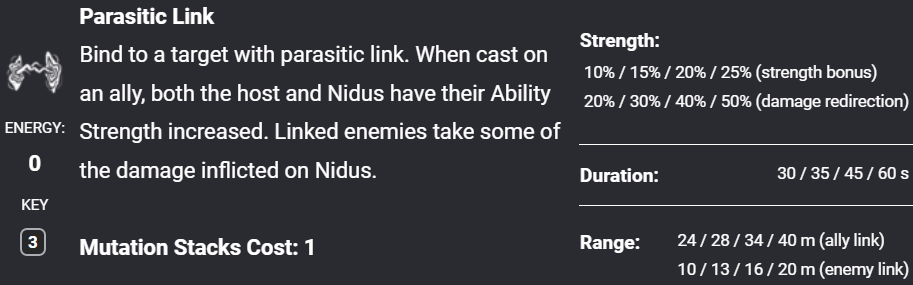
🔻Throw Afentis Prime every 10~20 seconds at the camp location, but you can also help with kills via Akarius if you’re playing with an inexperienced squad to reduce risk to defense operative. For interception missions, you should be placing a pair of health and haste motes at the camp spot and both of the main two capture points so that dps do not lose the buffs between waves. Wisp is also usually responsible for neutralizing the 3rd point for 2 cap interceptions. Do not place shock motes, they only contribute to causing AI bug to occur. You can use wisp’s 2nd ability to teleport back to spawn after looting if you dropped it before going to collect. Double tapping it also makes you invulnerable for 3 seconds in panic situations.
The most important aspect is to upkeep nidus linked roar on both DPS players as much as possible. Wait for link, cast roar (if you don't hit both, you can recast at any point due to augment mod), throw Afentis before going to loot at least 40m away, this breaks the link and nidus will recast his link later. For interception it’s not as important for roar to be linked, due to instalooting. You can easily ensure you hit both DPS by observing the minimap or looking at their buff timers for the infinity symbol which means they are standing within motes. Subsume over 4th.
- Roar subsume ☆ will provide a multiplicative damage buff to allies.
- Thermal Sunder [DO NOT CAST THIS WITH NIDUS LINK] Sunder will cause lag if buff is over 1500%] Tap+hold drops lingering blast buff zone. Requires thermal transfer augment. Only used on larger interception tilesets (not Cinxia) with Rhino as second support.
*Augur reach is flexible for constitution or Amar’s Hatred
Nidus specter is a hard requirement for wisp role
- Place a weak health mote right away to max out arcane bellicose for nidus.
- Wait for jade 150% str buff, 200% Brighbonnet and nidus link from nidus prebuff. Do not use nidus specter before placing motes if you have a nidus prebuff.
- Go into operator and void sling twice to trigger Madurai 40% str for 20 seconds.
- Place health mote first to trigger Archon Intensify. Archon Intensify grants 30% str for 10 seconds.
- Use contamination wave again to proc molt vigor.
- Place haste mote.
- Place nidus specter.
If you dont do nidus prebuff, use a nidus specter after you see 150% buff and do the rest of the steps the same way.
*You can only have 6 motes down at a given time. If you were to place a 7th mote, it would delete the oldest one. You don't need to buff all of your motes, just the initial health and haste mote. If allies lose the buffed mote at any point during the run, they can return to buffed mote location:
For Mirror Defense tilesets specifically, you will want to place a pair of fully prebuffed motes at both of the camp locations at either end of the map. That way, even if DPS players lose their mote buffs at any point, they won't have to run back to the prebuffed mote set to get max firerate.
Vauban Prime ☆
🔻Better than Volt specifically for 2 Cyte comps
For non 2 cyte comps, you’ll want to have volt with dispensary in the squad instead. Vaubro’s 2nd ability can put down vector pads in up to 4 separate locations at a time. Upon stepping on the vector pad, allies receive multiplicative buff to speed and damage. Invert ability so pad is tap to cast. Subsume over anything but your 2.
When allies step on the vector pad, it launches them in the direction it was placed, so be mindful when placing these. Don’t place too close to the camp spot or in high traffic areas. Place a pad in a way where stepping on it launches you against a wall to prevent dps players from getting launched too far. Use madurai for stronger buffs and cast speed.
- Bright Bonnet ☆ (BB) gives strength and energy. You shoot shrooms with Arbucep archgun to double the strength from 100 to 200%. Do your best to upkeep 2 shrooms at all times for squad energy, place them close to the DPS, but not right on top of them to avoid accidental bunny hopping.
*Arcane Concentration does not work for the vector pads, the ability duration does not snapshot. Neither does the ability strength, so when allies trigger a pad while you do not have nidus tether, their buff will be weaker.
Rhino Prime
🔻Rhino’s roar has a 45.5m radius with this build, which some prefer over vauban for large interception tilesets (not Cinxia), where near constant looting can make it difficult for some inexperienced supports to land roar as Wisp. Running Rhino instead of Vauban means giving up the speed buff and the multiplicative damage, which is fine since interception has lower enemy scaling. Subsume over 1 or 4. Use madurai for stronger buffs and cast speed.
- Bright Bonnet ☆ (BB) gives strength and energy, only used for 2 cyte comps. You shoot shrooms with Arbucep archgun to double the strength from 100 to 200%. Do your best to upkeep 2 shrooms at all times for squad energy, place them close to the DPS, but not right on top of them to avoid accidental bunny hopping.
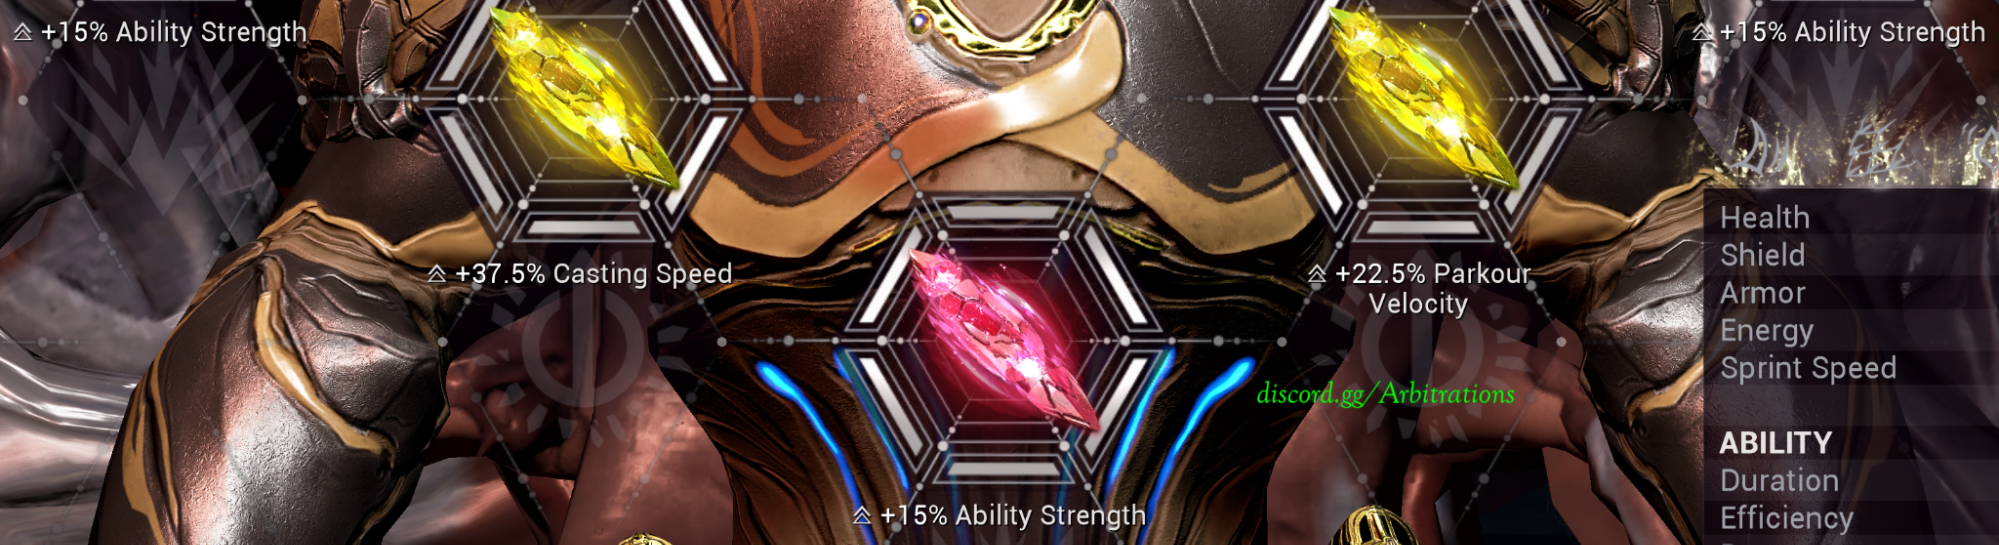
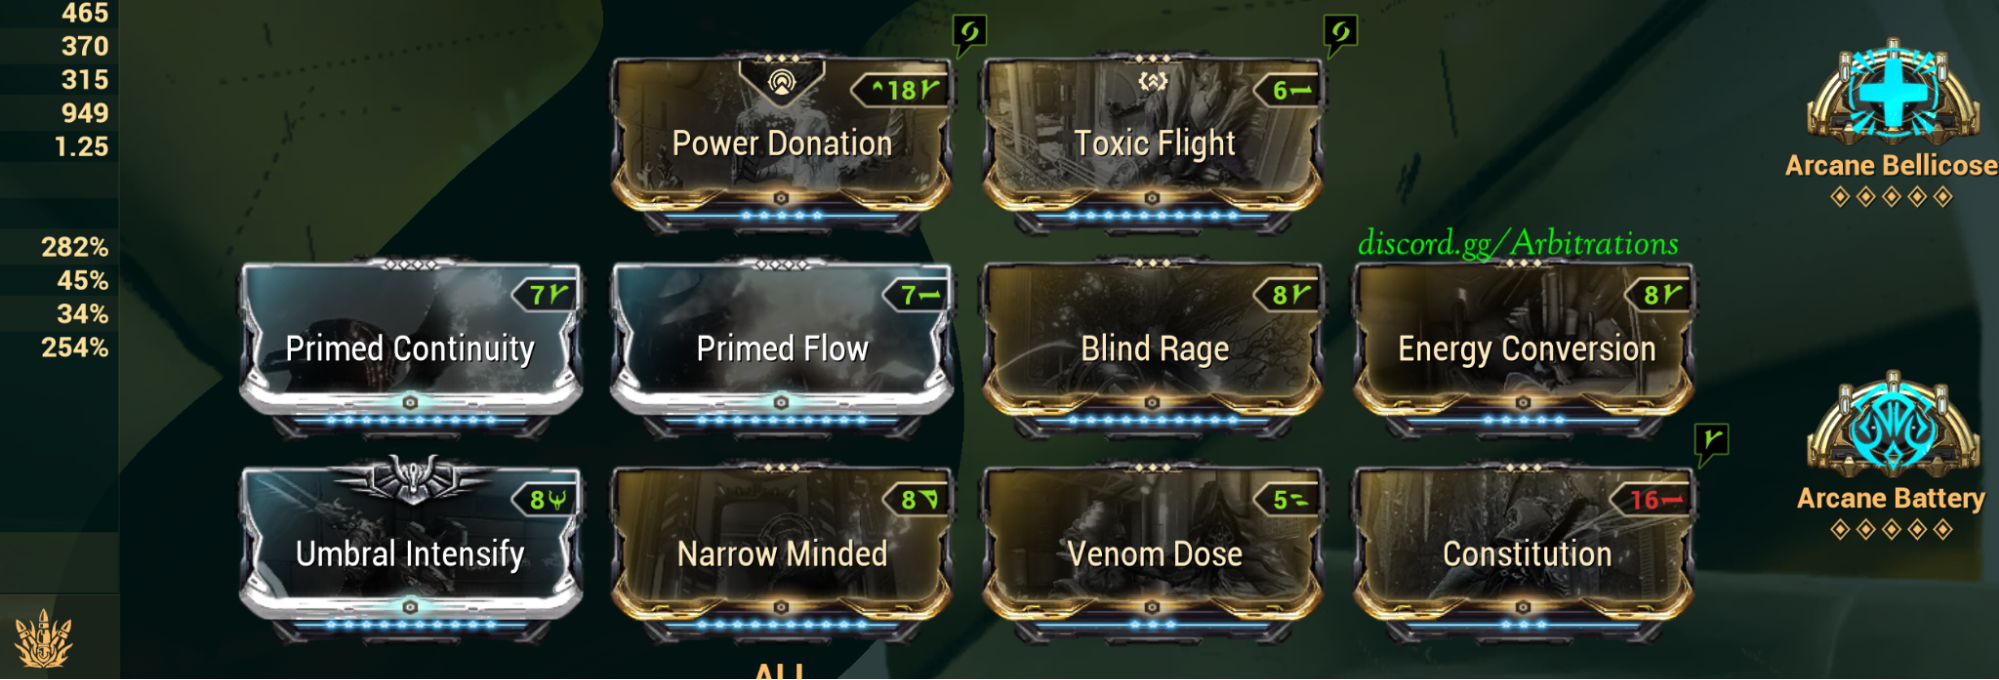
Saryn Prime
🔻Toxic lash applies 195.6% of weapons total damage as toxin alongside all sources of damage (not combining) including nightwatch napalm's fire ticks. This triple dips bane/roar and double dips modded toxin. Venom dose will give the team 652% corrosive elemental damage and some nice status weighting. You can drop Constitution or Energy Conversion if you prefer more casting speed or enemy radar. Subsume over 4th and run Unairu focus school.
- Energized Munitions gives you 14.1 seconds of 75% ammo efficiency for full auto goodness.
Volt Prime
🔻Only used if you don’t have Vauban setup, or Saryn is in the squad for Ammo+Reload
Volt’s 2 increases ally movement speed to make collecting vitus essence faster so they can get back to covering spawns faster. It is re-castable at any point, lasts 34.8 seconds with Molt Eff, has a 20m radius, persists, and provides a 1.5x speed multiplier. Shock trooper provides 767% electric for the team that does not combine with other elements, it lasts 104 seconds and has a 12m radius. Volt’s electric shield can be used to grant further electric damage to shots fired through it as well as doubling critical damage. Not needed, but it can be used strategically to defend the operative in certain scenarios. Subsume over 4th and run Vazarin.
- Dispensary ☆ when the player is below 70% energy/health or 70% ammo on primary or secondary (reserves). Lasts 33 seconds with 52.52% chance of triple drop. Only used when you have Ogris DPS in the squad.
- Bright Bonnet (BB) gives strength and energy, only used for 2 cyte comps. You shoot shrooms with Arbucep archgun to double the strength from 100 to 200%. Do your best to upkeep 2 shrooms at all times for squad energy, place them close to the DPS, but not right on top of them to avoid accidental bunny hopping.
*Dispensary users should be running vazarin to protect the defense operative if needed*
AURA CHOICE
🔻Enemy Radar helping with ai pathing is a MYTH, in defense missions the operative is marked as a priority target and mobs will sprint towards him. In interception the enemies will gravitate towards captured points or allies whichever is closer. The spawn engine only relies on squad members' line of sight (or FOV, as it will attempt to spawn enemies outside of your rendered view) with bias towards the host. So the only benefit to running enemy radar is easier spotting of mobs via the minimap.
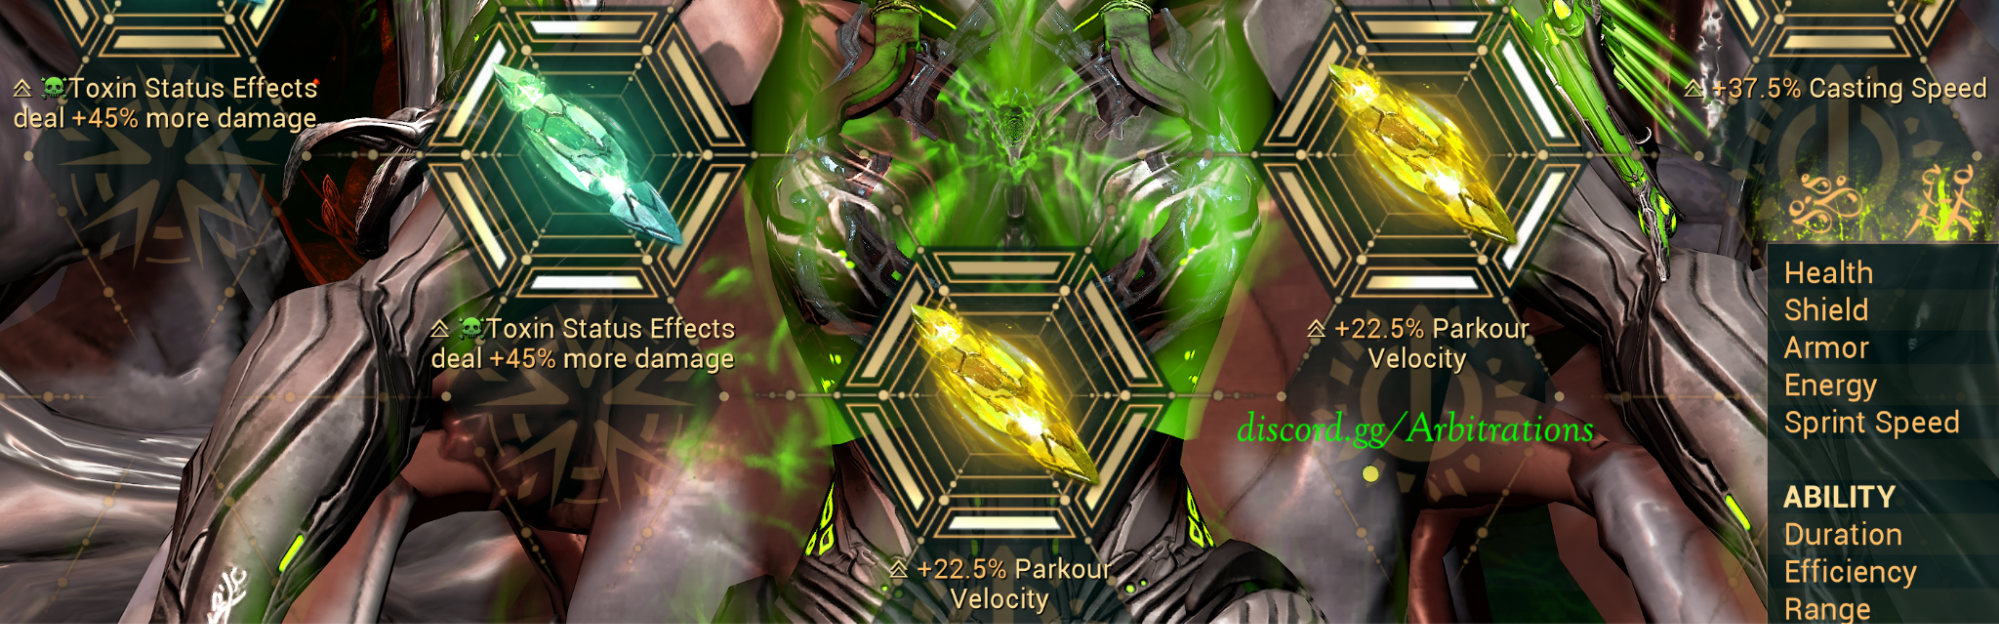
- Power Donation makes you lose 30% strength and gives +30% to allies. If all 4 squad members have this equipped, everyone will receive 90% strength and end up with +60% because each person had -30. Power Donation also applies to allied specters, with 4 power donation(+120%) the nidus specter’s tether gives 1.58x strength multiplier instead of base 1.28x
- Enemy Radar can be used on Volt/Vauban/Citrine after prebuffing. In most cases the innate 30m plus Primed Animal instinct and Vigilante Pursuit is sufficient, but this can allow for the Cyte to not have to run Enemy Sense on larger tiles.
- Growing power auras do stack and are easy to proc, but do NOT affect specters.
Weapons
Primary: Kuva Sobek ☆
🔻Use this or Boar for cyte
Kuva Sobek with magnetic valence element to prevent overflow issues causing you to deal 0 damage to drones when doubling up on elemental buffs. Cytes resupply set to electric for example will force proc electric regardless of which valence element you choose. This force proc is applied to every pellet that makes contact with an enemy, as well as the acid shells explosions themselves, which is how the damage can self propagate and clear whole spawns.
- For 2p1n Rivens Multishot and Firerate is the most comfortable. For 3p1n rivens, third stat being damage, crit damage, and electric are all good as well. Status duration is niche, but good for gas comp. Magazine capacity can be nice especially for client with delayed resupply issue.
- Ideal negatives are reload speed and ammo max. You cannot roll zoom on shotguns. Status chance is fine as well, with Resupply’s forced status.
- For Gas comp you can drop Primed Ravage for Hunter Track or Lingering Torment.
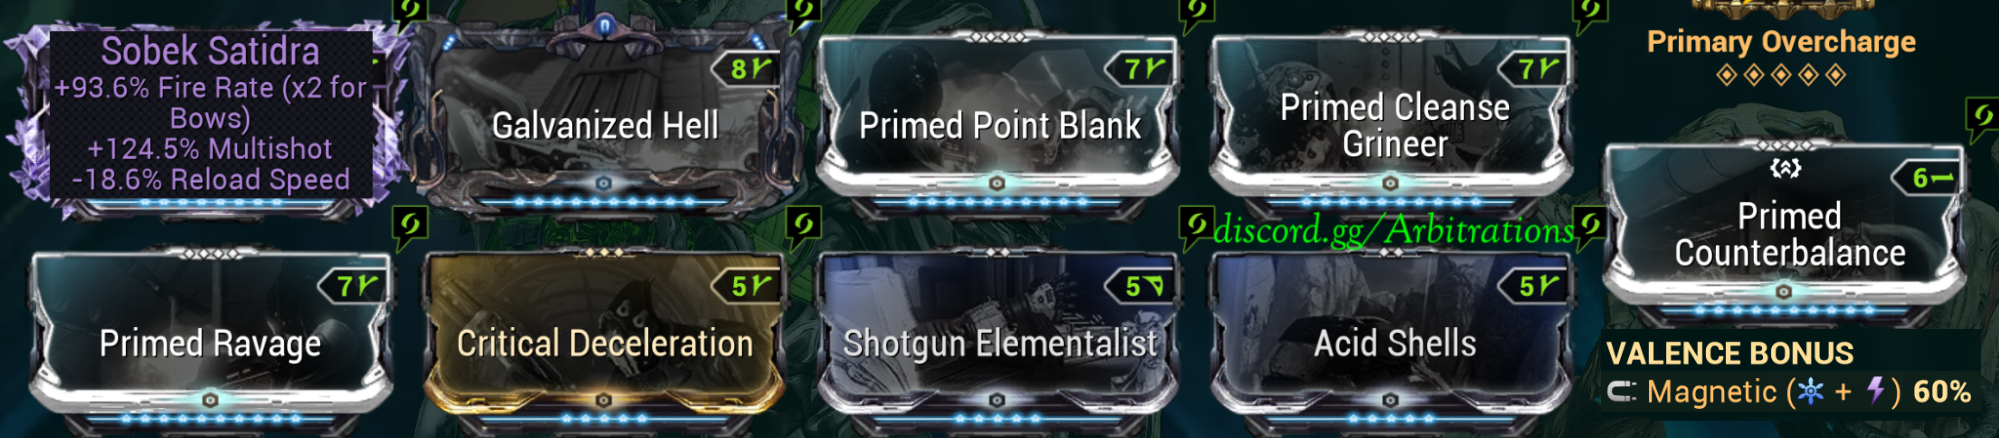
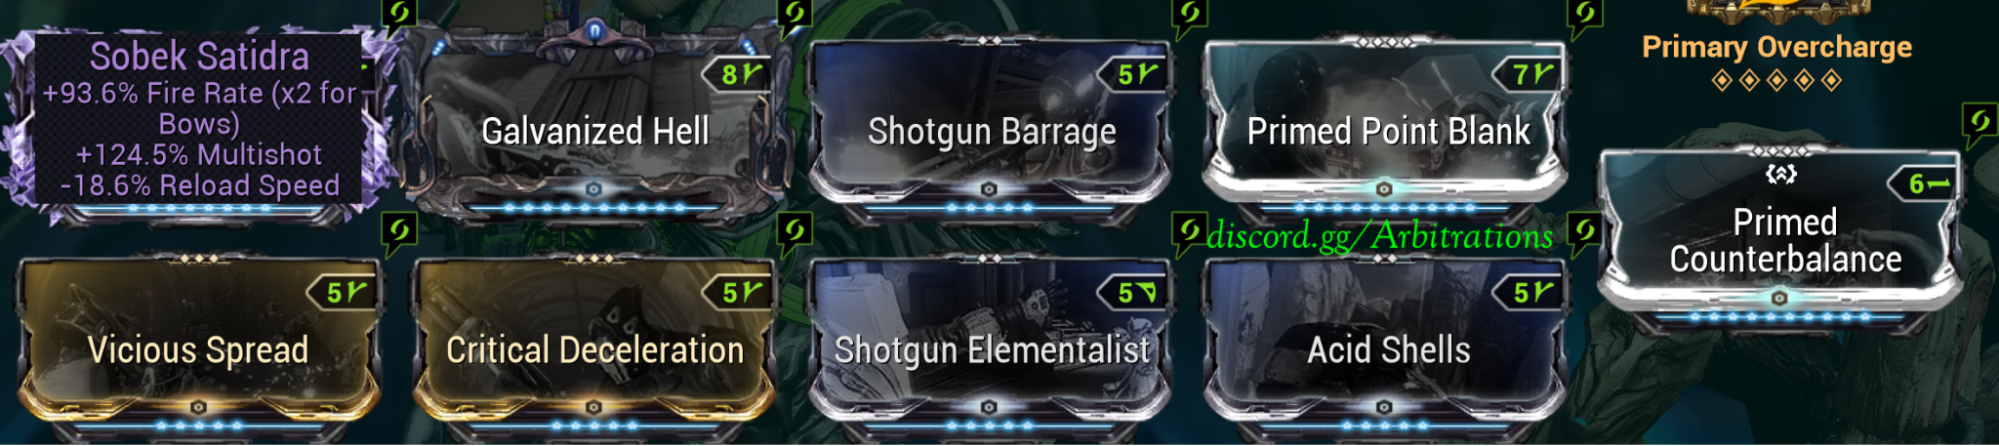
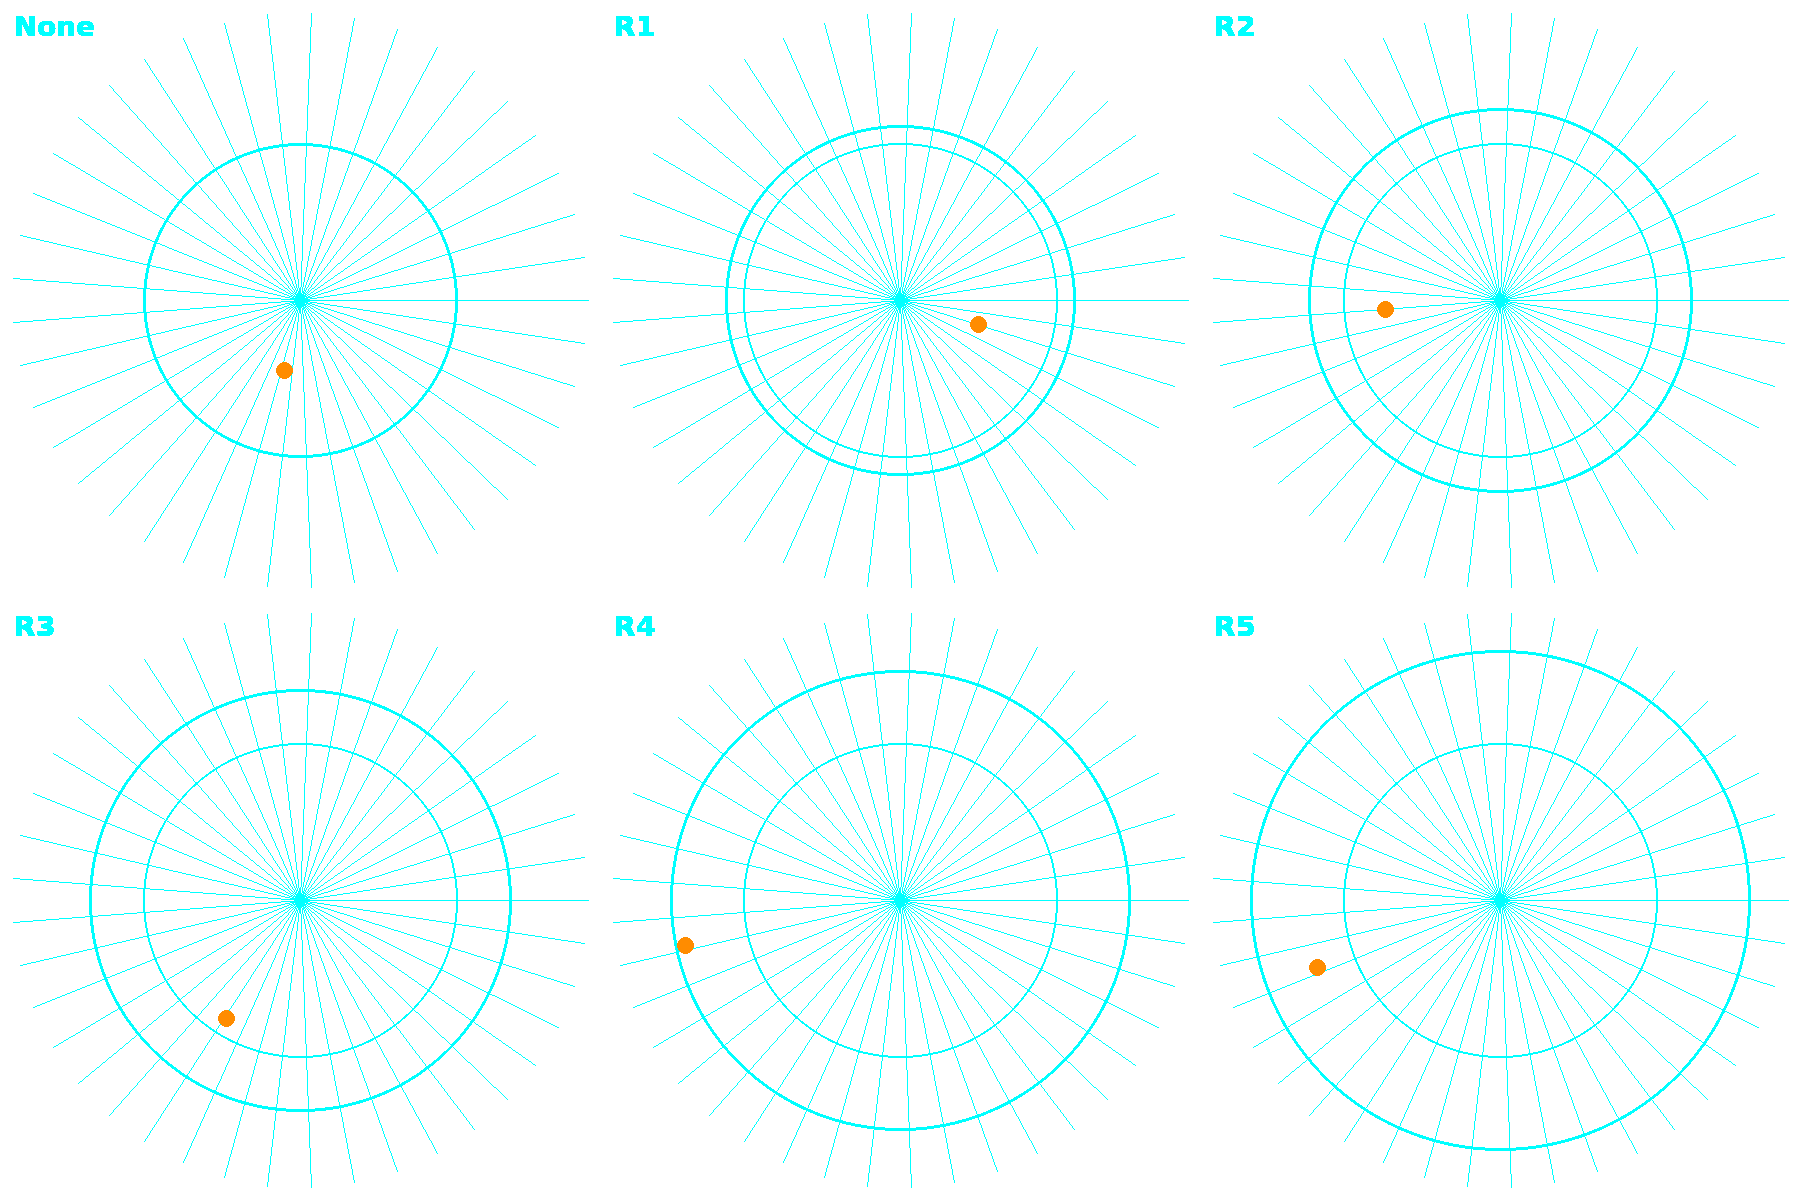
- Vicious Spread can be used to increase shot coverage area. Ranks 0-2 do basically nothing, Rank 3 is conservative and Rank 5 is all out. This is worth trying for yourself again, especially if you only tried it prior to Primary Overcharge. Adjust mod rank to taste.
The below example is using 124ms 2p1n riven, galv stacked, primary overcharge 350ms @ 50m distance. The orange dot is an arbi drone, the inner circle is spread with no Vicious.
Vicious Spread visualizer tool
*It is worth noting, Regular Sobek is worth using if you have a decent riven and consistent buffs, if you are trying to maximize firerate or do gas shenanigans.
Primary: Boar Prime ☆
🔻Use this or Sobek for Cyte
Most people prefer Boar Prime over Sobek for a higher spread, multishot and fire rate. Hitting enemies will be much easier but you will not have any AOE, so clearing huge groups is harder than with sobek.
- Evolutions: Reified Bane, Ready Retaliation, Critical Parallel
- Riven: Aim for a 3p1n riven with MS CD DMG FR CC with a harmless negative, like -ammo max or -reload speed. MS CD DMG is best in slot
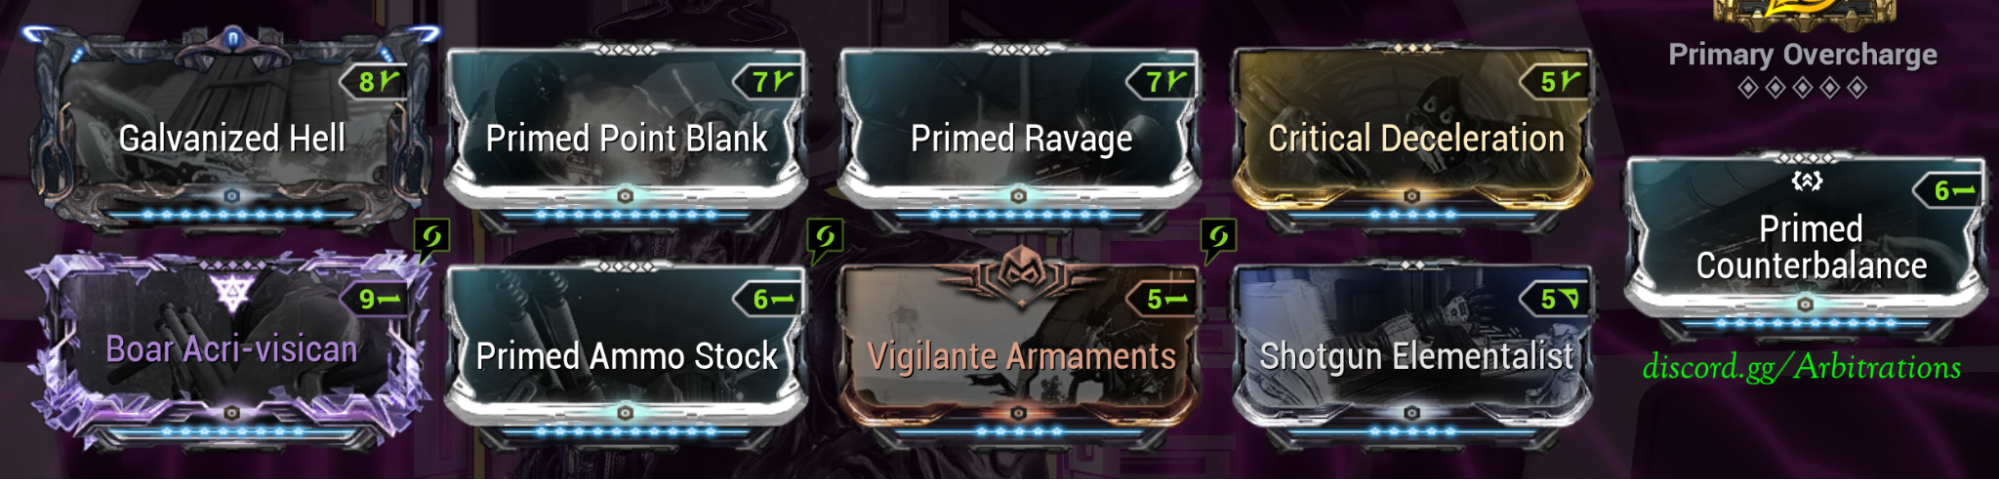
- Client cyte will lag with Overcharge. Swap Overcharge for Primary Deadhead and Point Blank for Shotgun barrage if you are not hosting. Lag depends on ping, tileset and PC specs. Aim to play with people in the same region as you.
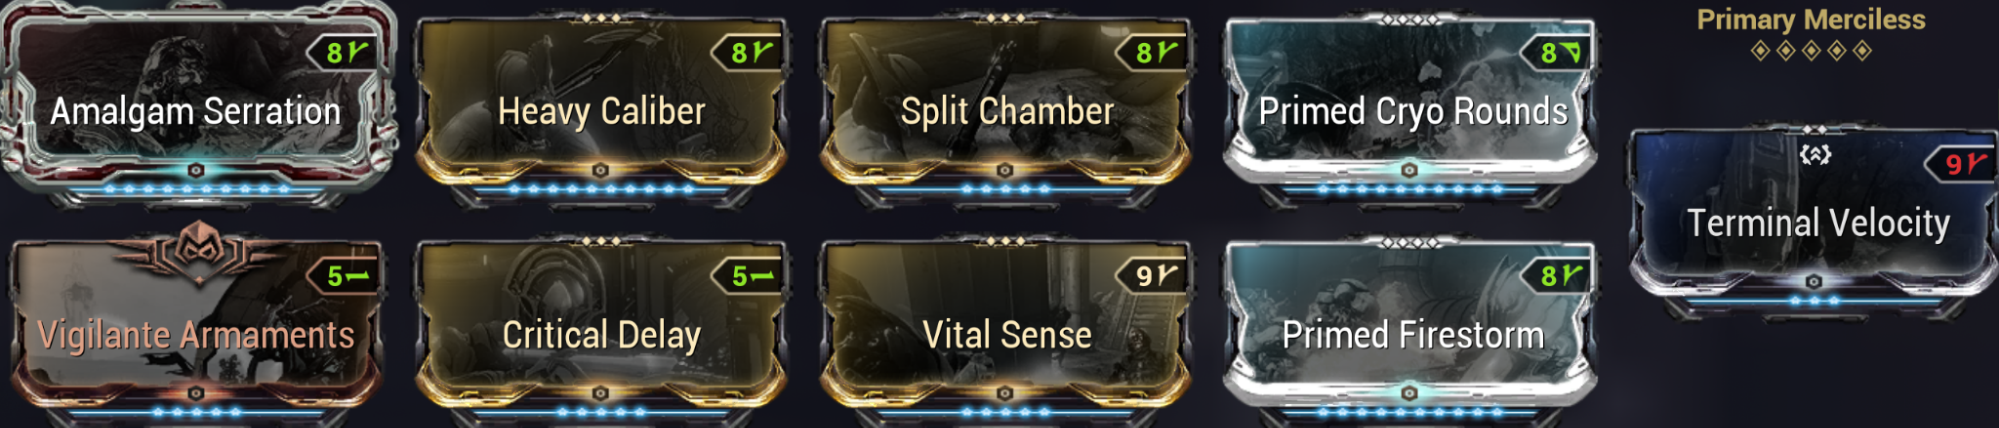
Primary: Kuva Ogris ☆
🔻Non Cyte DPS
The napalm ticks are one of the main things that kill the arbitration drones after the initial impact breaks their shield, instantly, before they can shield gate. The mobs will stack many heat status procs but the drones will not. Nightwatch napalm stays on the ground for 6 seconds and is not affected by status duration.
Use cold valence on Ogris since Saryn always runs ‘modded toxin’ and it’ll give her some viral weighting. The valence percentage amount does not matter, 25% would be just fine. But if you can, you might as well go for 60% to maximise damage output.
- 3p1n rivens Ogris rivens used for QOL rather than damage. Desired stats are Multishot, Toxin, Magazine Capacity, Projectile Flight Speed, Reload Speed and -Recoil in that order. You need at least +28.33% mag to reach 6 magazine. If you just want an all around good riven then go for ms, mag, pfs.
- Ideal negative is -Zoom. -Crit chance/damage, -Status chance/damage are acceptable as well.
- If you don’t have a riven, slot Vigilante Armaments.
- Primary Overcharge gives 35% of max energy as long as you are at or above 90% energy, to a maximum of 350% multishot with 1000+ energy. We accomplish this with Unairu & Arcane Battery, and maintain it with Bright Bonnet.
- Ammo Drum increases your ammo pool, but also makes it so you get 2 ammo from dispensary. You can replace this for Infected Clip if you don’t have a toxin riven or want the extra damage. You will be fine without Ammo Drum so long as the Afentis thrower isn’t eeping.
- Adhesive Blast, specifically rank 2 makes it so that 50% of your projectiles will explode on impact like normal, and the other 50% will land and explode after 5 seconds. This increases the effective coverage time of Nightwatch Napalm from 6 to 11 seconds. However, it reduces your initial shot coverage, so Energized Munitions and rank 6 Heavy Caliber is strongly recommended to compensate.
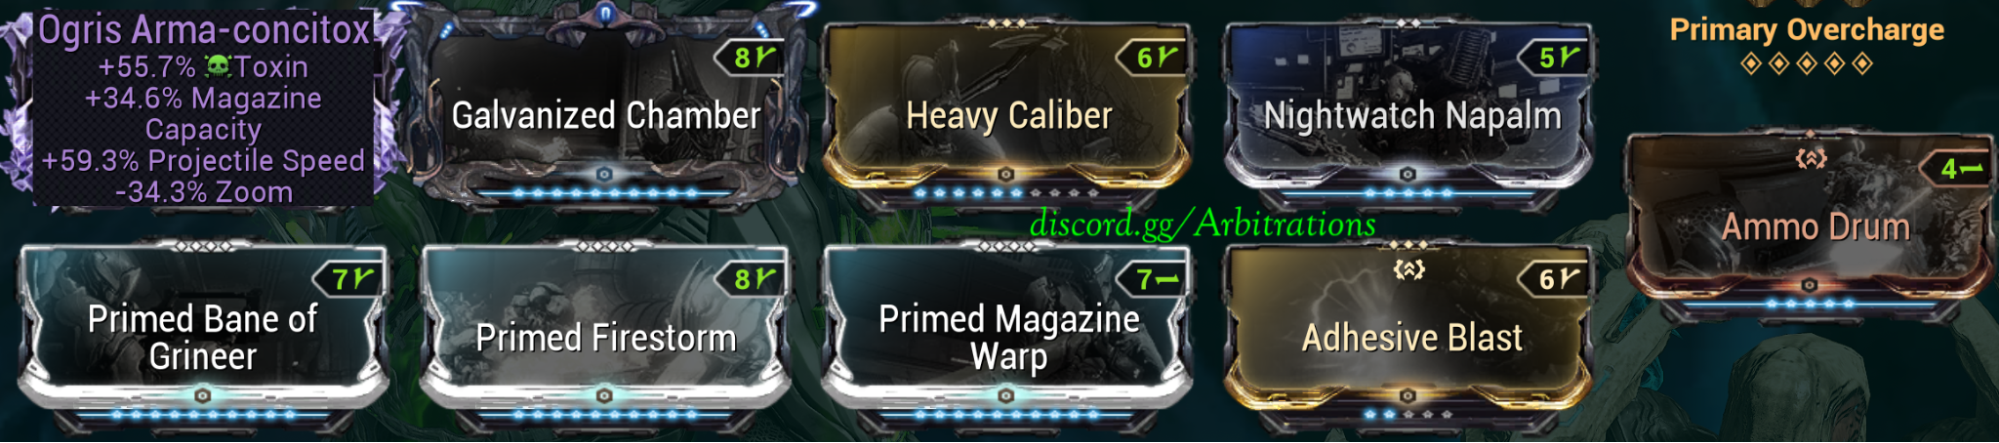
Heavy caliber r6 because the extra spread is good for coverage, if you're confident on nailing all the spawns or don't like the spread then Amalgam Serration's 25% sprint speed helps collect vitus essence that much faster. I’m recommending r6 due to the variance in coverage area with the addition of Adhesive Blast. You can run a higher/lower ranked heavy caliber based on how much spread you prefer. Big circle below is r10, then the smaller inner circles are r4, r5 and r6 respectively.
Primary: Afentis Prime
🔻Wisp throws it down shortly after the start of every wave or every time you cast roar. Spear lasts for 10 seconds, allies that kill 1 enemy while in the spear's aura receive 100% ammo pool, 50% reload, 20% firerate, and -50% recoil for 40 seconds. The only mods that matter for afentis are reload speed and firerate. You do not need a riven or any mods on this for that matter. Firestorm does not affect buff radius. Amalgam Serration is nice for the movement speed. Fractalized Reset isn’t required but if you already have it, it's nice as well. Critical Delay is only there to give enough crit for Tenacious Bond on Sahasa with Hunter Synergy.

*While regular Afentis works, the prime variant has 8x larger buff sphere volume. Make sure you are using the prime variant to guarantee buffing both DPS players*
**You do not need the full build for afentis. This is just if you want to min-max
Secondary: Akarius Prime
🔻General use secondary for all roles
Cyte can struggle with very close spawns, where Ogris users don't have this issue. Akarius covers that gap. Synth Deconstruct on your companion will grant pocket reload, letting you return to your primary immediately without worrying about finishing the reload.
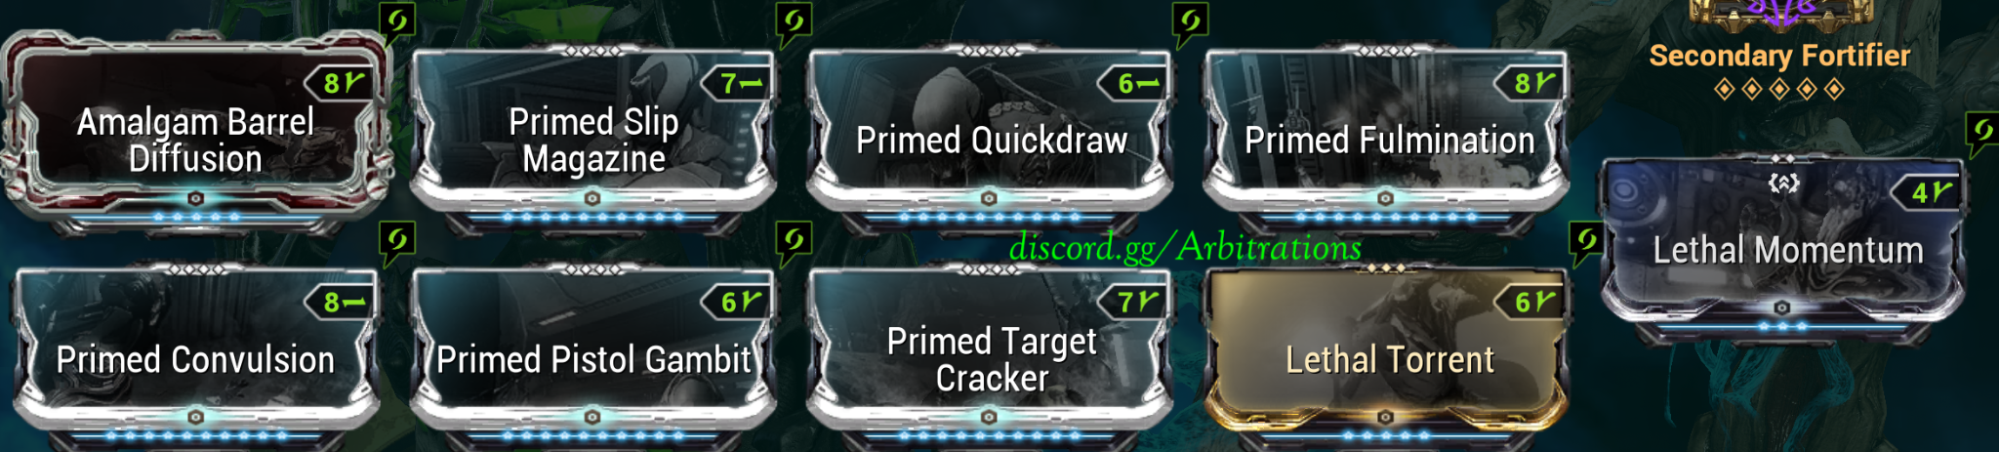
*For support, secondary can be anything you want or nothing at all. It’s a nice to have, mainly in the event that DPS gets eepy or you host migrate.
Melee: Praedos
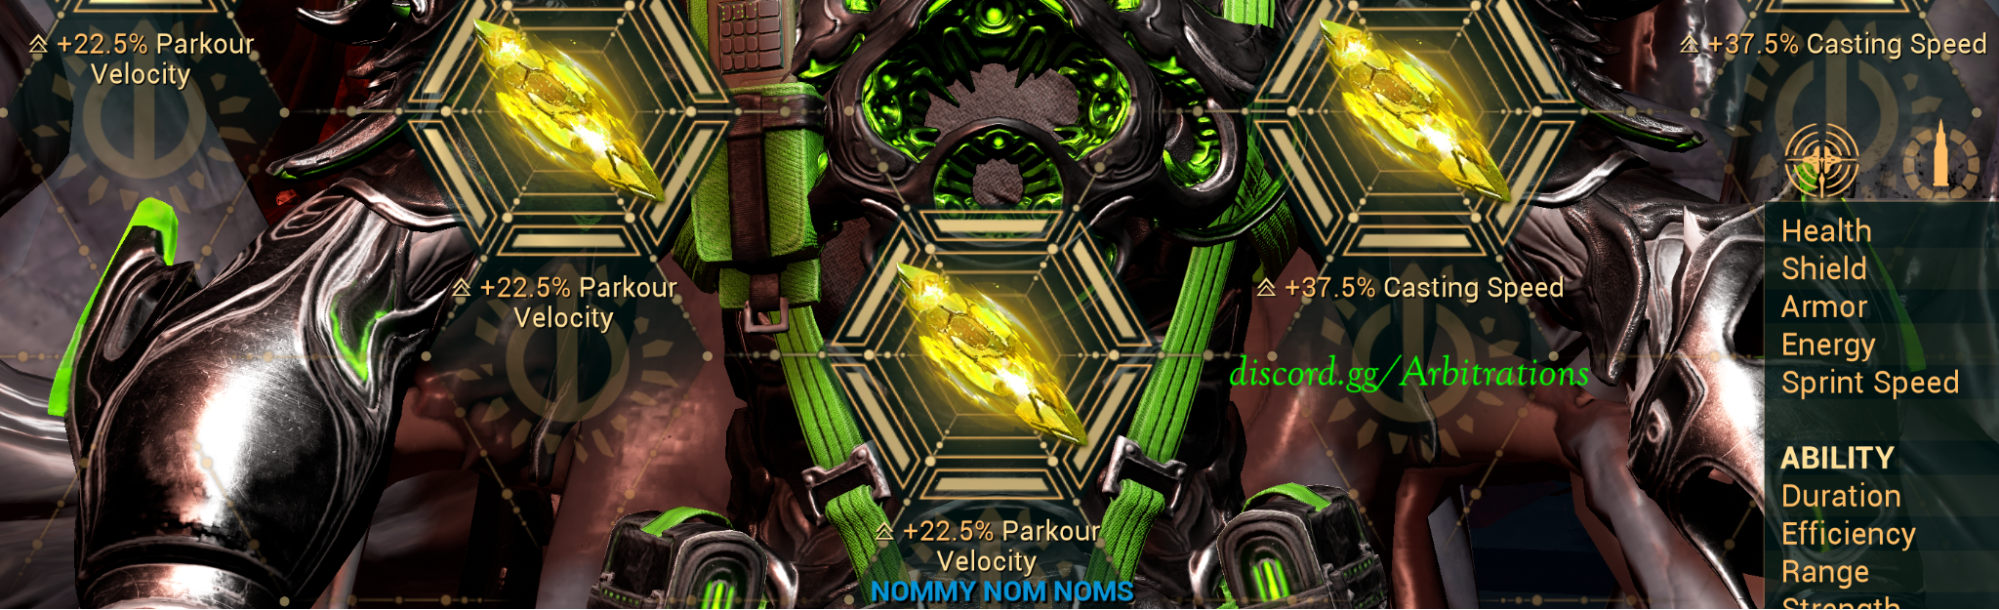
🔻With Parkour and movement speed incarnon evolutions. For modding, max attack speed is all that matters, in order to speed up slam animations and allow for faster recovery. Riven is not needed. Everything else is quality of life.
- Truth’s Flame (new tennokai mod) gives Truth effect after gaining 1000 affinity the next time you swap to melee for like a ground slam. Truth gives 25% Parkour velocity for 30 seconds and has a 30 second cooldown. Not worth going out of your way to proc it, but the extra parkour is nice while collecting vitus.
- Melee Careen freezes enemies within 5.5m whenever you roll. Might save you at some point.
- Jugulus Barbs (2/3 set with Jugulus spines on secondary) creates a pillar that stuns enemies within 6m when using slam attack to get around faster. Nothin too special, just kinda nice AOE stun if you land in a pile of mobs. The number of tendrils scales with combo multiplier, with the 5th evolution you will have 12x combo the entire run. You can slot Primary and Secondary Dexterity on your gear wheel archgun for an additional 15s combo duration.
**LESS TIME SPENT COLLECTING = HIGHER KPM = MORE VITUS**

Companions
Chesa Kubrow’s Retrieve mod falls under the same category as Nekros desecrate, and does not affect the arbitration drones.
*Reinforced bond is still bugged for clients, you will not get shields from reloading, but you can use shield pads on gear wheel to grant your companion enough overshields*
Adarza Kavat
🔻Shytie Car
Adarza kavat provides a FLAT 60% critical chance to all allies within 25m for 13 seconds then goes on cooldown for 20 seconds. The additional FLAT crit chance is mainly beneficial when running Shyte. The synth mod is mainly used for pocket reloading the akarius when you (rarely) have to pull it out to clear super close panic spawns, so that you can swap back to sobek immediately without having to worry about finishing the reload for next time.
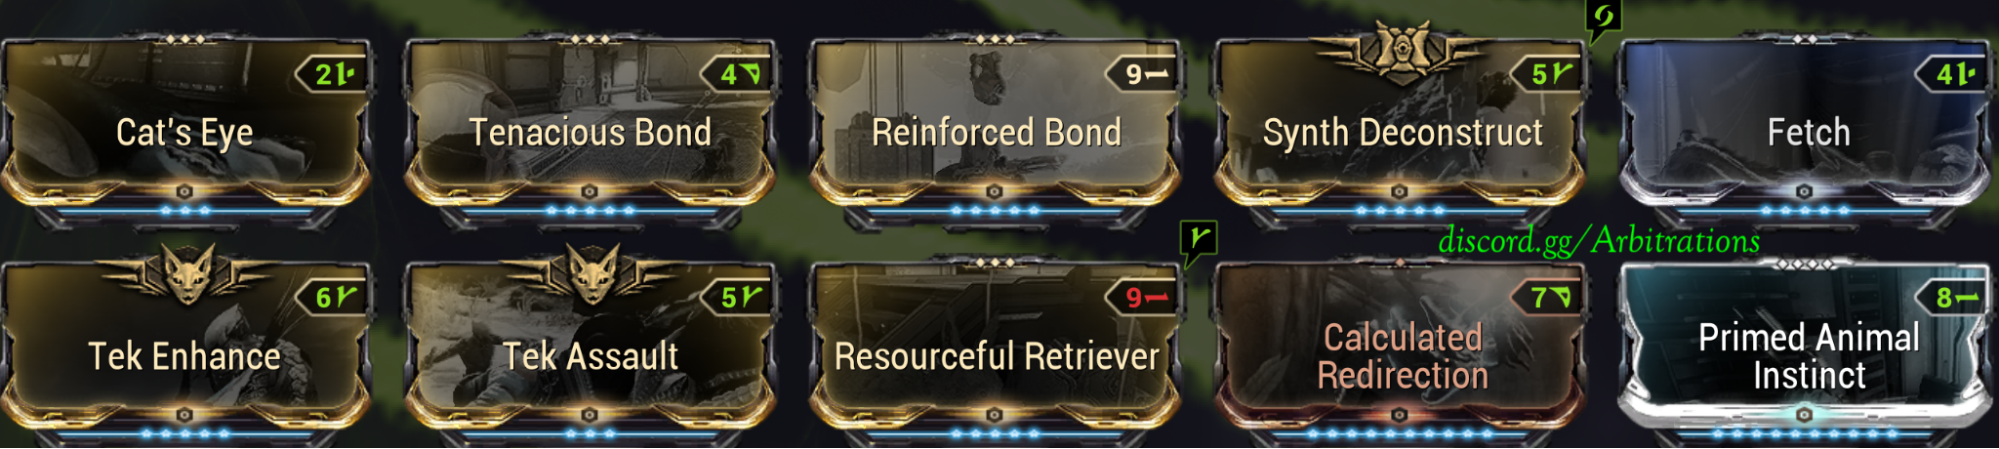
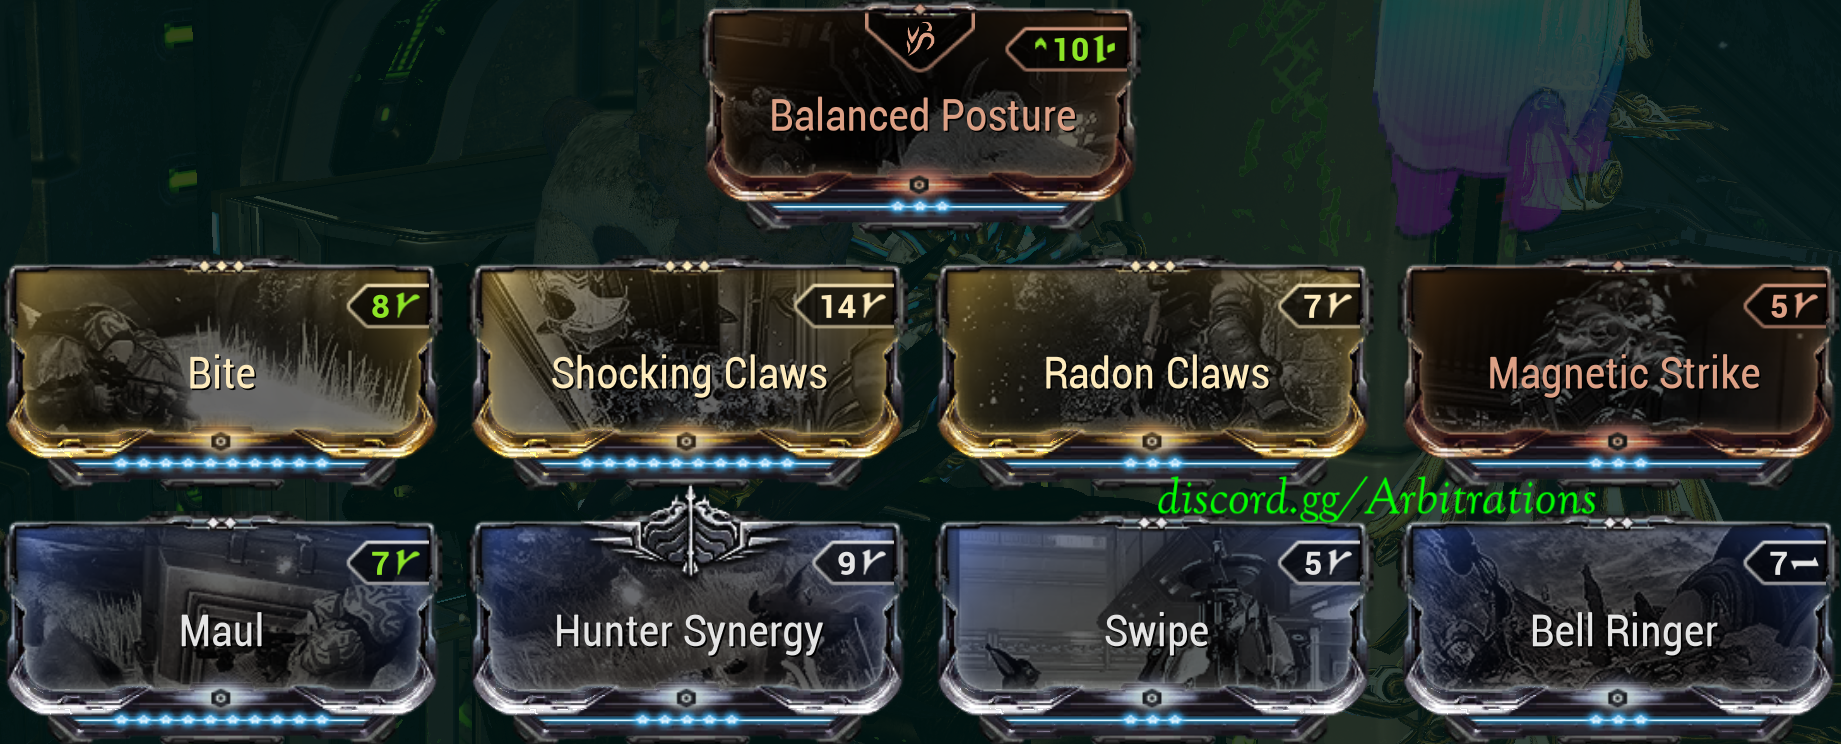
*Balanced Posture instead of Elusive helps kavat get in range of enemies to cast Cat’s Eye more often.
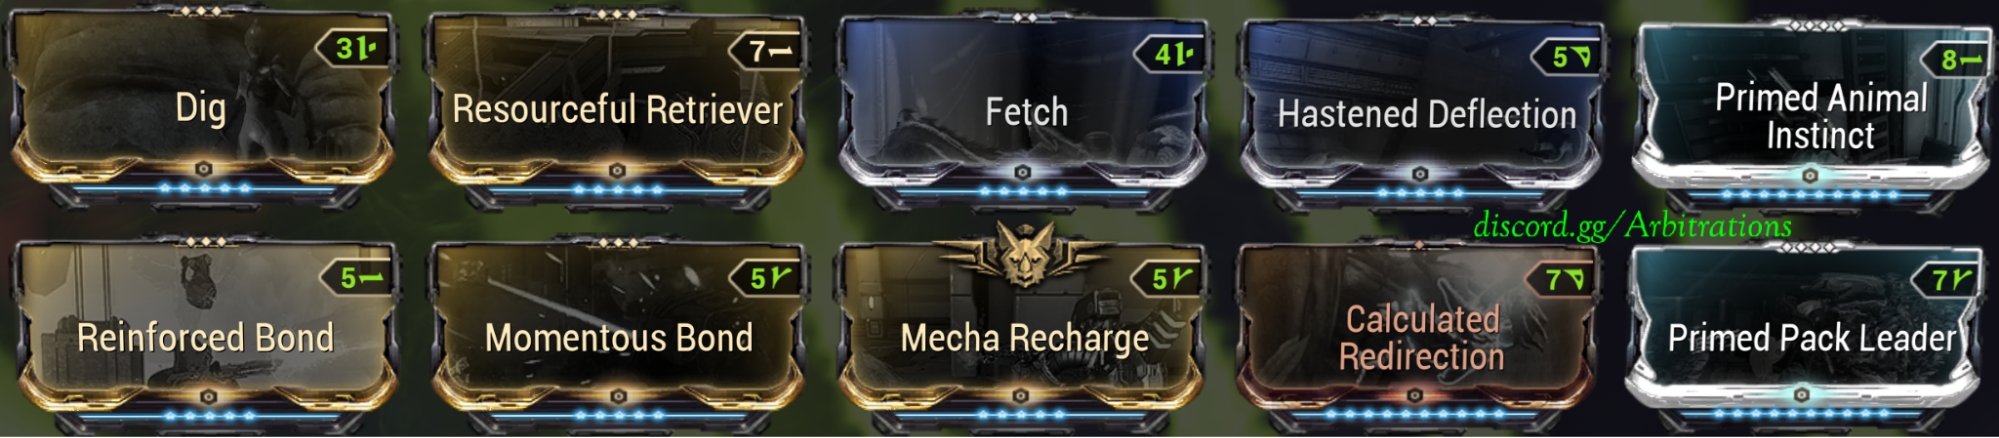
Sahasa Kubrow
🔻Dig Dog Dug, best buddy for supports
Roughly every 20 seconds, Dig will give 2 drops with 70% chance at a 3rd drop of ammo/energy. It will not dig if the player is attacking, and checks every 3 seconds. It also will not recast in the same spot, unless you move a few meters to reset it. While it’s very inconsistent and cannot replace Dispensary, it can offer some additional ammo, and make proccing energy conversion easier for Wisp with no Dispensary on 2 cyte comps.
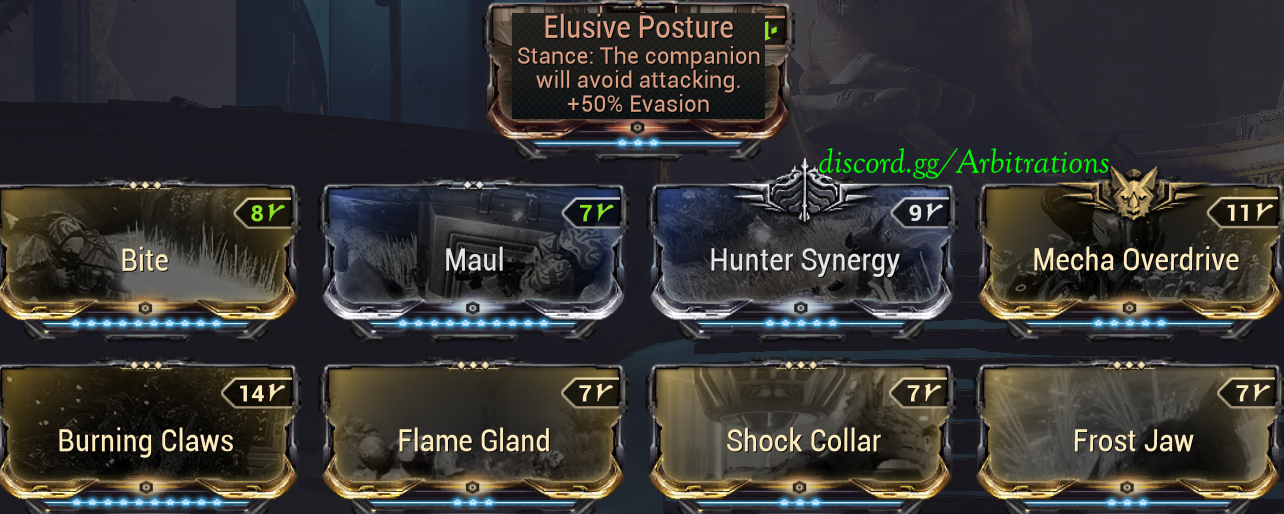
Sly Vulpaphyla
🔻Skill Issue kavat
Since reinforced bond is bugged for clients, if you can’t be bothered to use a shield pad here and there, this can be your no thoughts empty head solution. Vulpahyla will have over 1200 shields consistently without needing to pad, reaches breakpoint for critical chance for tenacious bond, and will provide you a get out of jail free card if you manage to die. It will sacrifice itself to heal you and give you 1 second of invulnerability. Any Vulpaphyla works, but if you have Sly, Survival Instinct is a nice small QOL.


Pre-Buffing Before Mission
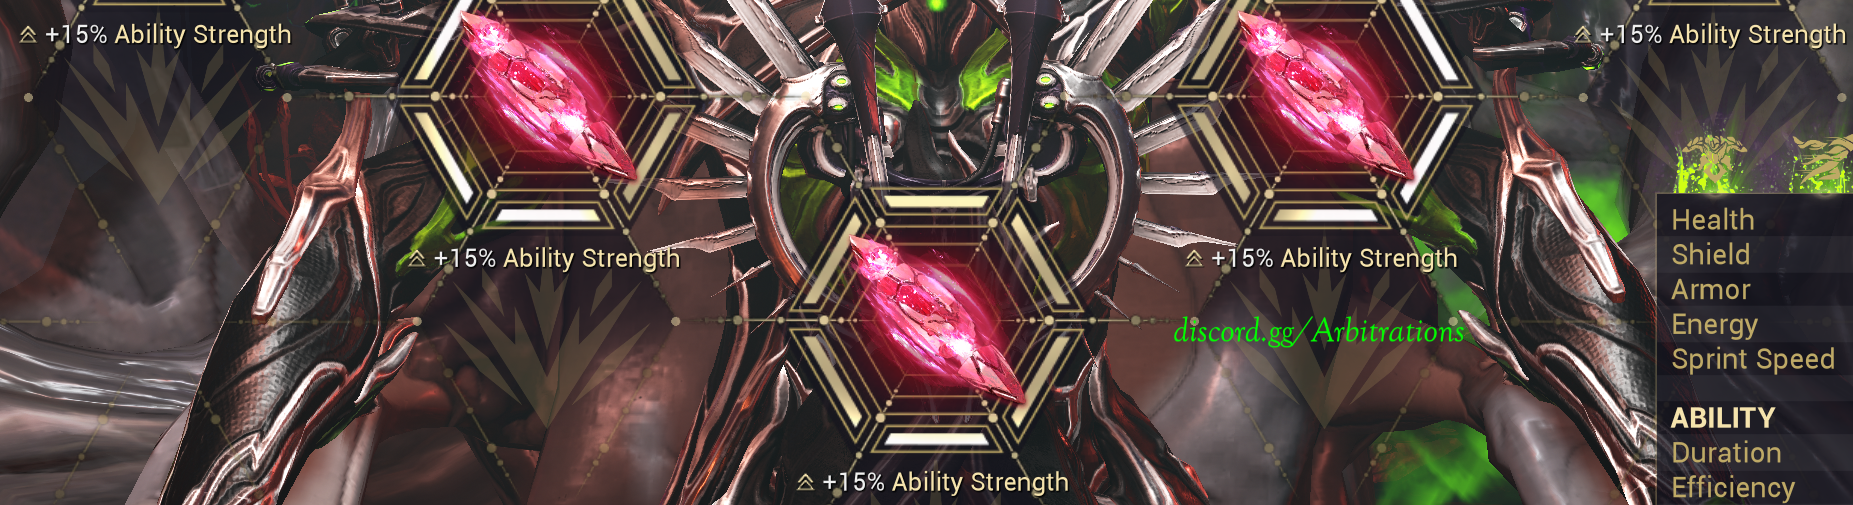
Jade
🔻Place Zenurik’s hardened wellspring, drop a shroom and shoot it with Arbucep archgun to double the strength of 100% to 200% from BB. Finally, cast your 2 with the default “Power of the Seven” pictured below. Wait for wisp to finish motes, then leave and rejoin on your primary role. Her 2nd ability gives strength to allies within affinity range up to 150% strength maximum. Subsume over 4th.
- Bright Bonnet ☆ (BB) subsume gives strength and energy.
*For both pre-buffing loadouts it's a good idea to run Sahasa Kubrow with its Dig augment, in order to make proccing Energy Conversion easier for wisp and potentially nidus.
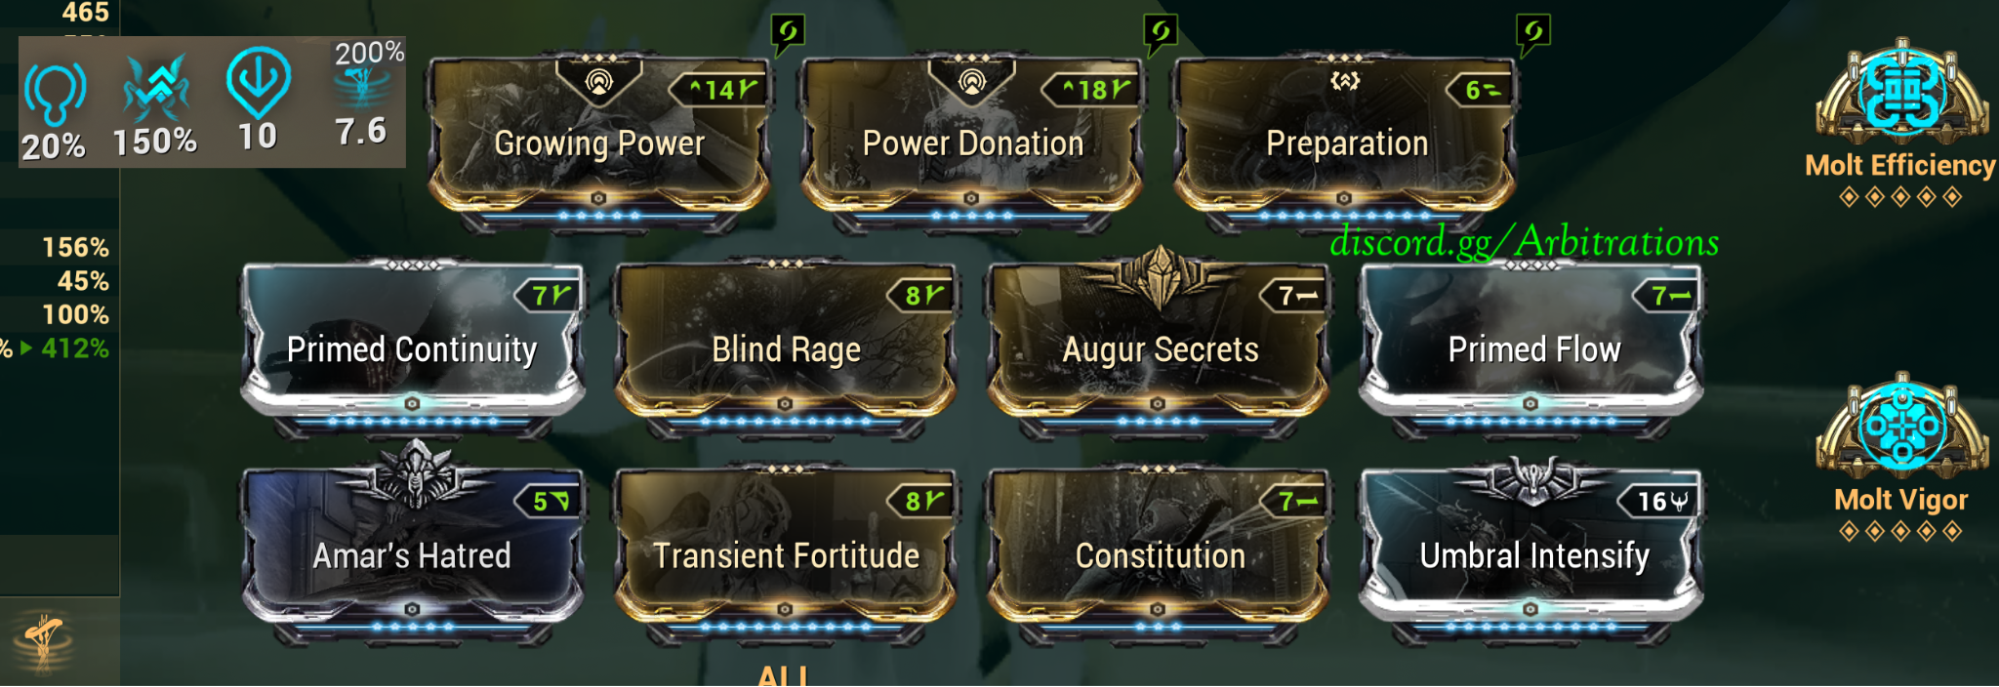
Nidus Prime
🔻As of Jade Update 43: Jade Shadows: Constellations, stack cost from Nidus link has been removed which allows him to be used easily as a prebuffer to reach over 700% haste motes. Nidus prebuff is generally done by client cyte.
- Join as Nidus.
- Cast Brightbonnet and use Arbucep to buff it to 200%
- Wait for Jade 150% power of seven
- Double sling to proc Madurai 40% and cast operator ability to proc Vigor 45%
- Link to the Wisp and stay close so the link doesn’t break
- Wisp places their motes
- Leave the mission, swap loadout to your actual role and rejoin
Make sure Wisp knows NOT to have their own nidus specter summoned, their specter's tether will cancel yours. Also worth mentioning that you would not benefit from a nidus specter yourself, it would remove your specter’s tether once you cast tether, plus it could cancel your tether early as well.
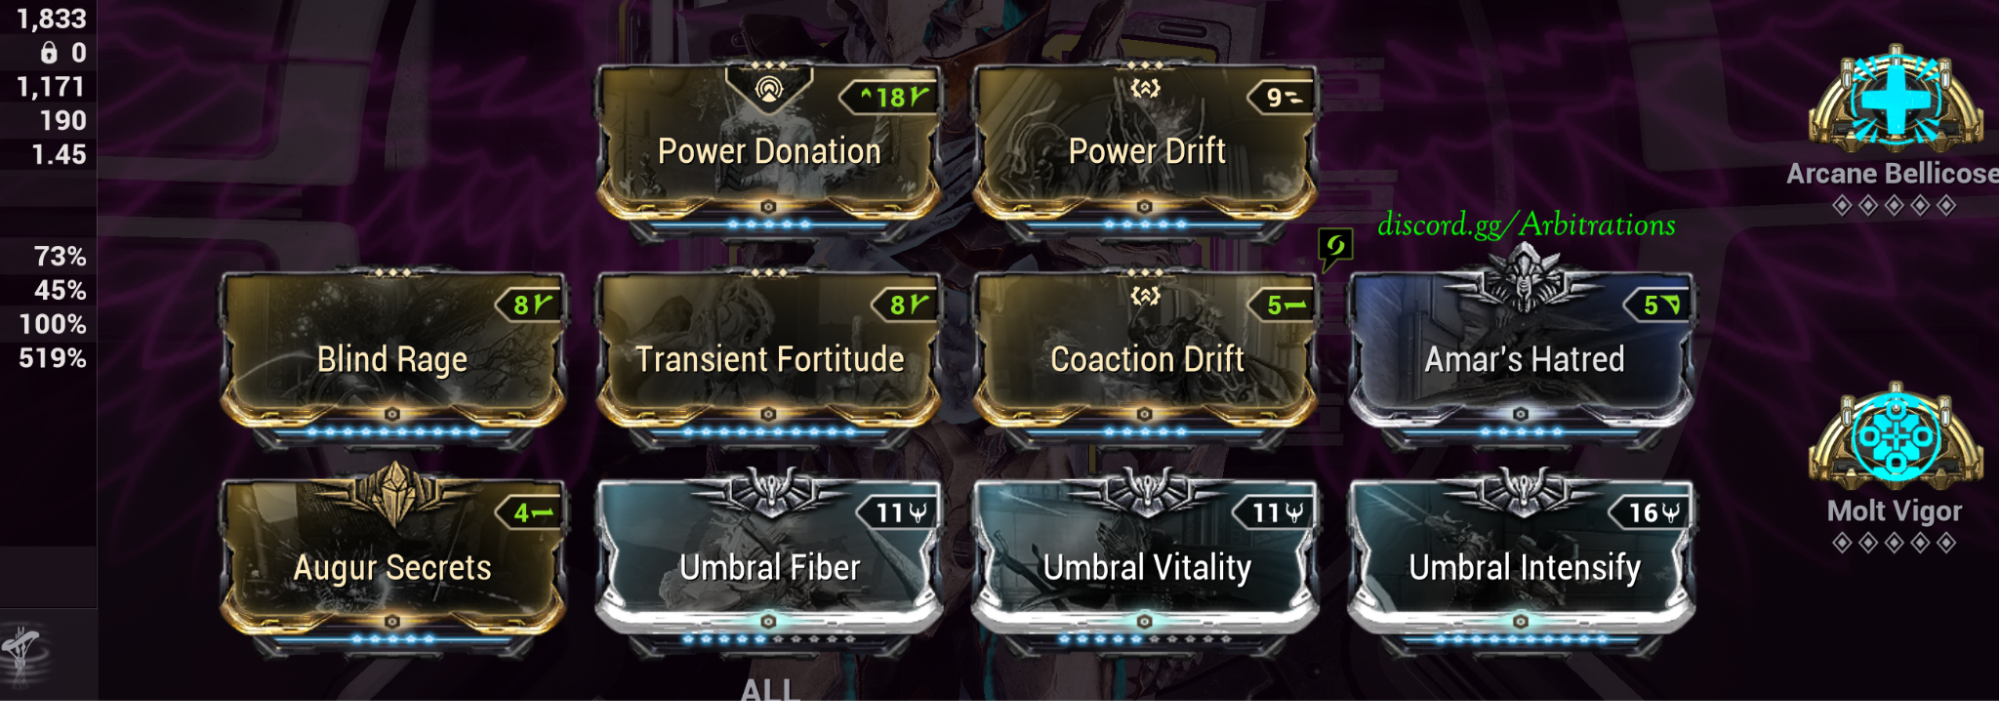
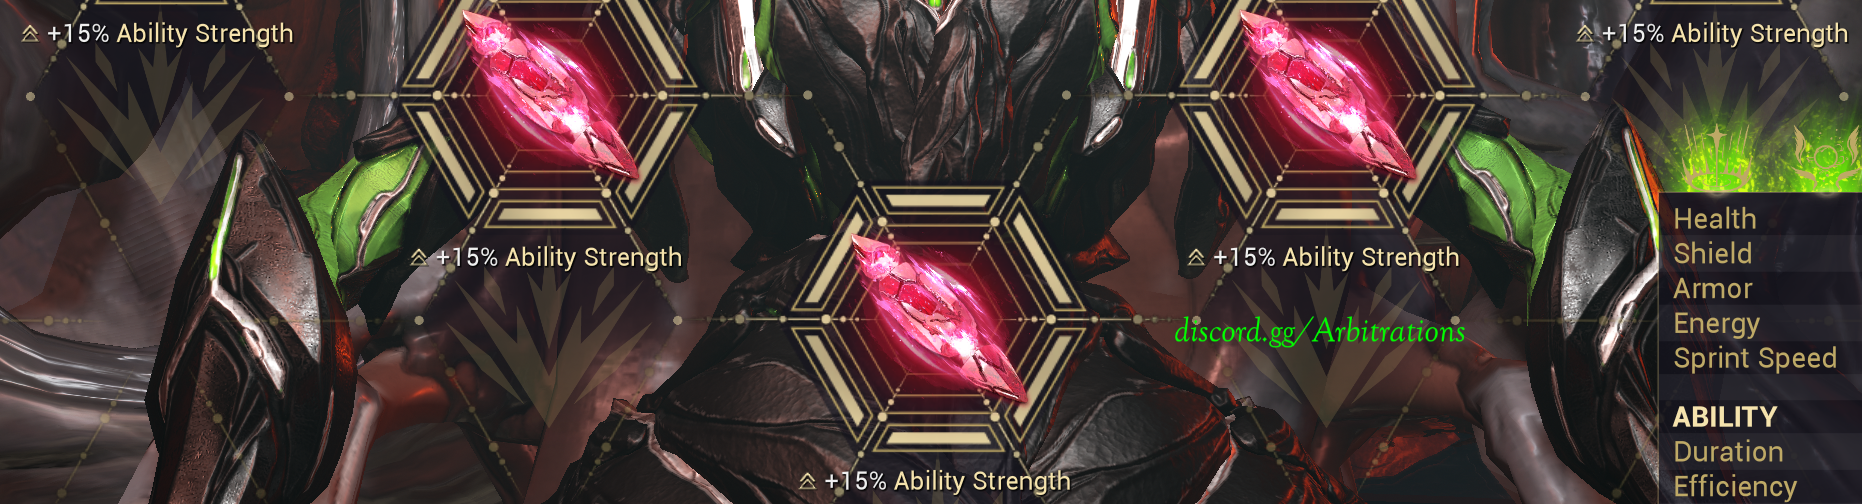
*Umbral fiber and vitality can be any rank. They are only used to buff Umbral Intensify
Miscellaneous
Knockdown Resist
🔻As of update 35: Whispers in the wall, Upon using an Archgun Deployer, players will now gain 2,000 Overguard, which prevents knockdowns. Eliminating the need for Primed Sure Footed. This can be easily depleted by allies getting electric proc’d from the rail on Cinxia/Casta/Seimeni tile for example, so you may have to reactivate it occasionally.
- The effect from the archgun deployer has a 60s cooldown.
- The Overguard gain is capped at 2,000, so re-deploying your Archgun after the cooldown resets will refresh your Overguard up to the 2,000 cap.
Be aware that past wave 80 or so, the 2000 overguard will vanish with 1 bullet, you’ll get 1 second of overguard gate, and then you'll be susceptible to knockdown again as well as potentially still taking damage.
Gear Items
🔻Everybody should obviously have Resource booster if you’re gonna be farmin any kind of resource. Next is Resource Drop Chance Booster, as long as one person in the squad has this, it should be fine. But, it’s best if the host has it just to be sure it gets applied. 30 day Boosters can be purchased from the Market for 200 platinum. Finally, there is Resource Drop Chance Blessing, which MR30+ players can bestow at relays once per 24 hours. Blessings last 3 hours. You have to leave the relay, or navigate to another relay after receiving the blessing in order for it to apply. If the whole squad doesn’t have bless, It is best if at least both of the DPS players have Drop Chance Blessing. You preferably do NOT want Mod Drop Chance Booster in the squad, due to it making vitus despawn faster.

- Large squad ammo restores pulse every 7.5 seconds for a total of 4 times, totalling 30 seconds. Will restore 3 ammo for Kuva Ogris per pulse. You can purchase the 100x crafting blueprint from clan dojo, but don’t forget to slap them on your gearwheel.
- Large squad shield restores pulse every 7.5 seconds for a total of 4 times, totalling 30 seconds. Will grant 300 shields/overshields to allies, including companions. You need to use these to trigger reinforced bond as a client. For host, the bond mod works fine.
- Atomicycle Summon for holding open doors in order to allow for easier spawn access or to prevent enemies from getting stuck. Also sometimes used for anchoring.
- Med Tower air support from Mantis landing craft, similar to Sentry Gun (but taller), used as an elevated platform to shoot from. Lasts 20 minutes and cannot be destroyed. These can be harder to place, as they don’t always land where you try to place them. Landing craft air supports have a 10 minute cooldown (5 minutes with Engineering Intrinsics rank 2).
- Railjack on-call crew can help if you start to get overwhelmed. Zarr is the go to for OCC due to AI only having to reload one shell for full 5 magazine and good AOE damage. (You should be checking Ticker in Fortuna’s shop after each daily reset looking for elite crewmembers with 0 points in pilot and gunnery that have the +150% Crit chance for Rifles. These are sought after for profit taker as well, and it can take a very long time to encounter such a crewmate as only 2 or 3 appear randomly each day.)
☆ Specters ☆
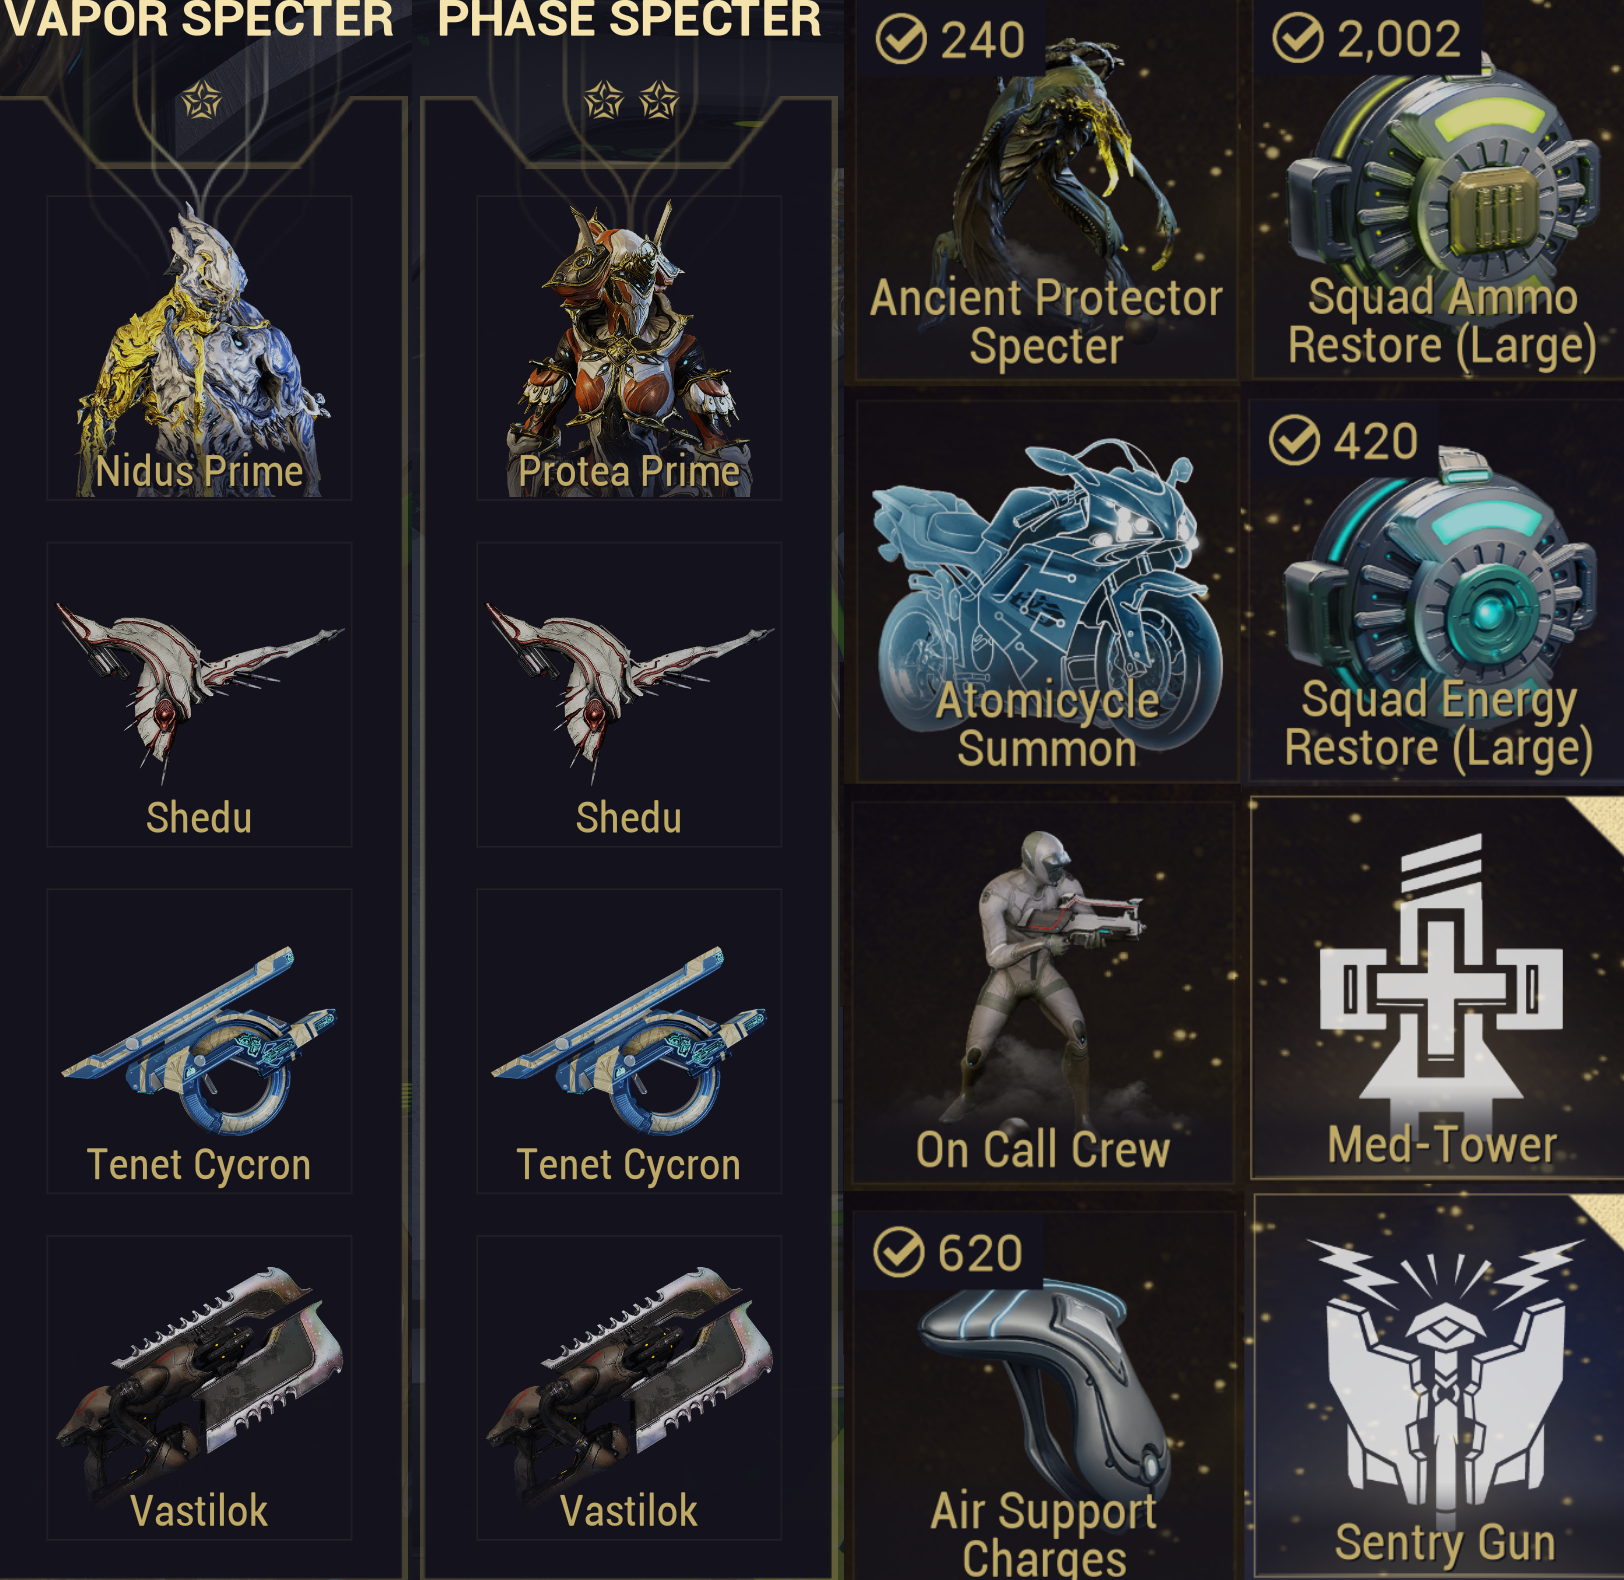
🔻Warframe specters and their weapons DO NOT copy the installed mods or appearances (On-call crew does copy weapon’s mods, but not rivens). Star level affects specter spawn level, but that's not important. Just use 1 star for Nidus because you get 10 specters per craft, and 5 per craft on 2 stars. The blueprints can be farmed quickly via low level rescue missions, I recommend Nuovo on Ceres.
- Nidus specter ☆ will tether to you granting 1.28x strength bonus frequently. Nidus passive gives him 15% strength and with 4 power donations his tether becomes 1.58x. Generally, all four players will run nidus specter.
- Protea specter casts dispensary when the player is below 70% energy/health or 70% ammo on primary or secondary (reserves). Lasts 25 seconds with a cooldown of 40 seconds after casting. With 4 power donations her base 25% at extra ammo drop will become 55% chance at 2 ammo drops. Have the Protea hold position near the camp location, so they don’t follow you and drop dispensary away from the team.
- Dante Specter, NEVER use these during defense missions. Defense operative cannot be vazarin dashed when he has overguard for some reason. This can lead to failed runs.
It is important that you equip “innate” battery style primary and secondary weapons when building your warframe specters loadout. Kitguns with pax charge do NOT count, specters do not copy mods or arcanes. Grimoire does work for this but it makes a lot of visual effects and noise that people dislike. Plinx blueprint can be bought from the market for 20k credits. Giving specters “innate” battery weapons prevents them from stealing your ammo drops as well as the constant reload sound bug when specter is out of ammo and you’re full. Ammo drops are player independent, but specters cause you to pickup even when full, deleting ammo. Give them a short range melee such as Vastilok or Furax so they shoot instead of trying to melee. Aside from these factors it doesn’t much matter what you put on them for arbi, they aren’t doing much killing. Recommended specter weapons in order of which is best fit for arbi:
- Primary: Shedu, Bubonico, Nataruk, Basmu, Fulmin, Flux Rifle (NOT tenet)
- Secondary: Tenet Cycron, Cycron, Tenet Plinx, Plinx
- Melee: Vastilok, Furax, Ankyros, Obex, Kogake, Tekko, Hirudo
Keep in mind when specters are summoned they copy your currently equipped warframes level, so if you just forma'd your warframe, the specter will be level 0 as well, and tether will be minimum rank only giving 1.1x multiplier at base. you should summon another one once your frame reaches 30.
Old gen console players (ps4) can crash if you throw your specters straight downwards, so throw them straight up in the air if you have an old gen player on your squad.
Loot Despawning
🔻 From what I could find, the hard cap is 50, the 51st deleting the 1st and so on. Since the squad’s KPM is so high, the 5 minute despawn timer on Vitus essence doesn’t even matter at this point, as it can easily be removed when the 50 total drop capacity rounds over. Depending on your squads KPM and various other factors like Mod Drop Chance Booster on top of drop chance boosters and blessing on the team you may want to increase the frequency at which you collect drops. Typically you’d see the icon blinking on screen to indicate it’s about to despawn, but when it gets removed earlier like this there is no visual indicator. If you start to notice vitus despawning, increase the frequency at which you collect. This can happen on a few of the defense tiles, namely Akkad and Kala-Azar.
https://www.reddit.com/r/Warframe/comments/2r5x0f/resource_drop_limit/
https://forums.warframe.com/topic/164093-update-1170-1171/
Tilesets
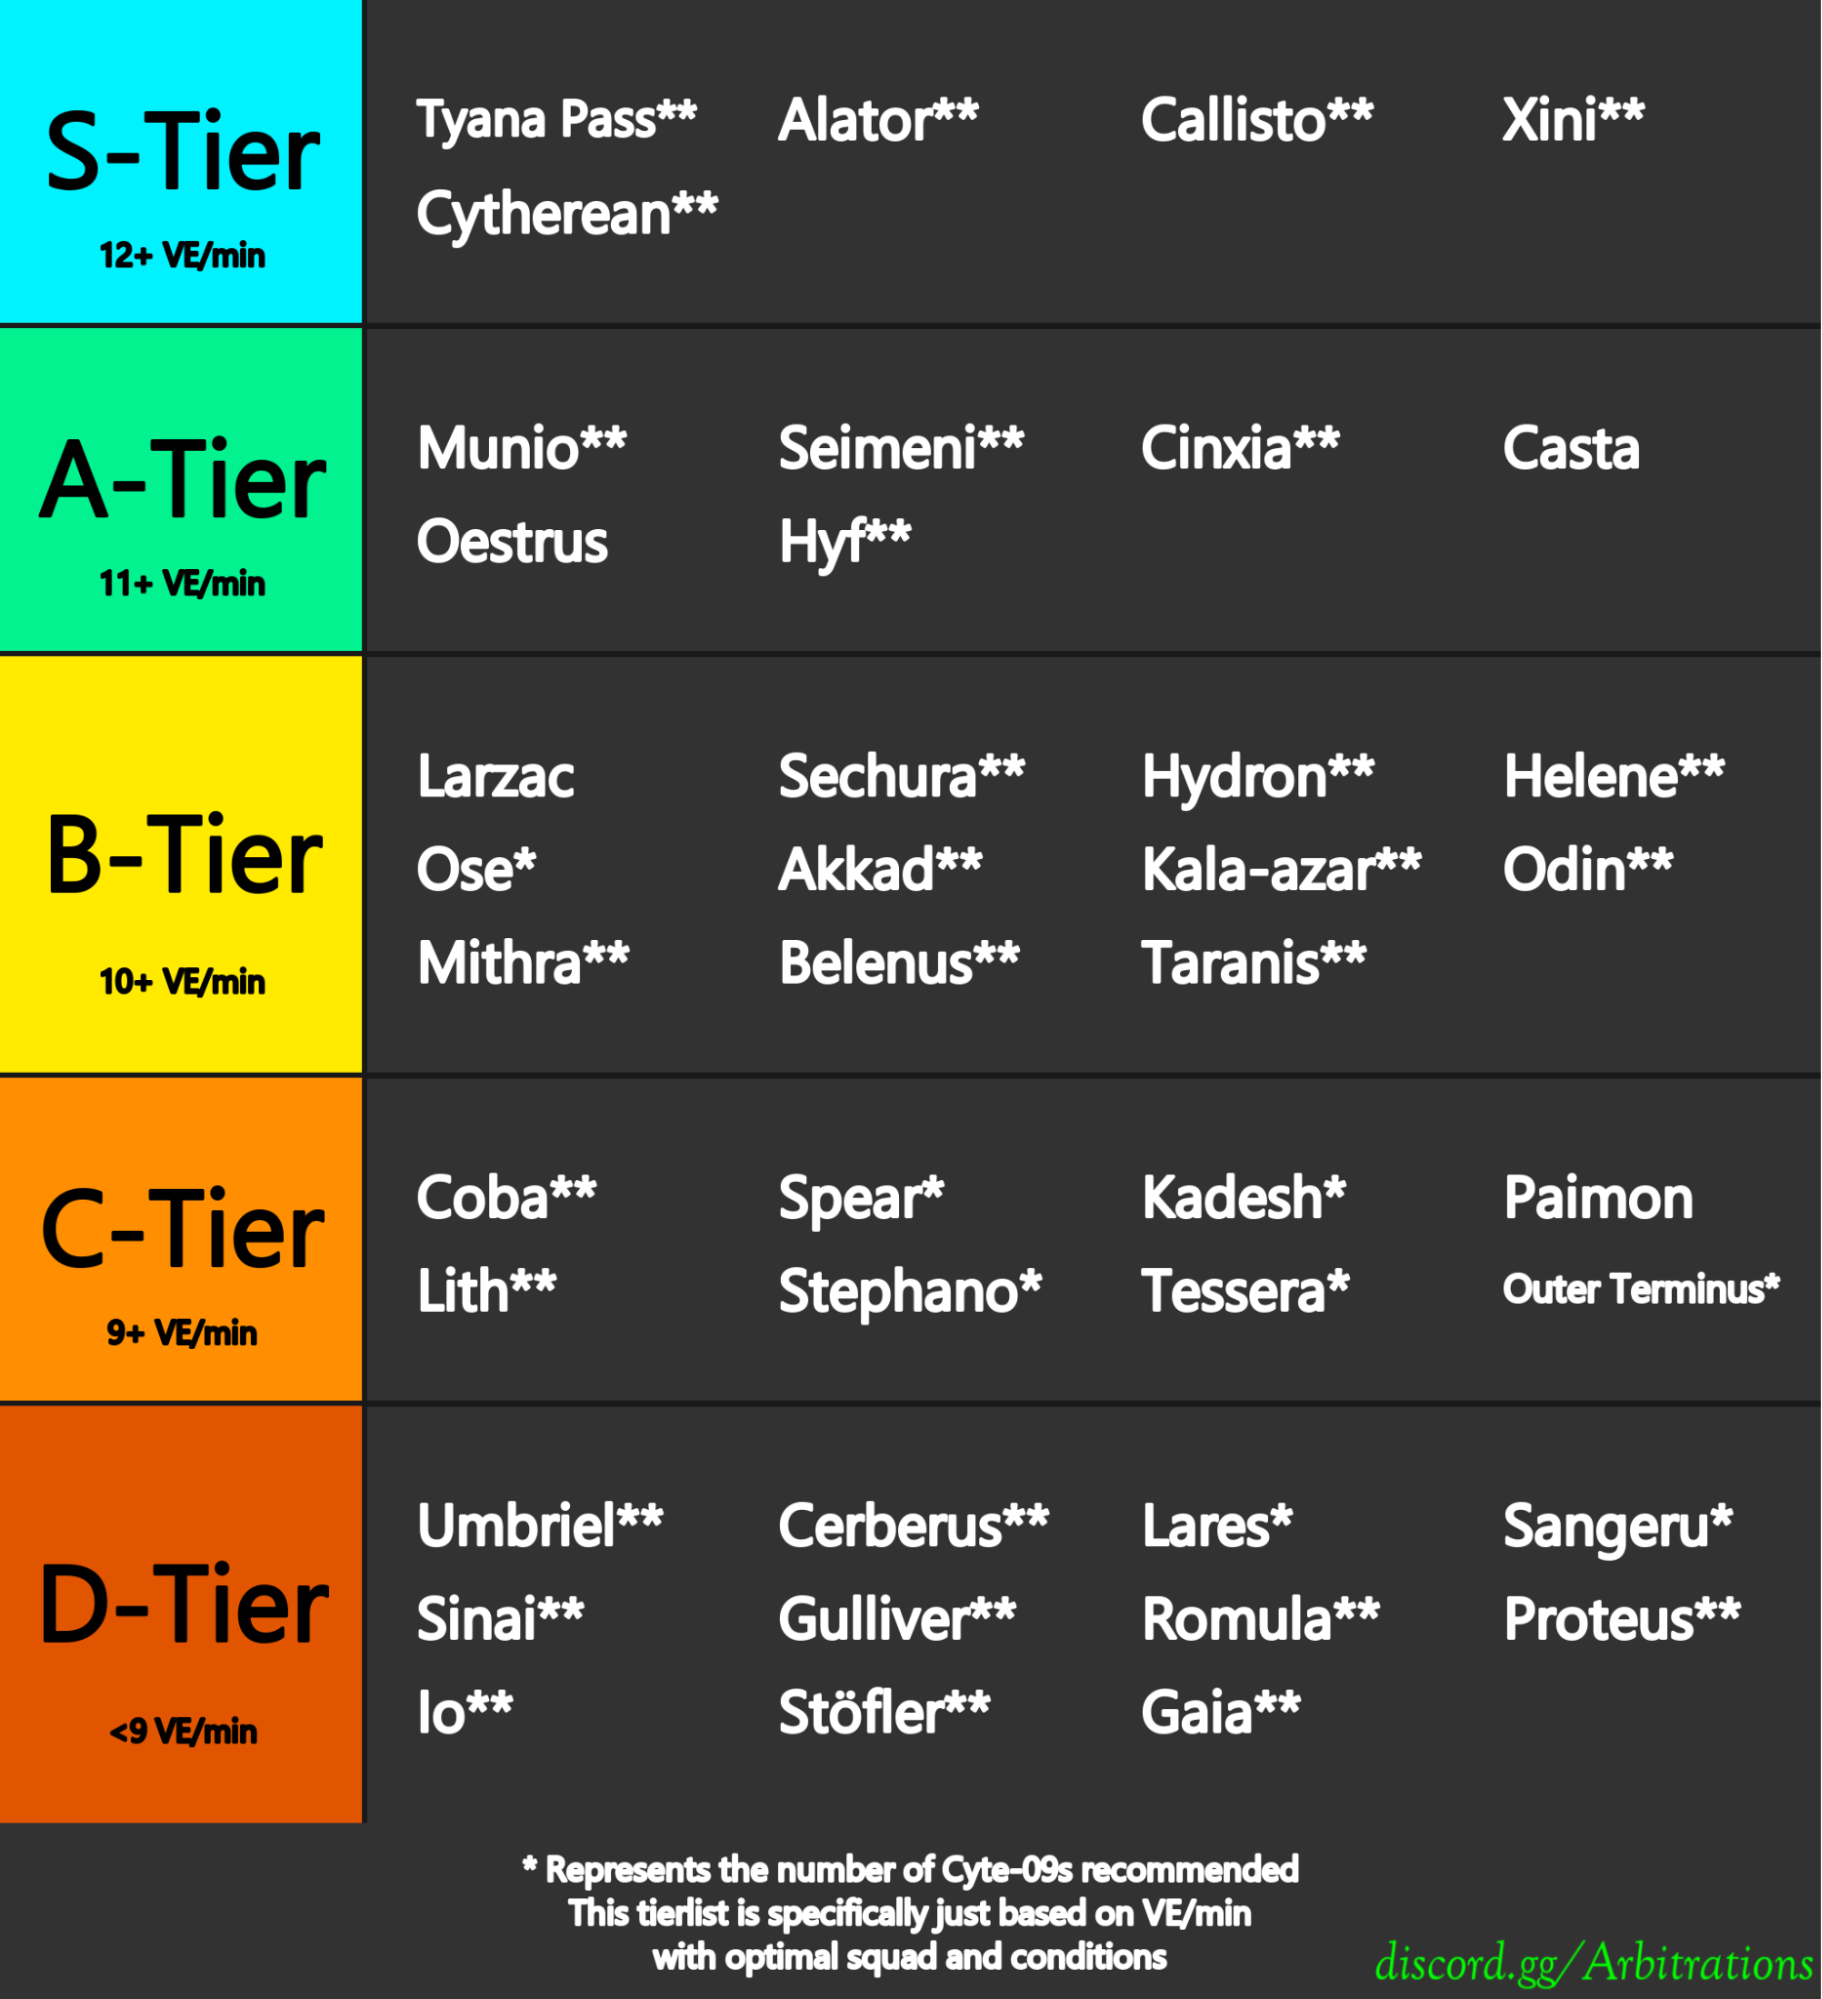
🔻No matter the tileset, defense or interception arbitrations are much better kuva/hr than Kuva survival on Taveuni which caps out at about 70k/hr, even a bad arbi map with randos can net you 300 vitus essence in an hour or 120k Kuva. F-Tier maps are not listed (ie NON defense/mirror/interception maps), because they are abysmal vitus/run, mostly due to bad spawns, or large tilesets that are way too spread out to be efficient on.
The interception and Mirror defense missions far outclass the defense style missions due there being no hard set number of spawns per wave like defense has. This is with optimal squad and conditions. It does not take into consideration tile size, number of spawns, spawn frequency, ease of looting or accessibility. Strictly vitus essence per minute.
When organizing a squad make sure to set the party to friends only, so that if someone disconnects from the group, a rando doesn't pop in. Any squad member can then re-invite and they should be able to reconnect as long as it's before wave 3, if they get an error message have everybody reset. (invite only mode only allows host to send invites)
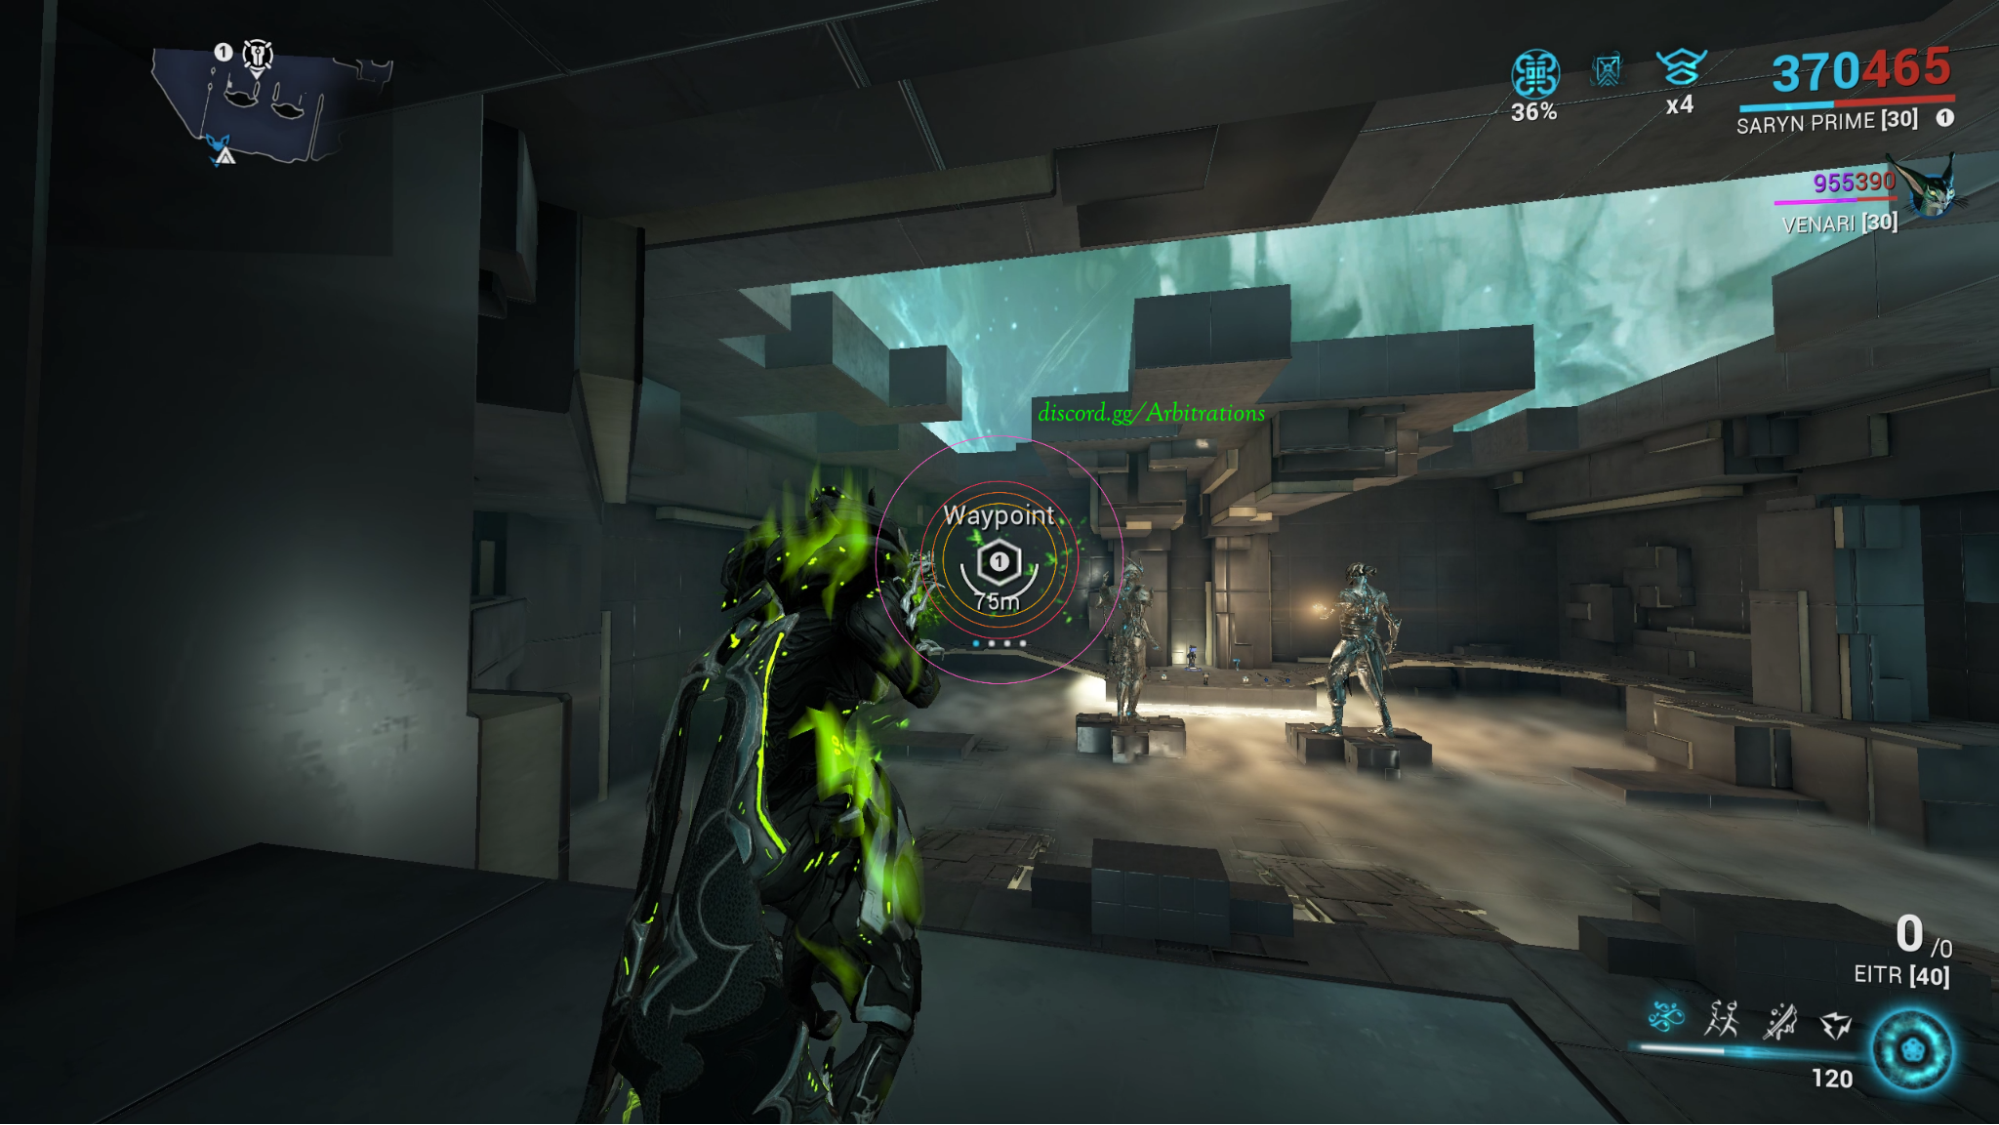
Efficient Movement
🔻Here is an example of spawn killing and using bullet jump, rolls and ground slams to go fast. After launching yourself into the atmosphere you can aim down sights with right click to slow down slightly while you aim where you’d like to land with ground slam.
Defense operative tends to follow a random player and can be 1 shot easily past 90w. So to avoid this, Collect vitus near the end of the waves and try to maintain high KPM and spawn kill enemies.
Anchoring fixes this issue, click to read more on that.
Interception Arbitrations
🔻Capture 2 of the easily maintainable points and half capture a 3rd point up to about 40% and let the enemies re-capture it to allow you to stay 2-3% ahead of the enemies. Points capture faster with 2 people, so when each round starts send 2 players to each of the 2 full capture points. The sooner the 2 points are captured the sooner enemies will spawn in. Designate a person on the team to manage the half capping of the 3rd point, I recommend they do it immediately after the primary 2 points are captured while the other 3 players get to camp spot. Less likely to forget if you just do it right away every round. If you notice the designated person didn’t do this either say something to remind them or do it yourself if someone isn’t already doing it.
Defense Arbitrations

Enemy level scales exponentially until wave 96, where enemies are level 1628.
At wave 96 and up enemies scale linearly, increasing in level by 18 per wave. Data sheet.
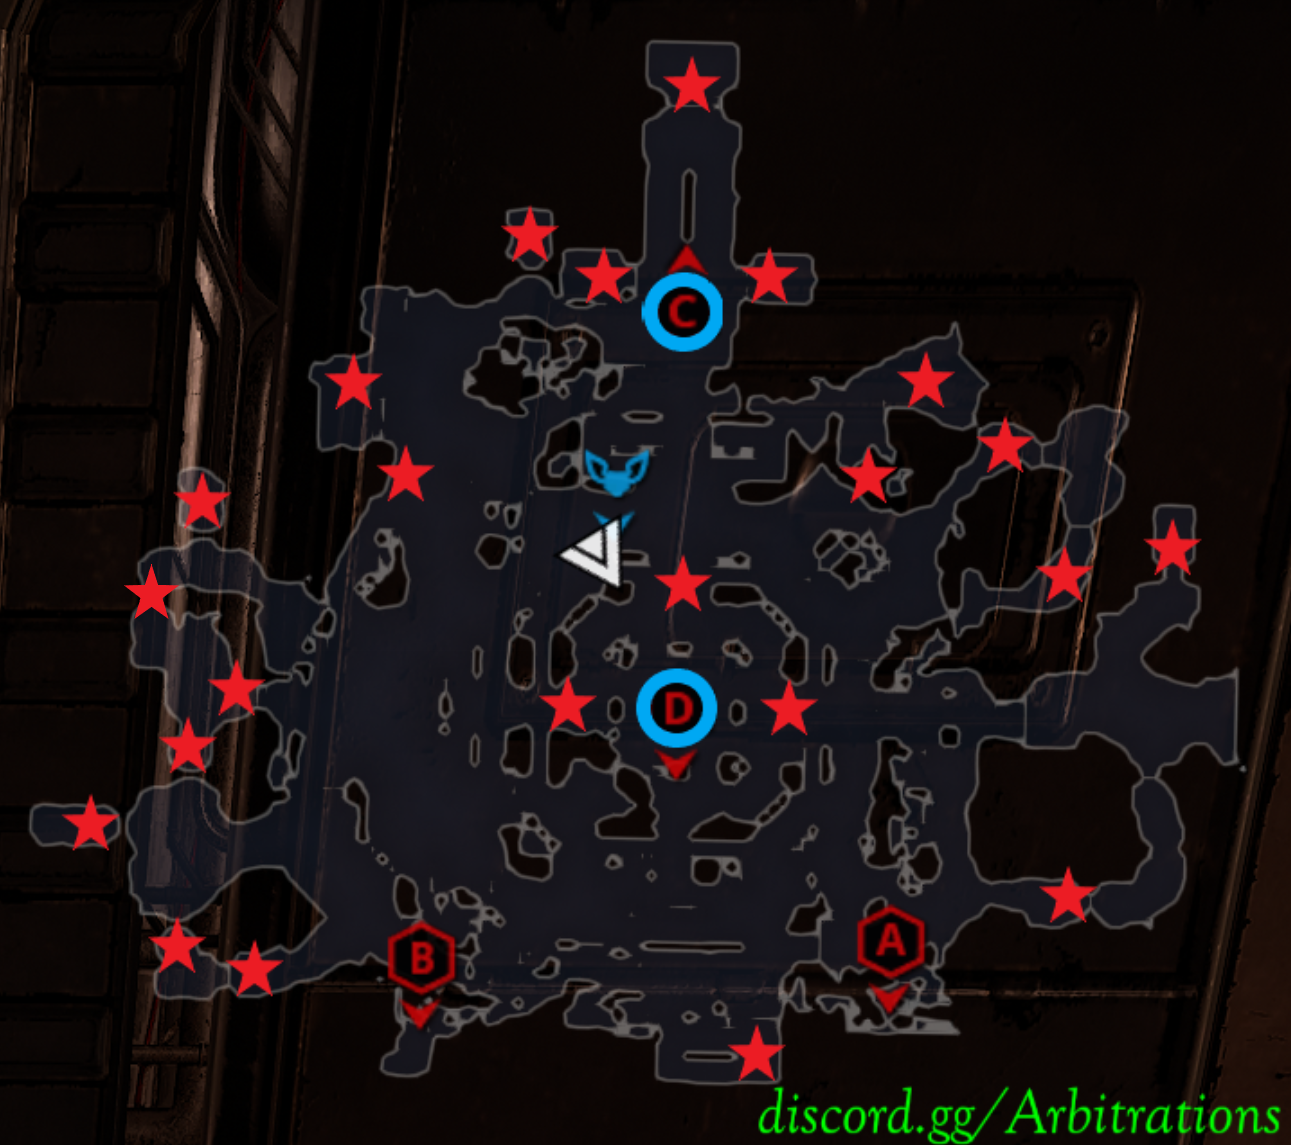
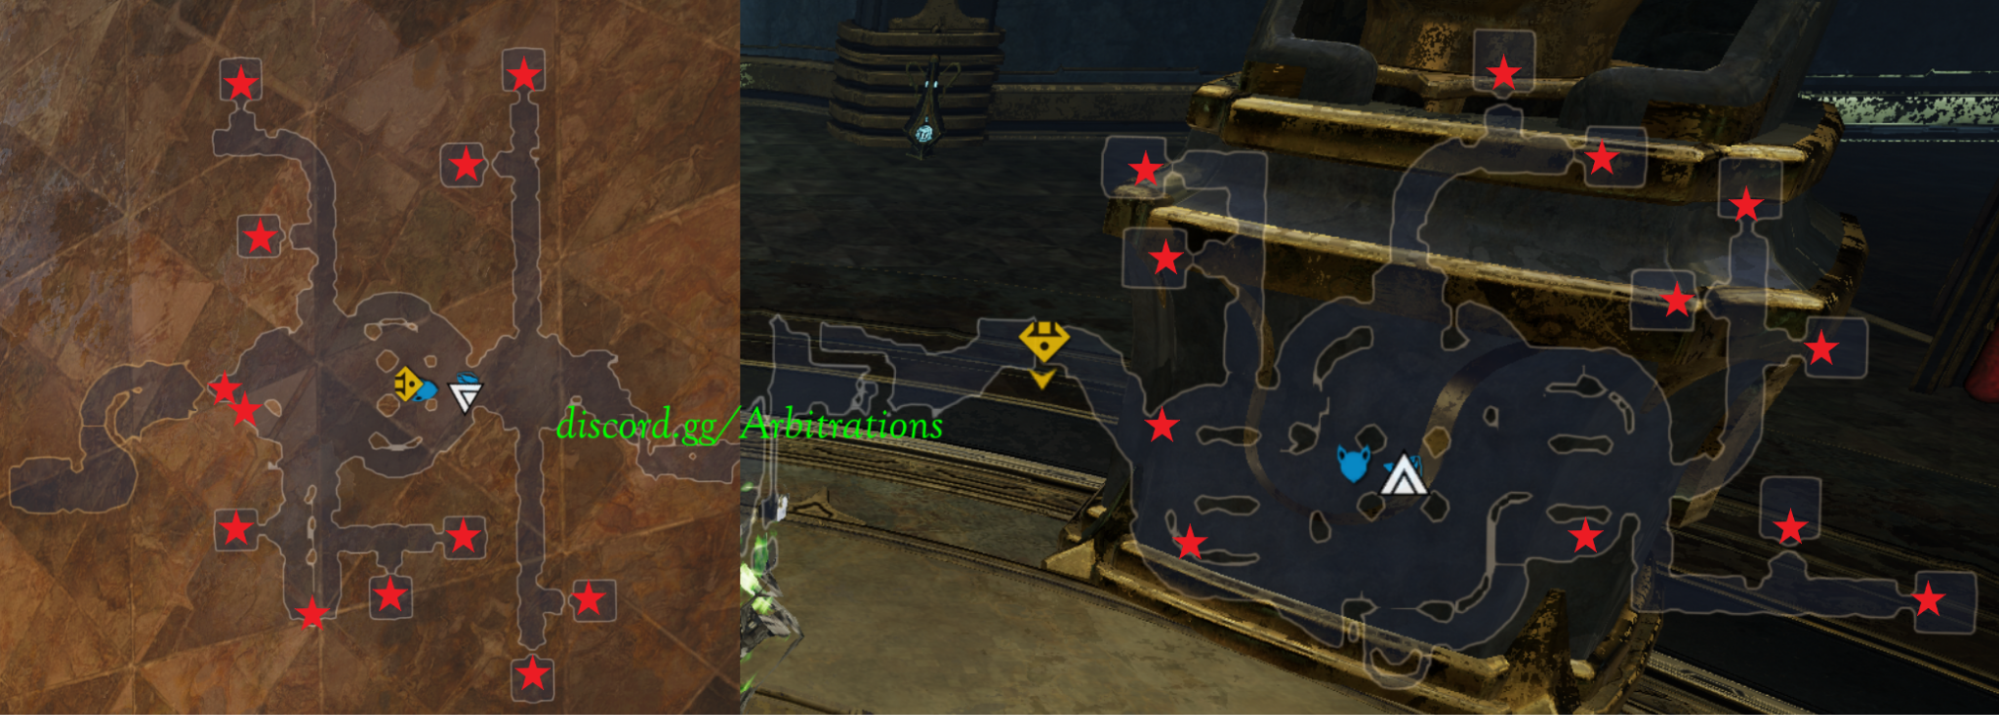
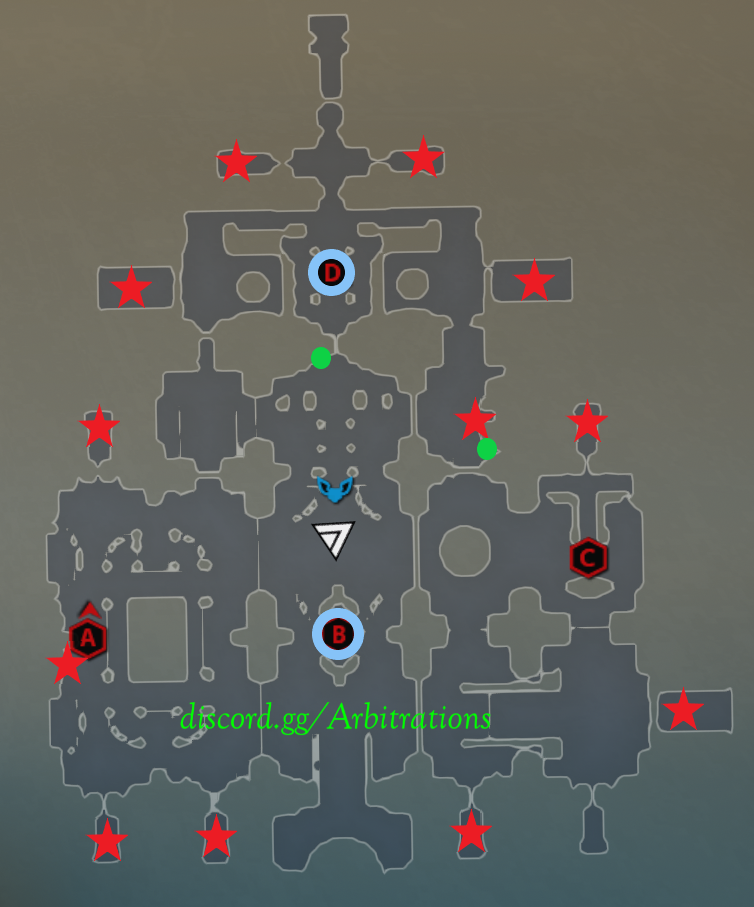
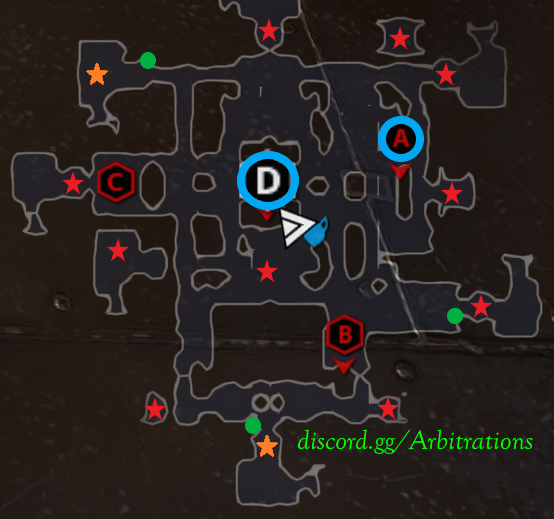
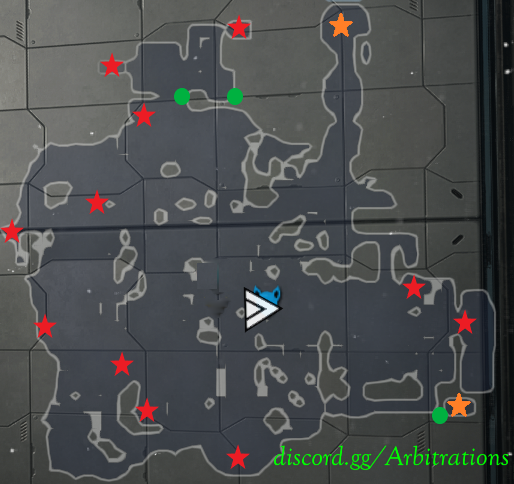
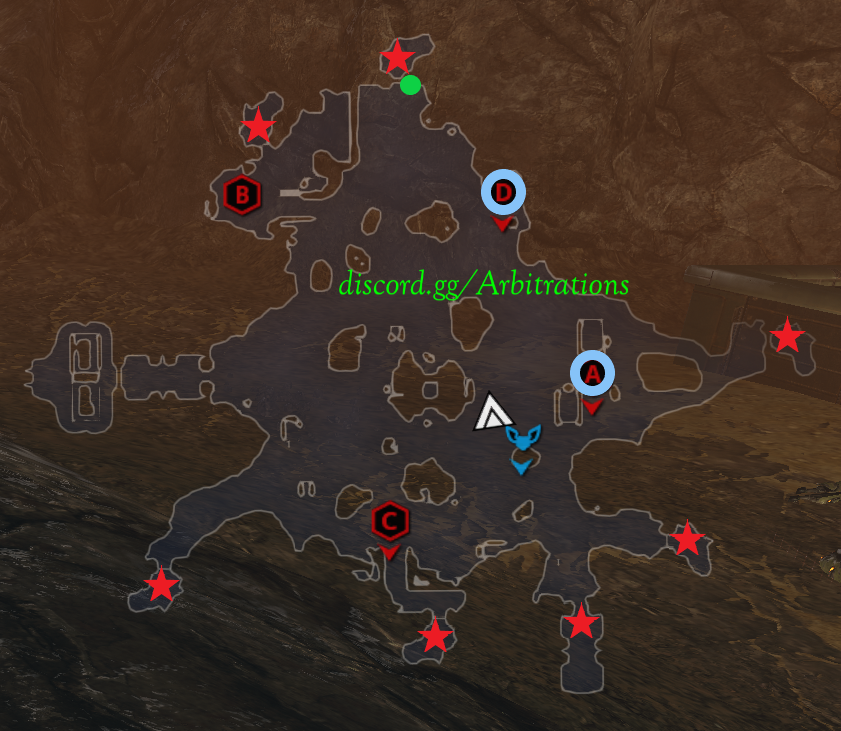
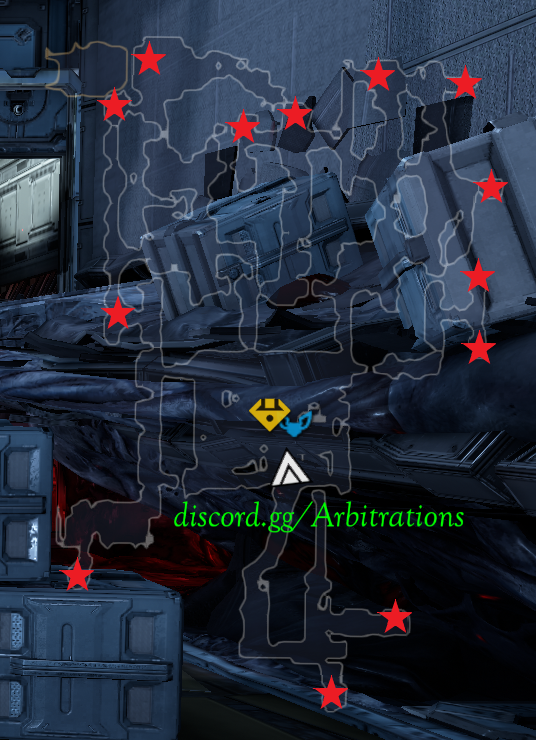
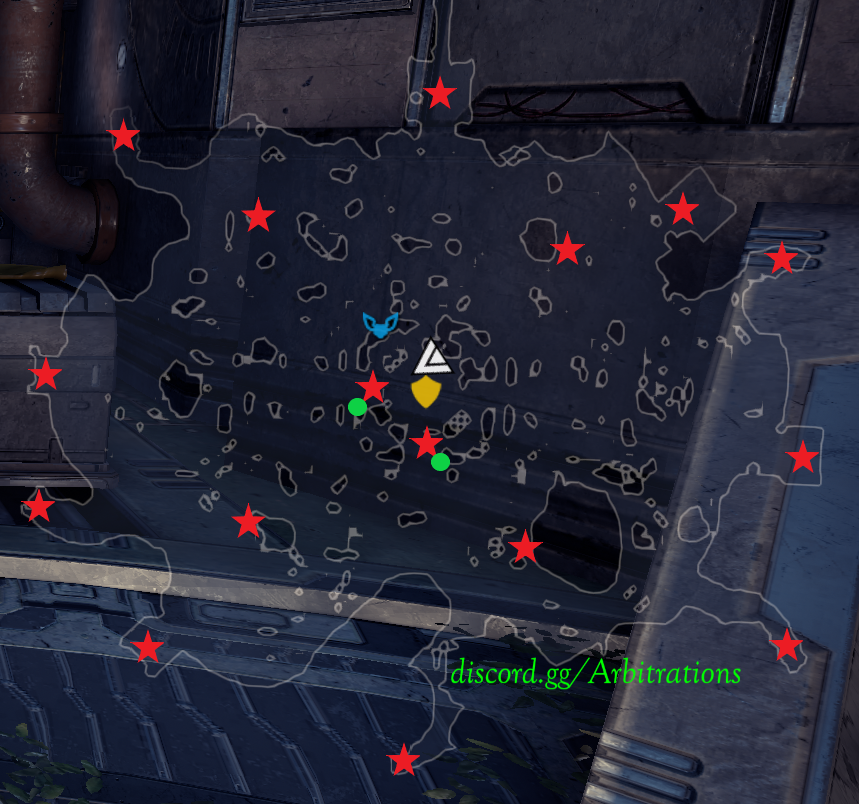
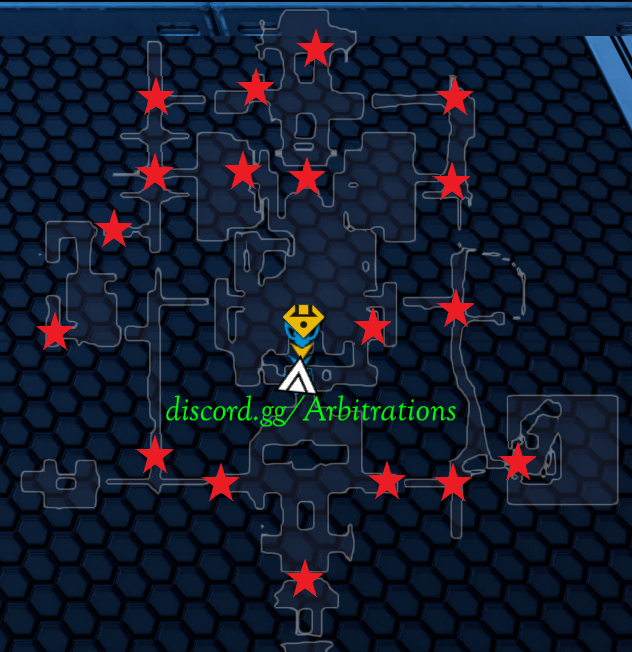
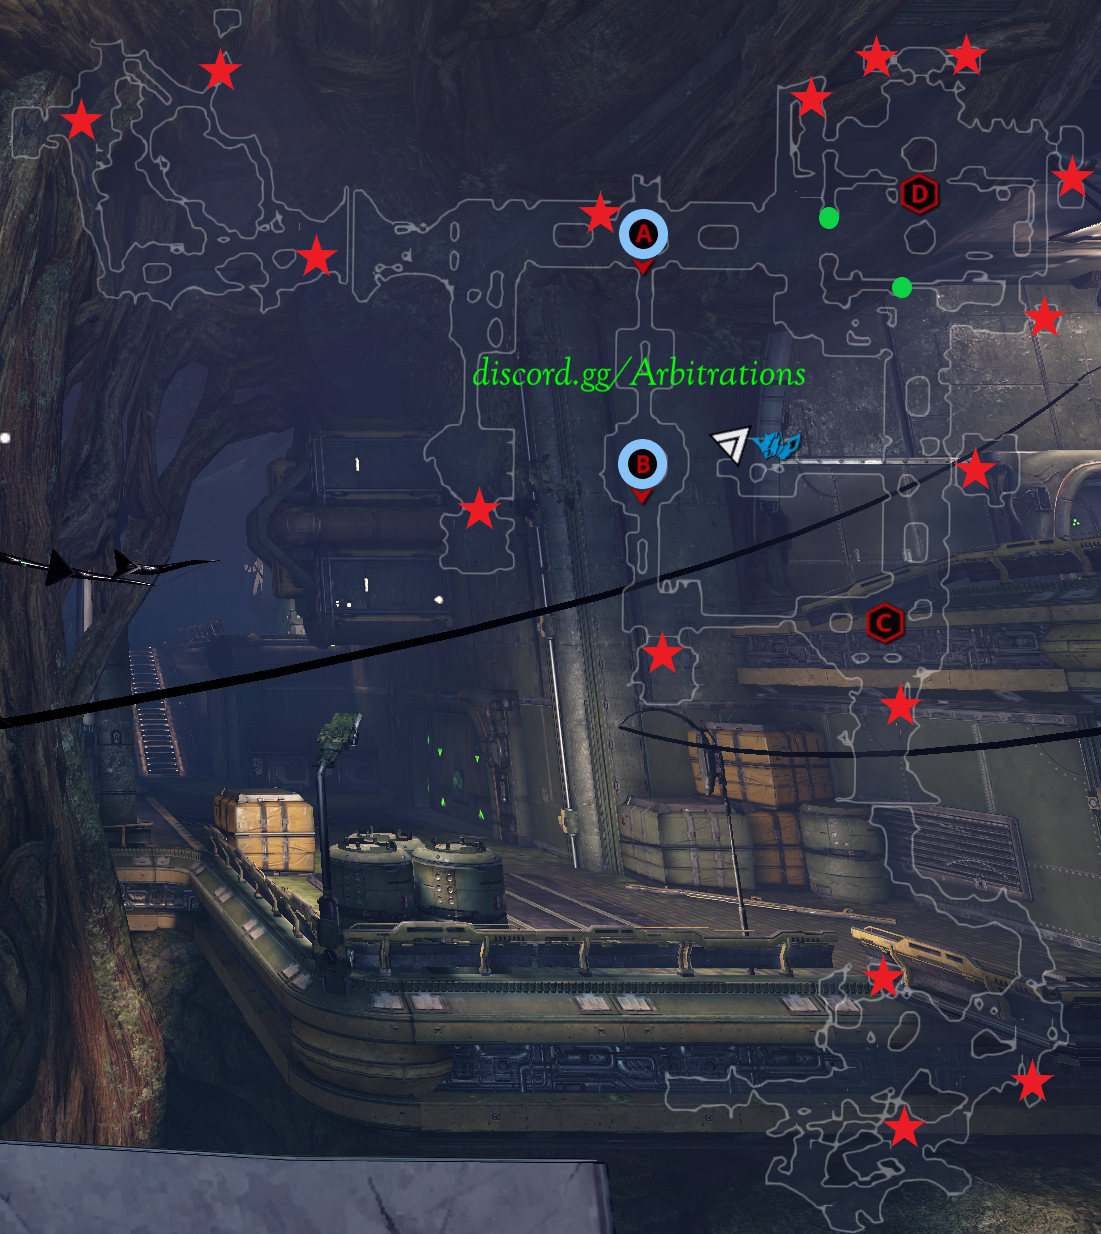
Spawn and Camp positions
🔻To see more video examples of where to aim for spawns check #general in the discord and look at pinned messages. If you’re still confused: shoot the red dots on minimap.
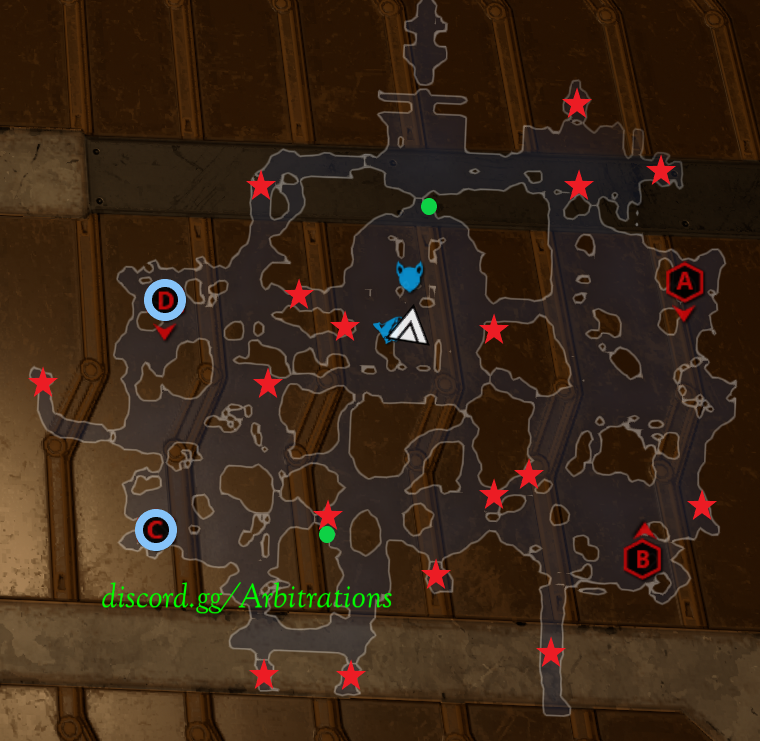
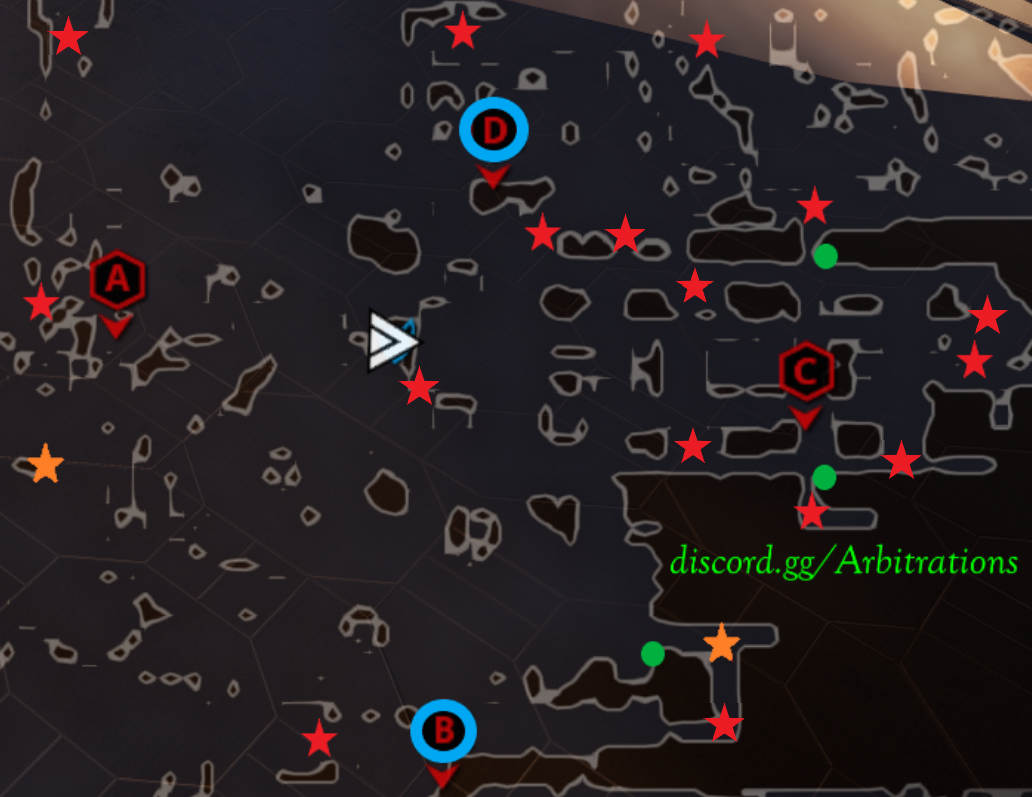
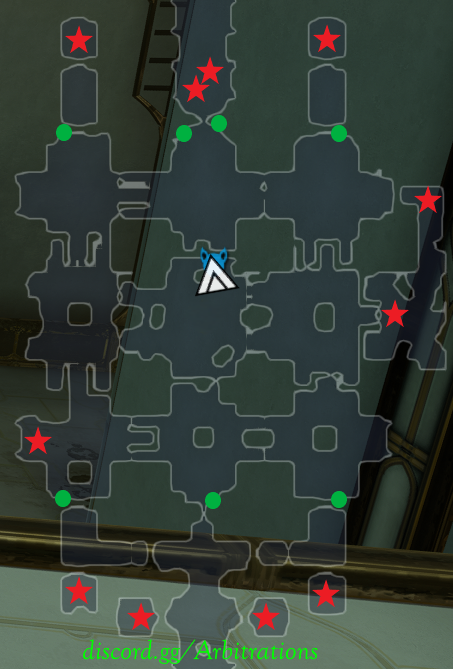
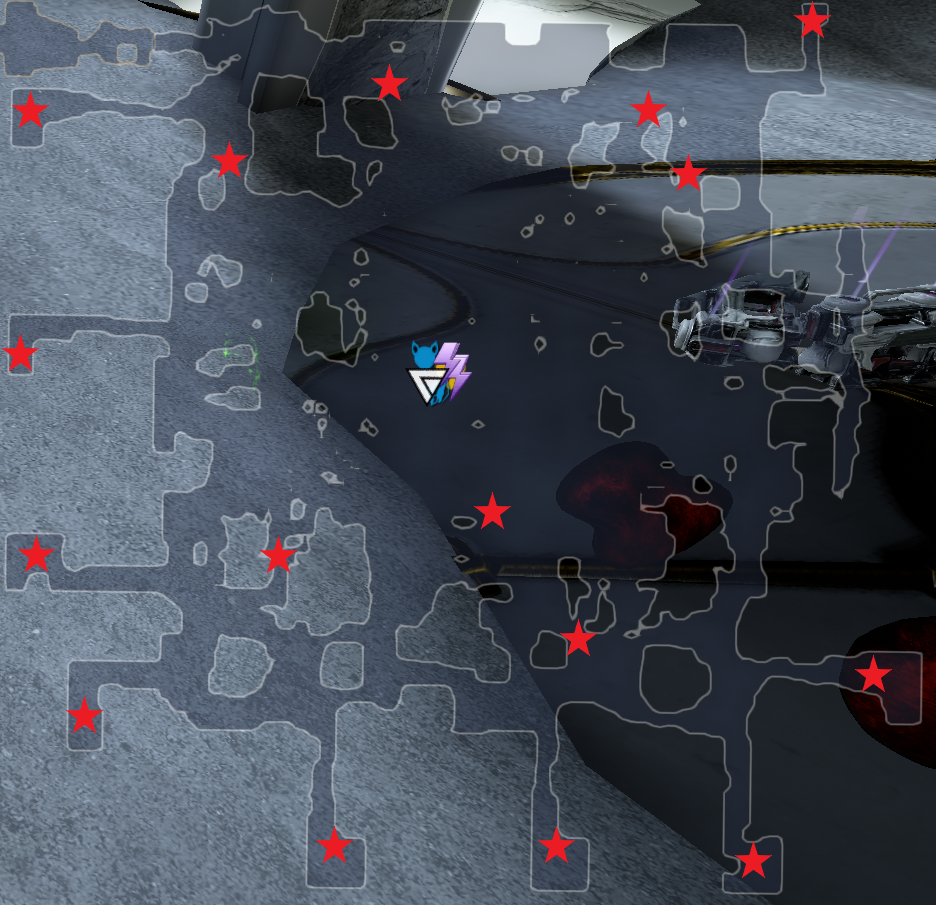
Red star indicates enemy spawn points
Blue circle indicates which interception capture points to utilize for 2 cap.
Green circle indicates atomicycle or ancient healer locations that can be used to hold doors open to either make spawns more accessible or to keep enemies from getting stuck.
Cyte aim points will be added soon for each tileset.
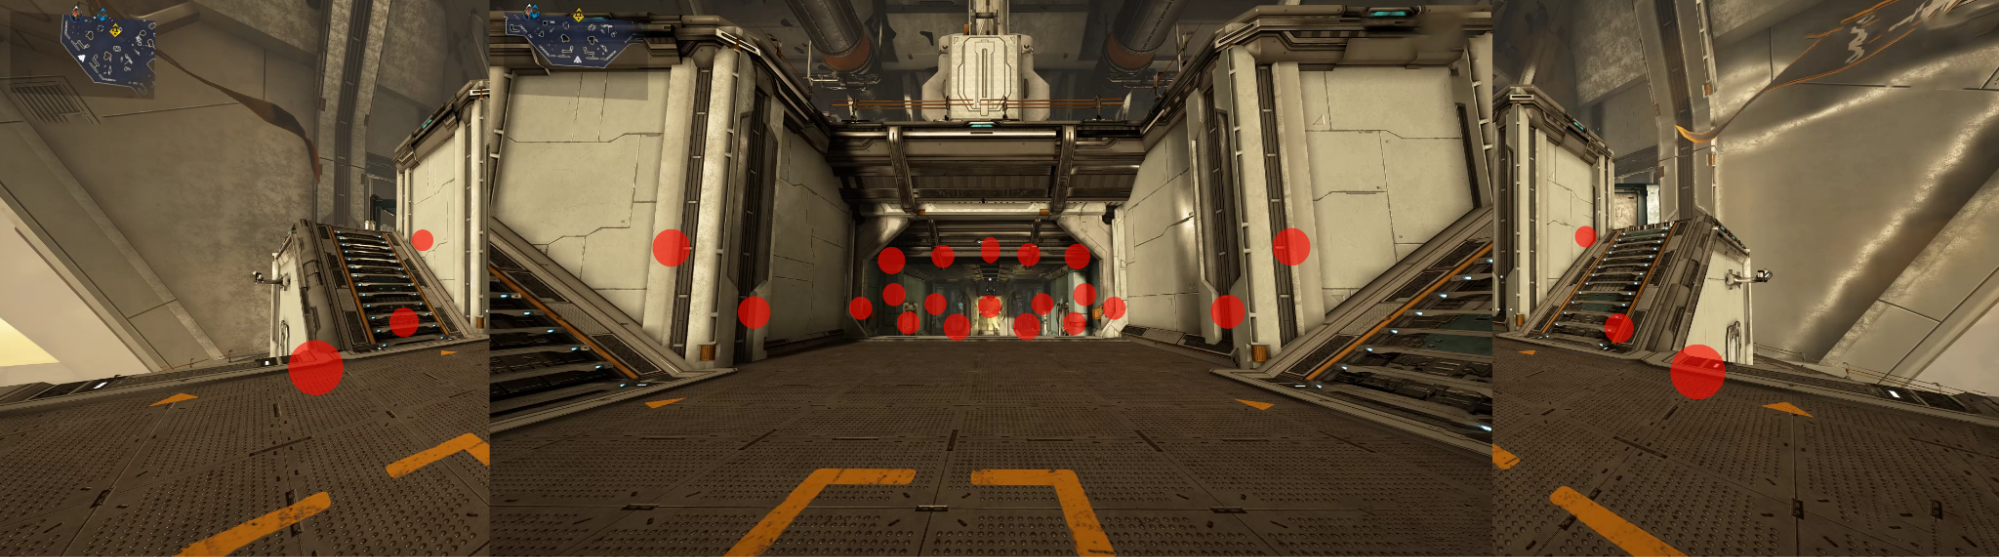
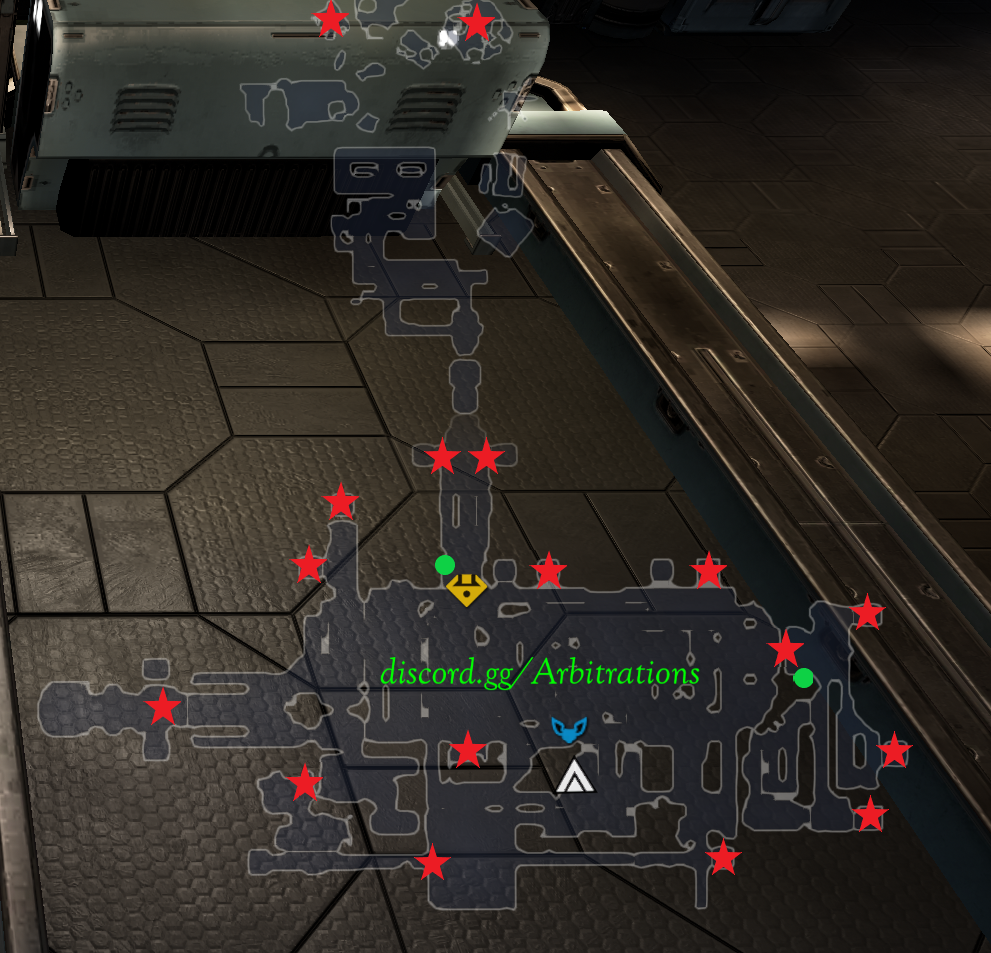
Callisto, Sinai, Io
🔻There are 4 different starting tilesets to roll, look for the two short hallway one depicted below.
- Every time someone loots the starting area past the big door at the top of the stairs, it breaks the rest of the spawns for a noticeable amount of time. So either do NOT loot the void section vitus at all, or only loot if the team all agrees to not loot unless there are 3 or more drops in there.

Umbriel, Stephano
🔻Roll for cave network tile for Umbriel, and the sealab tile for Stephano.
Cytherean, Xini, Gulliver
🔻
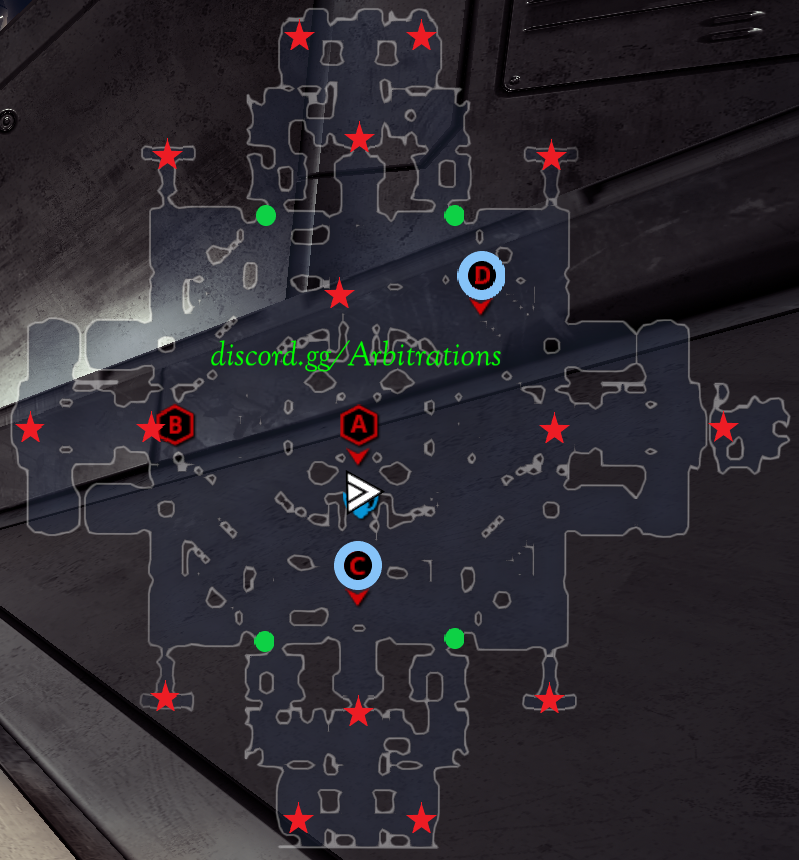
Alator, Kadesh, Spear
🔻https://www.youtube.com/watch?v=2AxLdauS7JY
- More spawns than Cinxia, but majority of them are only reachable via Cyte, supporting dps Saryn will have to be more active and move around to help cover spawns.
- Camp location can be either C or D point, I recommend D point.
- Kadesh and Spear are the defense variants of this tile, Kadesh is infested and more manageable. Spear is grineer and they can overwhelm you very quickly, and defense operative is highly likely to die.
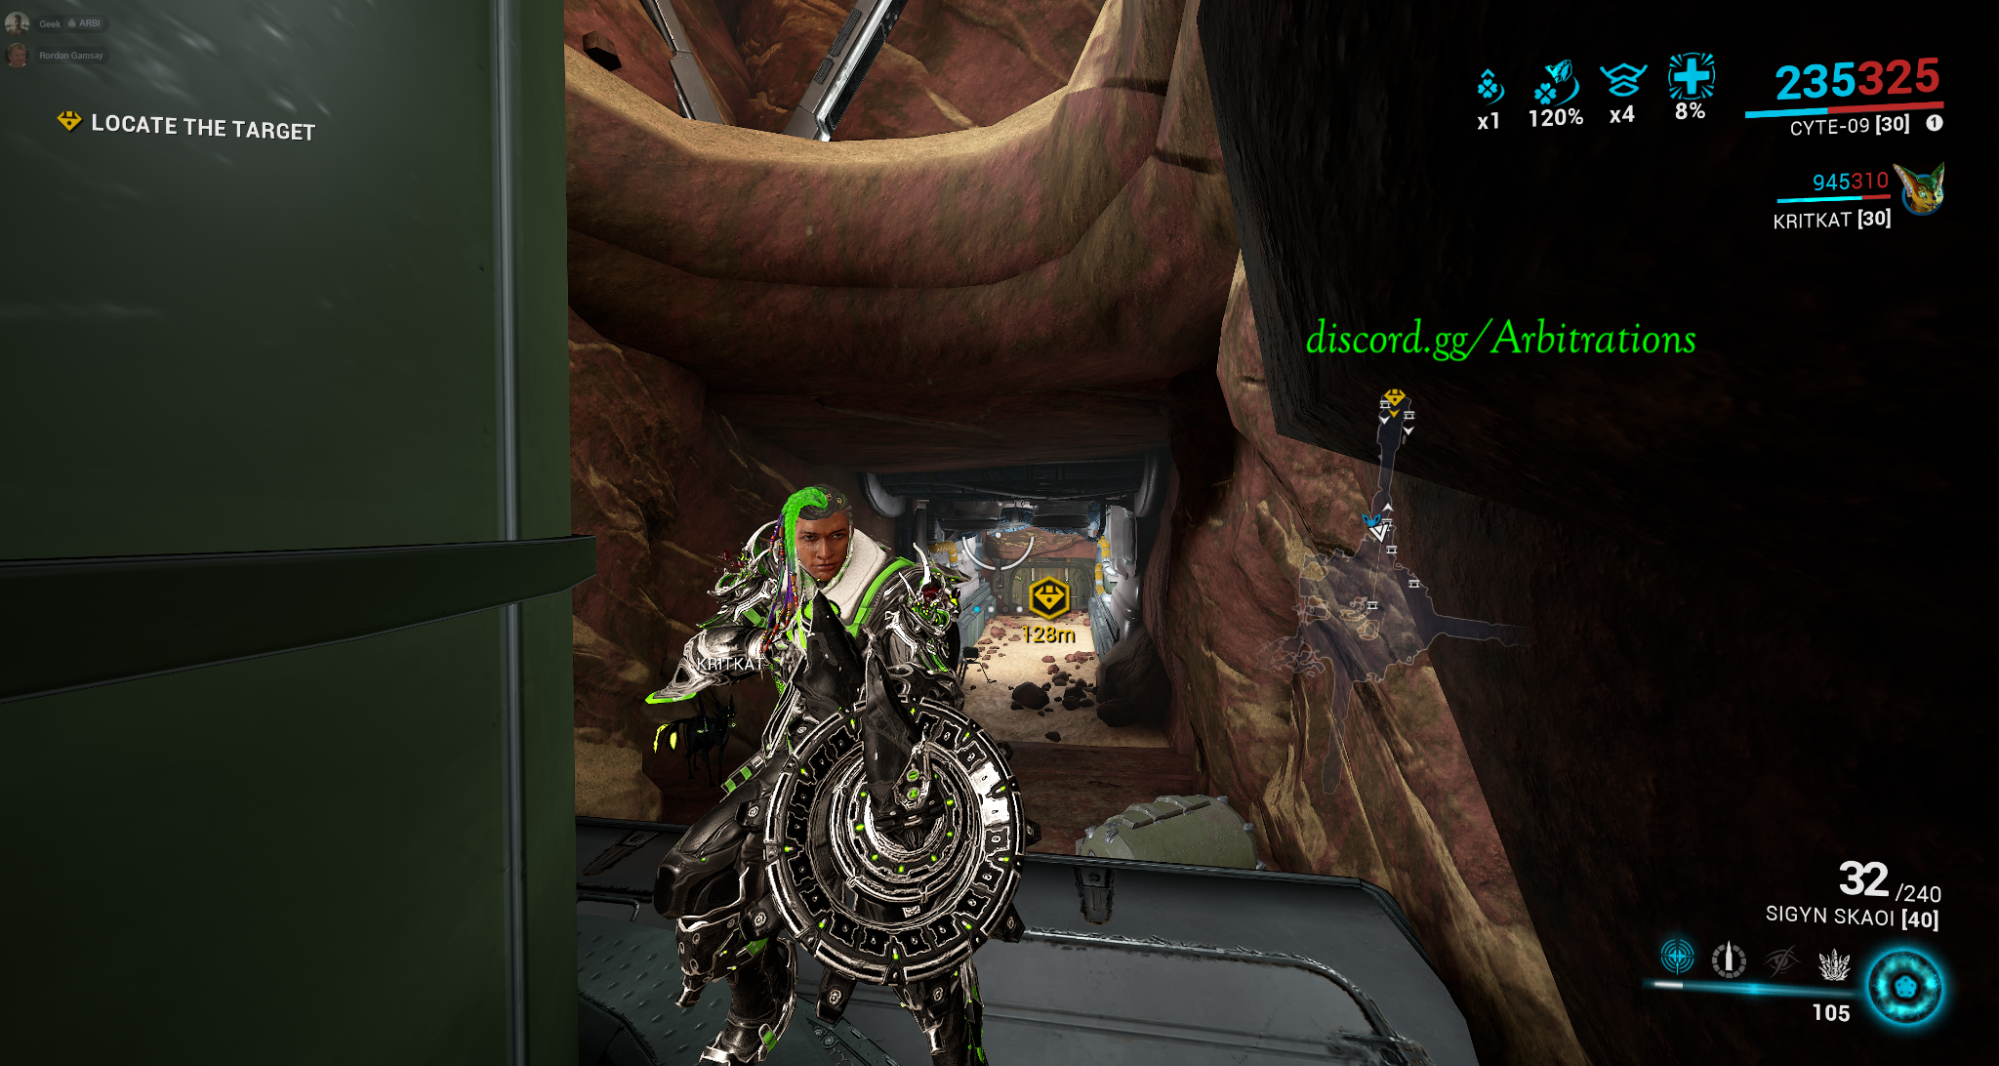
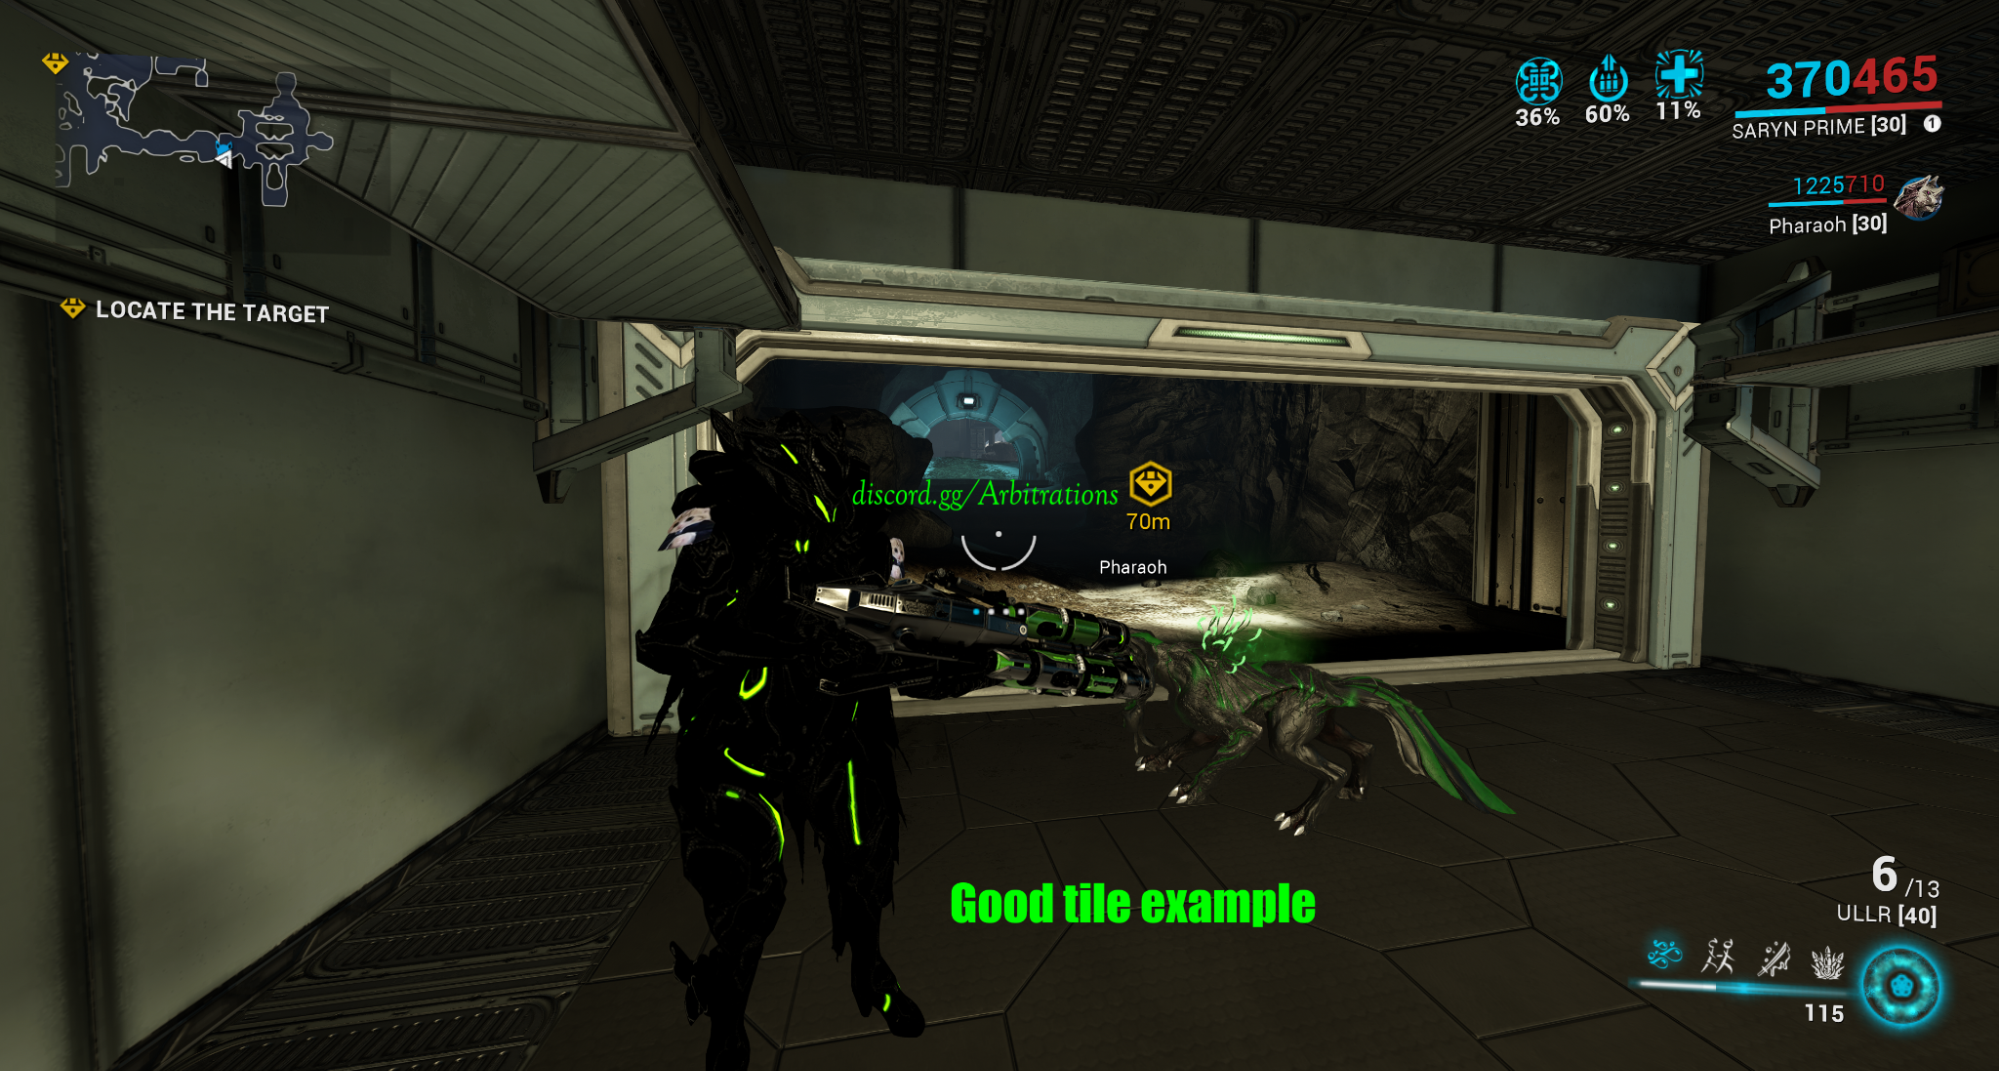
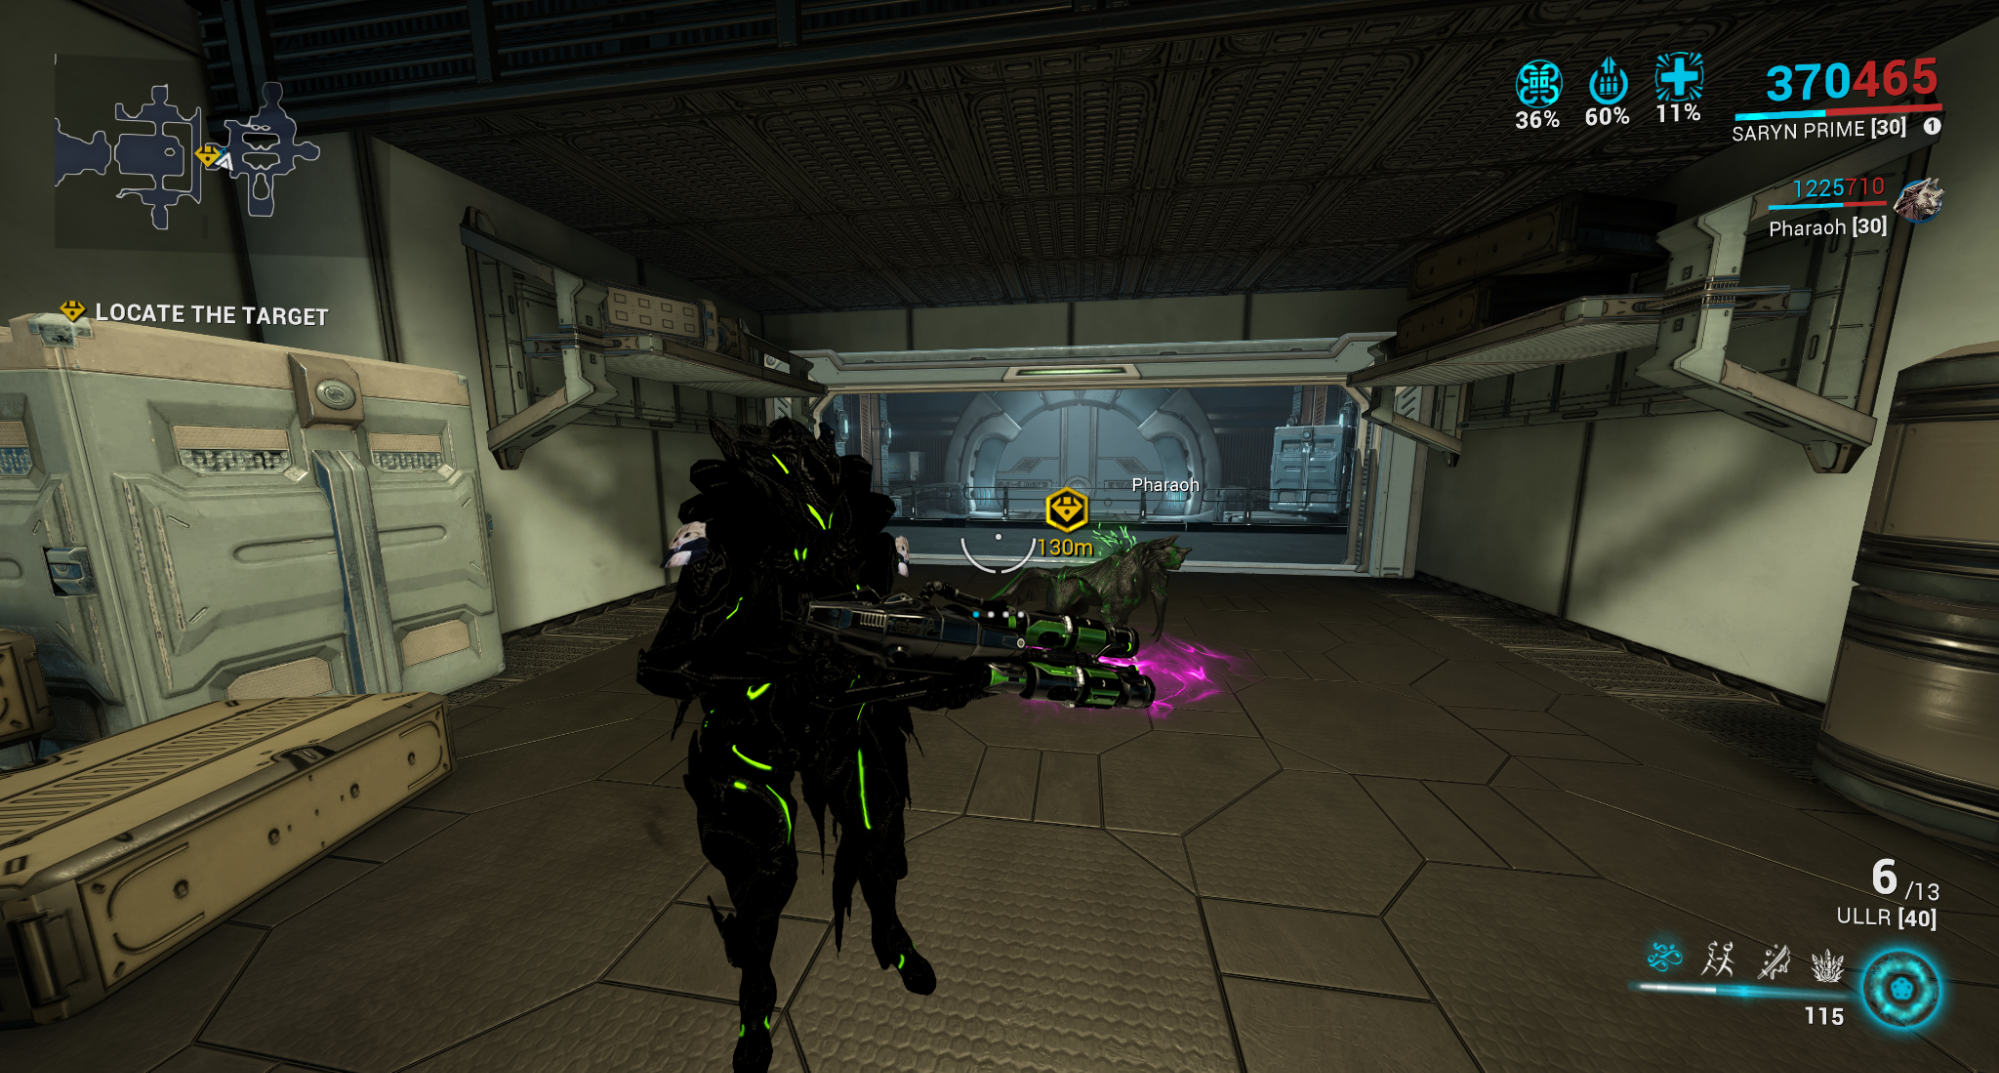
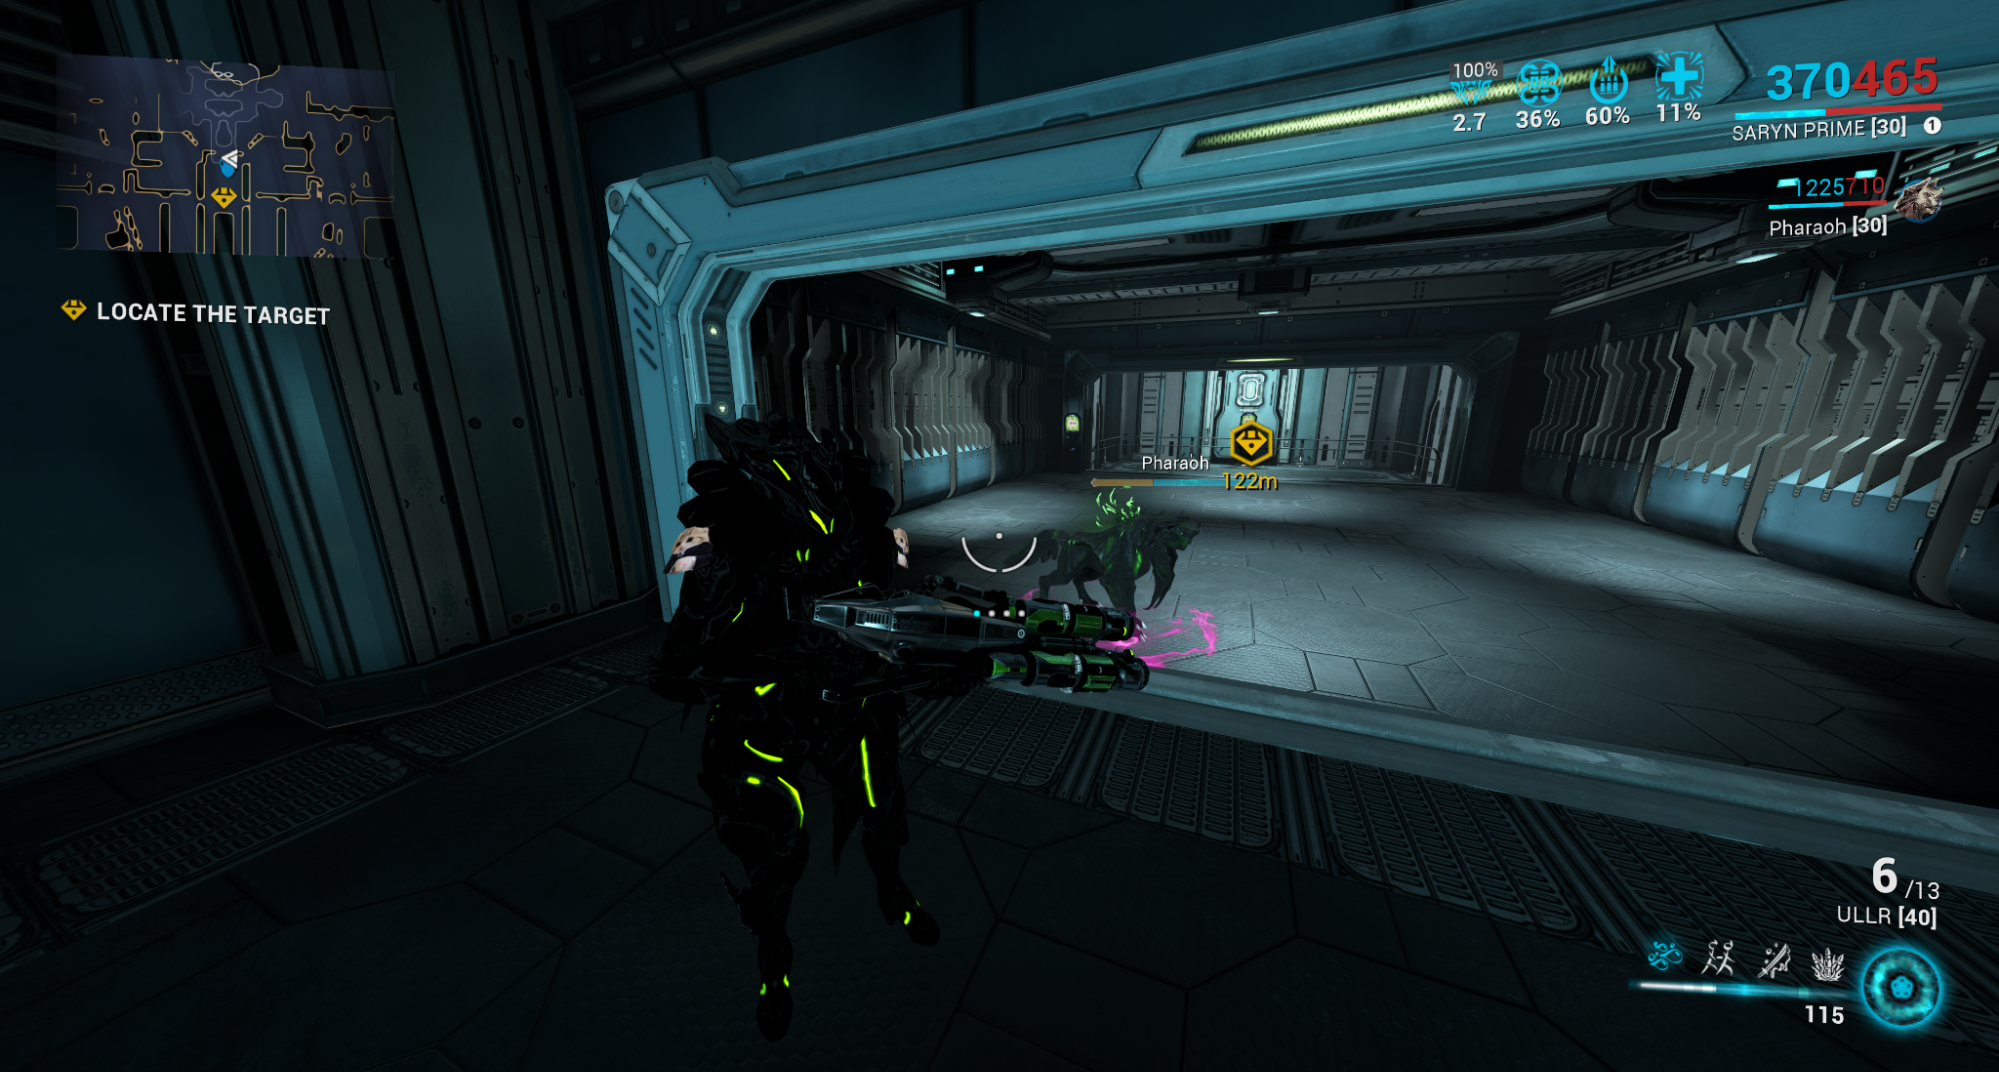
*Spear and Kadesh can roll 2 different starting rooms, look for this specific one so that you do not get the random spawn 130m away from the camp area. Alator does not have this issue.*
Tyana Pass
🔻Mirror defense, first half same as Alator, other half is this corpus section.
- Two spawns in the void area between tiles, best thing to do is drop a Kuva Zarr on call crewmate and make them hold position in the void platform between wave changes.
- Every time someone loots the void area, it breaks the rest of the spawns for a noticeable amount of time. So either do NOT loot the void section vitus at all, or only loot if the team all agrees to not loot unless there are 3 or more drops in there.
Munio
🔻Mirror defense
Mithra, Taranis, Belenus
🔻words
Casta, Seimeni, Cinxia
🔻https://www.youtube.com/watch?v=FOCBQu6UPQU
- Plenty of spawn locations, all easily accessible from camp spot. Do not bother with Shyte here.
- There is a 50/50 chance the tile has rain each time you start the mission.

Hydron, Helene, Odin
🔻https://www.youtube.com/watch?v=AL0in8XSot4
- Very bottom spawn and top left spawn are the only ones that are not able to be cleared easily from the camp spot and may require you to move a bit or go loot to clear them faster.
- Shyte meta is probably the easiest on this tileset, and makes it much more playable. All of the spawns are on roughly the same level/plane and are easy to get the hang of.
Sechura, Tessera, Outer Terminus
🔻https://www.youtube.com/watch?v=Gj_VKXuPc6o
- Be careful when looting inside the top area spawns, if the operative follows you in there, he's quite vulnerable in tight quarters and active spawns.
- The majority of spawns accessible, bottom right spawn occasionally require somebody to go over there and clear it. Shyte comp works nicely here, but is not as easy as Hydron/Helene.
- A corpus ship flies by every other 5th wave and wastes about 30 seconds.
Look for the below tile out of the 3 possible for this node:
Ose, Paimon, Larzac
🔻https://www.youtube.com/watch?v=ErfZb69yjhQ
- Spawns are very spread out but still accessible for the most part.
- A corpus ship flies by every other 5th wave and wastes about 30 seconds.
- Do your best to not neglect the left spawn with the ice tunnel. Enemies coming out of here get a nice line of sight on the camp spot and can easily 1 shot the defense operative.
Rhea, Lares, Sangeru
🔻Larezzzzzz
- The bottom right spawn just stops working randomly, so there are effectively only 6 real spawns, and they are quite slow. Easy tile though.
Akkad, Kala-Azar
🔻Loot despawns really fast due to sheer number of drops from infested, loot quickly.
Coba, Lith
🔻words
Oestrus
🔻pain
Gaia
🔻2 tiles to roll, open tile depicted below has better spawns than Iron Wake variant.
Hyf
🔻https://www.youtube.com/watch?v=-HsabIutq14, https://www.youtube.com/watch?v=oGZ3l39V16U
- When running with shyte, Supporting ogris dps needs to keep good uptime on napalm for the spawns they can reach to prevent getting easily overrun.
- For this tile I strongly recommend everyone place down atomicycles and specters to keep the doors open to allow for better accessibility and prevent enemies getting stuck.
- Do not place atomicycle or specter at the 2nd floor middle doorway, if it dies/expires it will cause a hard crash and clients will disconnect from the host.
- Be careful of the right side spawns, it's a short run for them to get to the operative.
Stöfler
🔻Terrain changes to this after 2 rounds, tile is massive pain to loot, and loot despawns very quickly.
🔻MadLad @UMBRAL_MASH#8049🔻